
Create a Line Chart Design
In the following tutorial you will learn how to create a neat line chart design in Graphic for Mac.
For starters you will learn how to setup a simple grid and how to create the main shape using the Rounded Rectangle Tool. Next, you''ll learn how to ease your work with a simple script and the use of that Align stroke to pixel grid feature. Taking full advantage of the Effects pane, you will learn how how to create the colored lines.
Finally, you'll learn how to add a bunch of text and how to stylize it.
Step 1
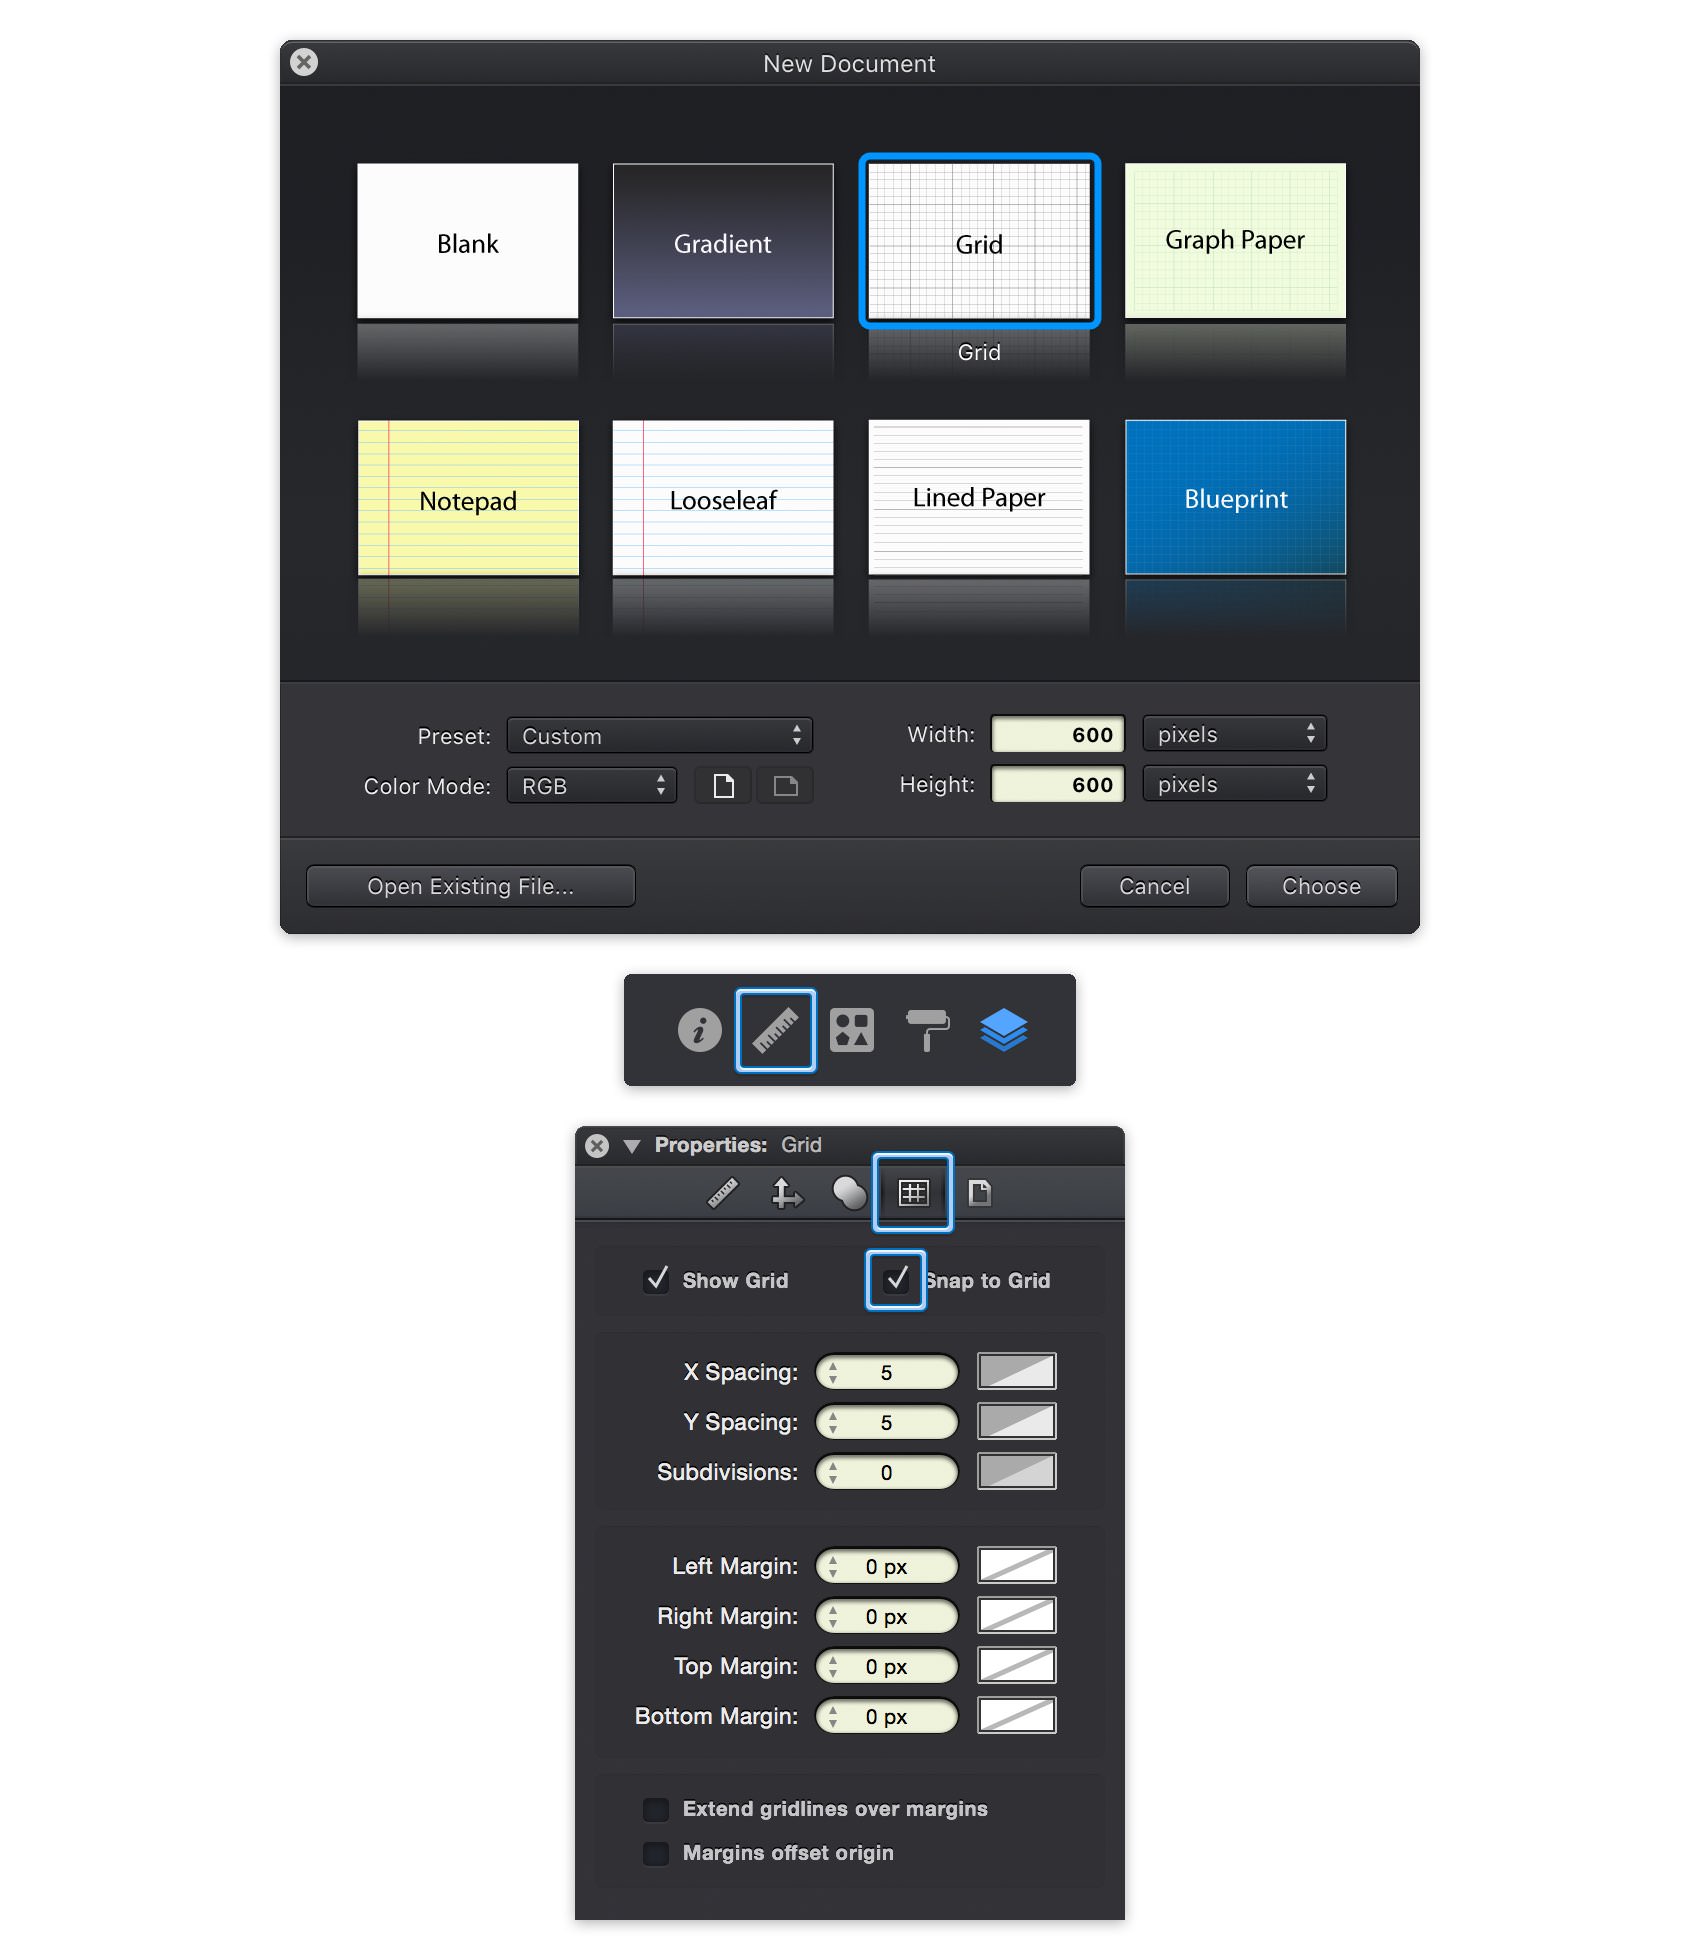
Go to File > New (Command + N) to bring up the New Document window. Select the Grid document style, set the document units to pixels, and set the document dimensions to 600 pixels wide by 600 pixels high.
Next, we'll set up the document grid. Switch to the Grid pane in the Properties panel. If the Properties panel is not currently visible, you can easily open it using the ruler icon that lies above the Layers panel. Change the grid X Spacing and Y Spacing to 5, set the Subdivisions to 0, and enable Snap to Grid (Command + Shift + ').
Keep in mind that you can quickly enable or disable the grid and the Snap to Grid feature using the Command + ' and Command + Shift + ' keyboard shortcuts.
Step 2
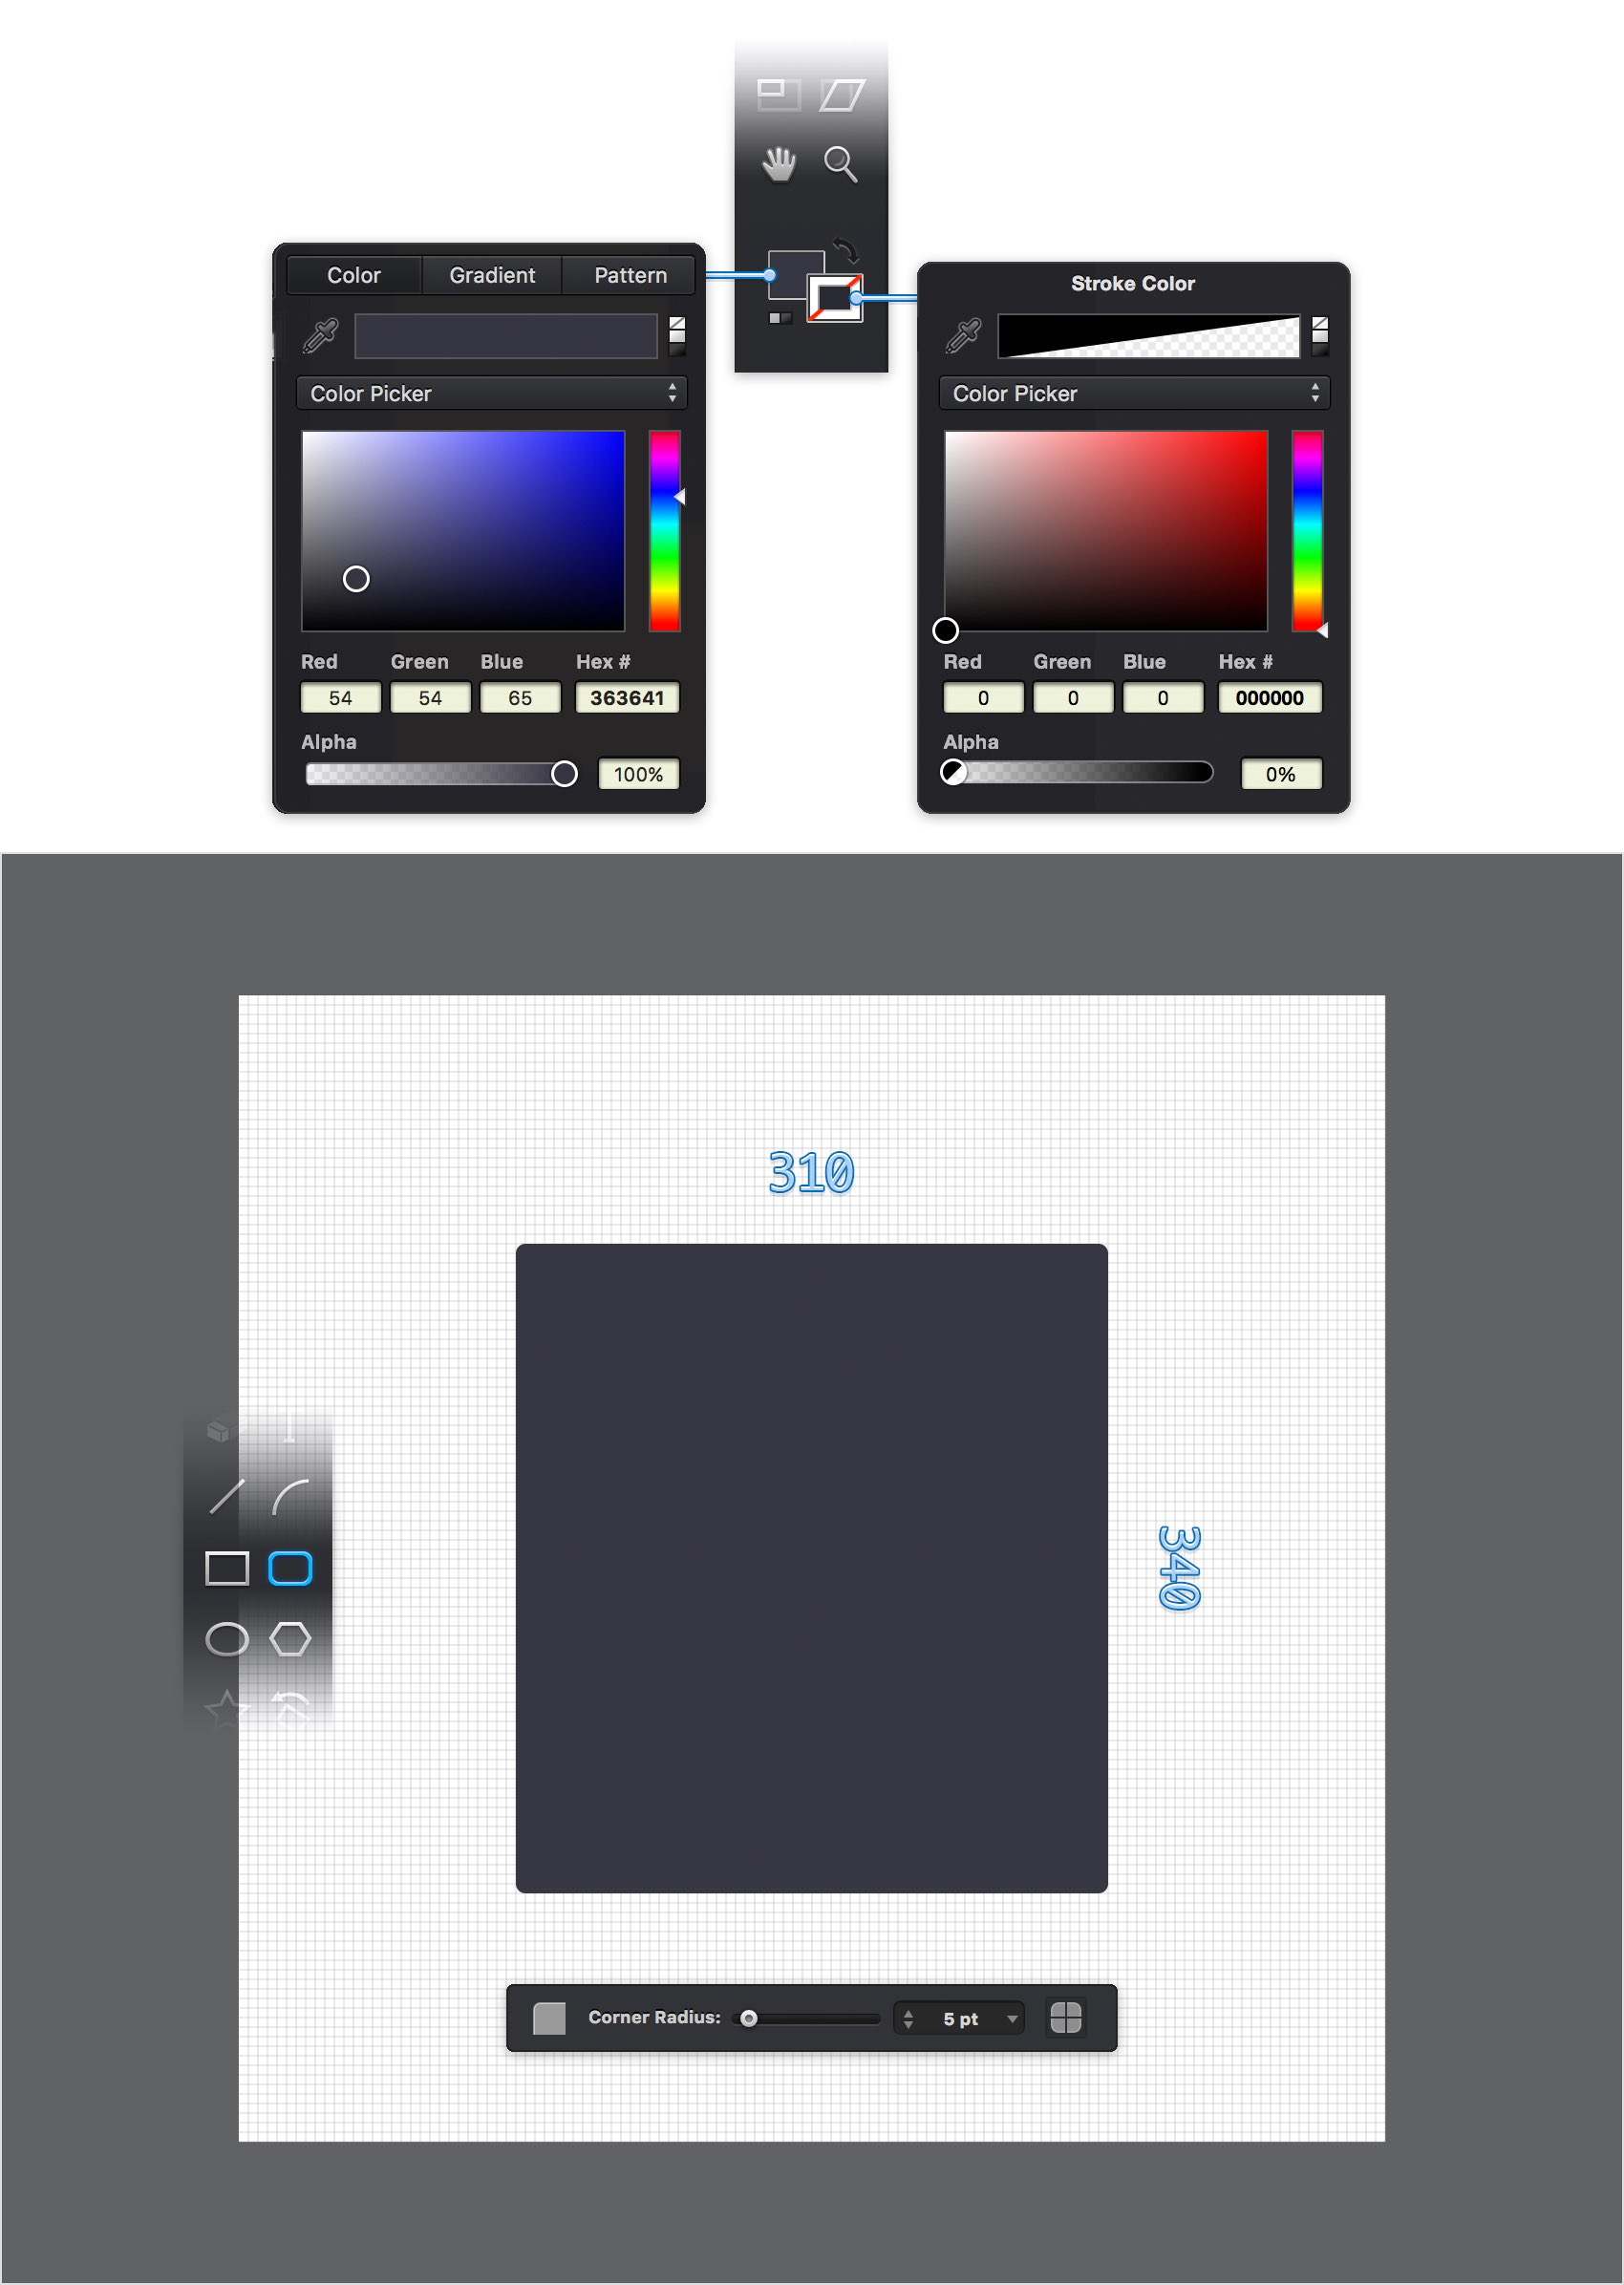
Focus on the Toolbar and notice that by default the fill color is set to white while the stroke color is set to black.
Click the stroke color well and drag the Alpha slider to 0% to make your stroke invisible and then click the fill color well and set the color to R=54 G=54 B=65. Pick the Rounded Rectangle Tool (Shift-M), focus on your Tool Options bar and drag the Corner Radius slider to 5 pt. Move to your canvas and create a 310 x 340 px shape.
Step 3
For this step you will need to download the Create Rectangular Grid plugin. Go to File > Plugin > Manage Plug-ins. Copy your Create Rectangular Grid plugin inside the newly opened folder then close it.
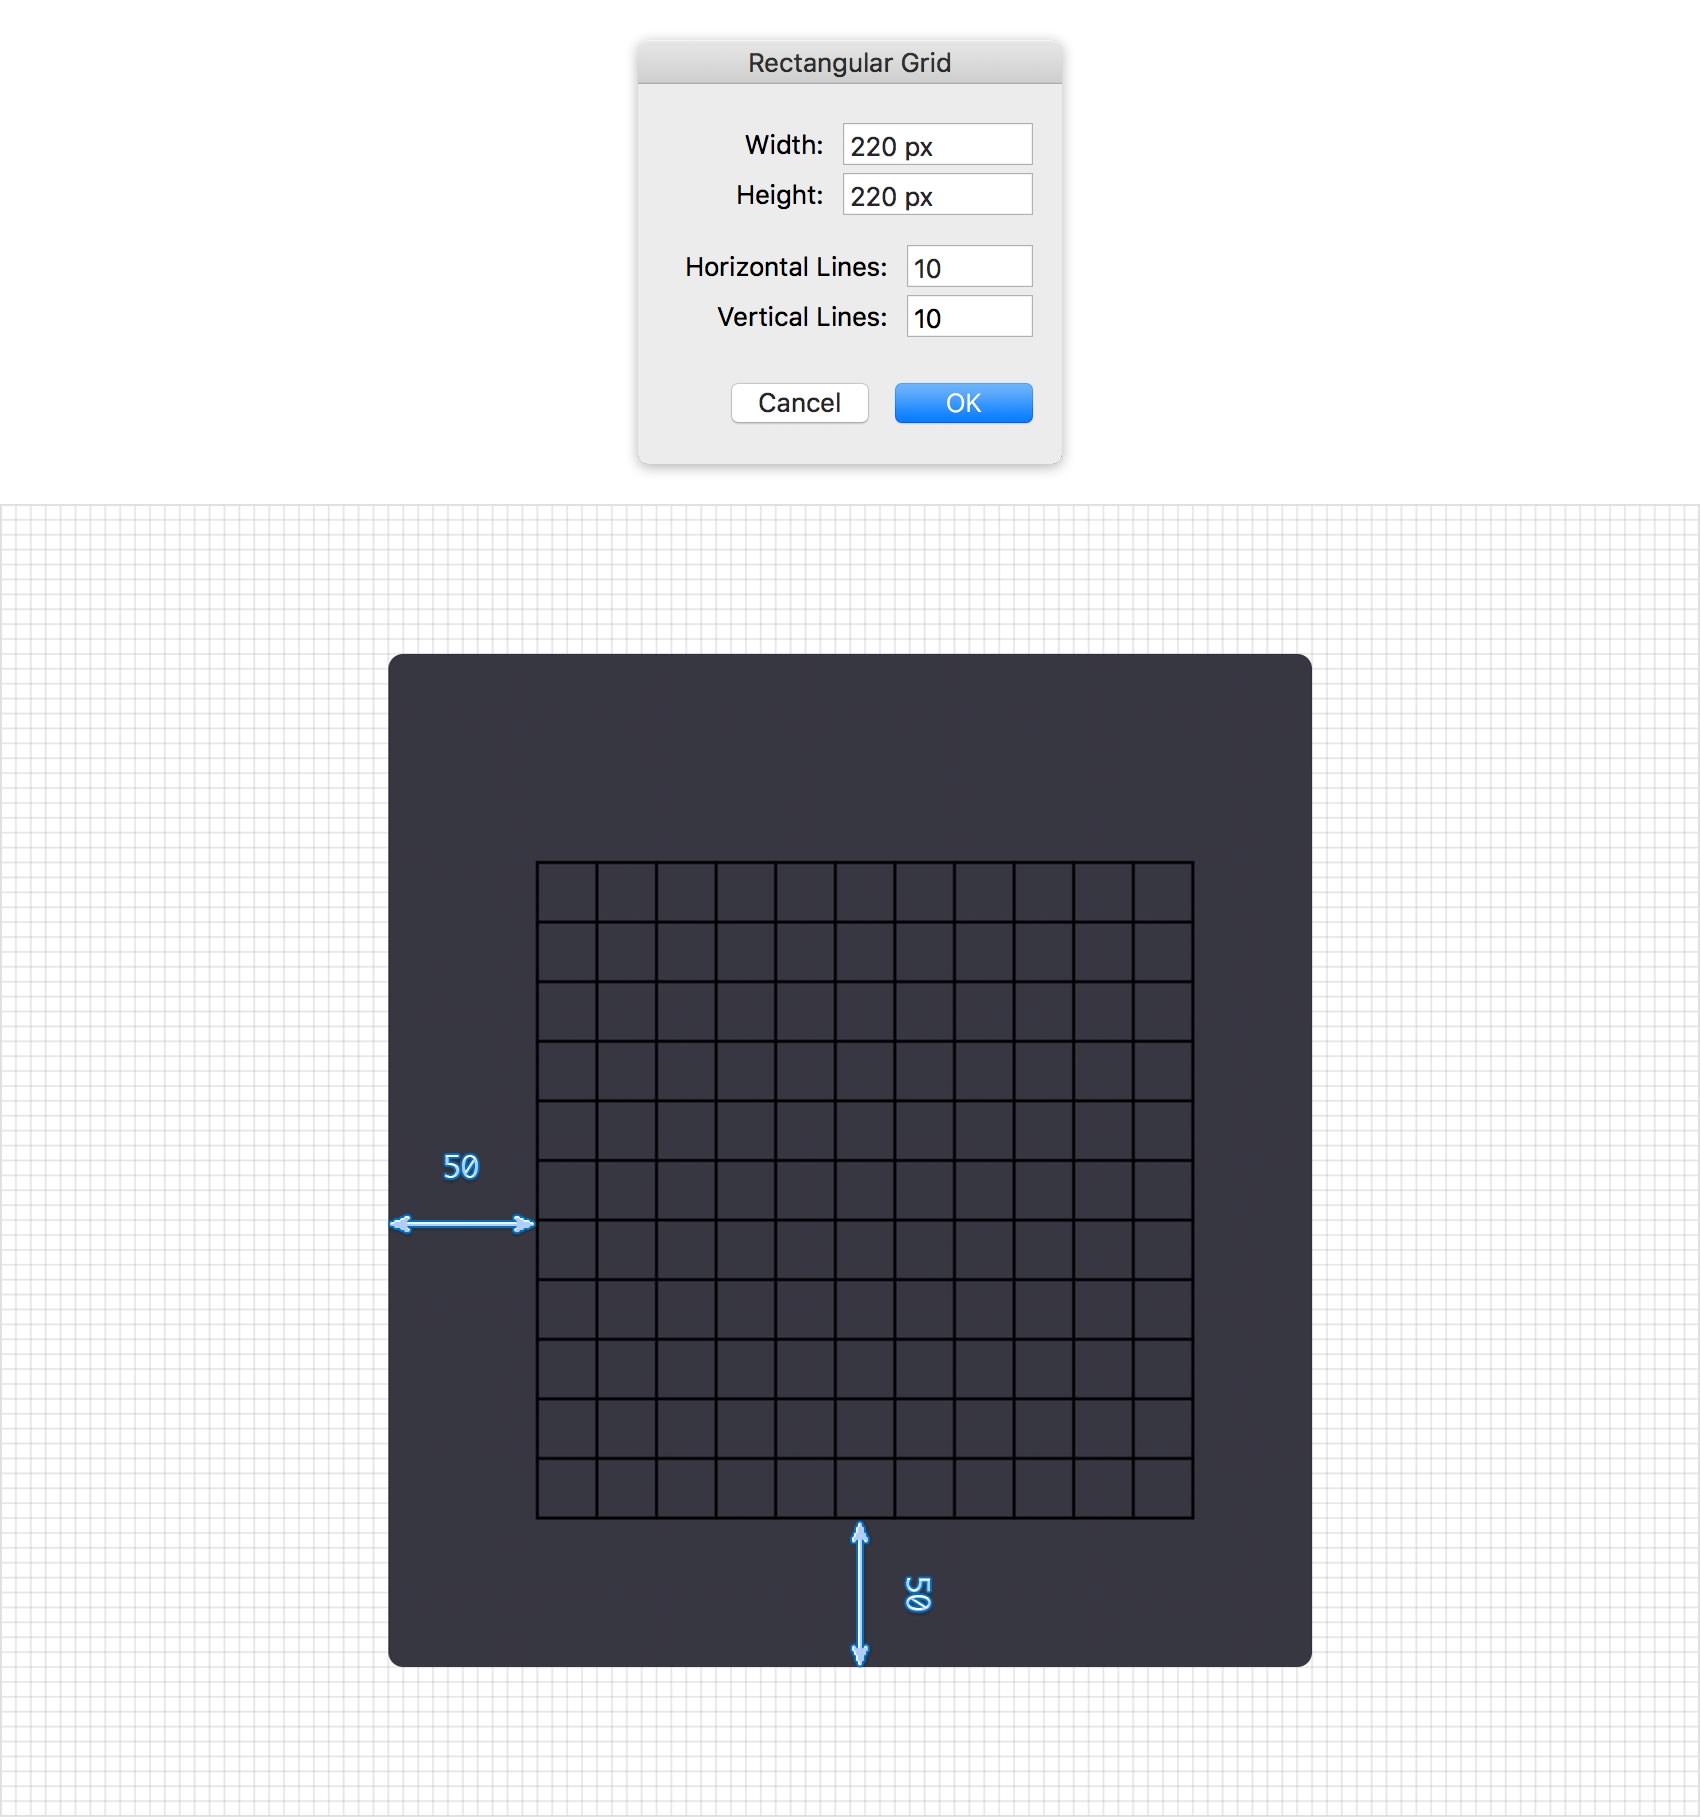
Get back to your Graphic file and this time go to File > Plugin > Create Rectangular Grid. Enter 10 in the Horizontal Lines and Vertical Lines boxes, set the Width and Height to 220 px and then click that OK button.
Make sure that this new group of paths stays selected, place it exactly as shown in the following image and then focus on the Effects pane from the Appearance panel. If the Appearance panel is not currently visible, you can easily open it using the leftmost icon that lies above the Layers panel. Click the color well that stands for the existing Fill and drag the Alpha slider to 0%.
Step 4
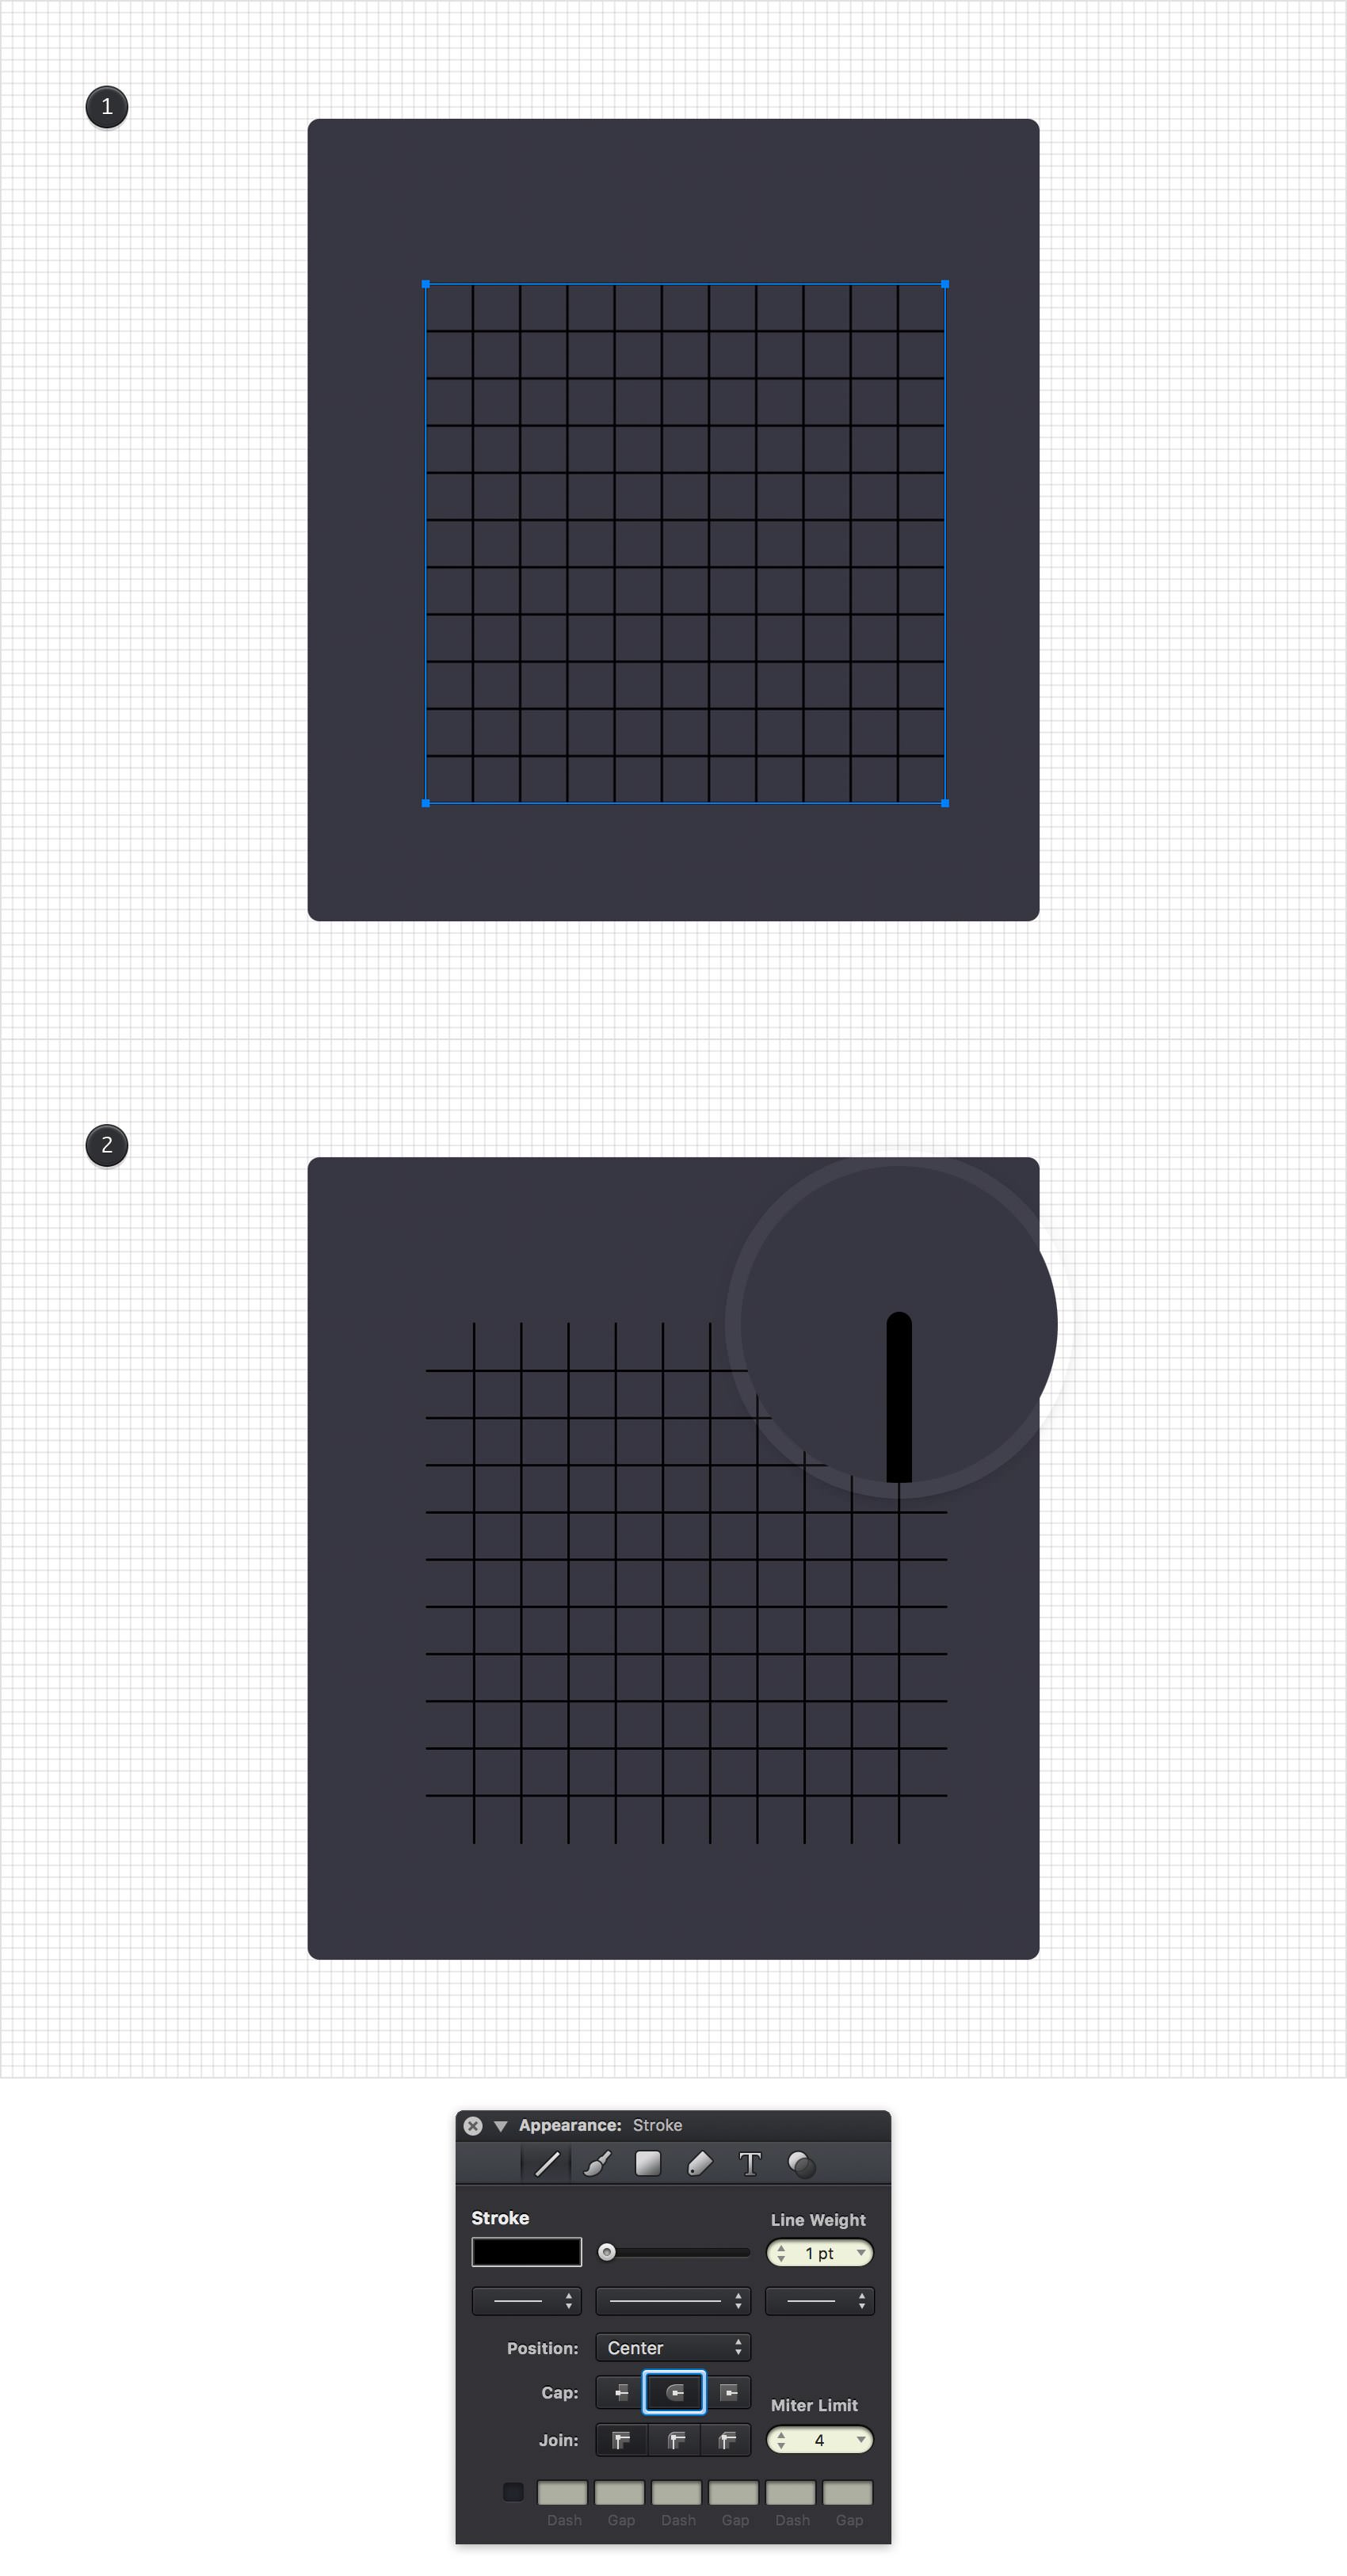
Make sure that the group made in the previous step is still selected and hit Shift + Command + G to Ungroup it.
Using the Move Tool (V), select the four paths that make up the outer edges of your grid and remove them using the Delete button from your keyboard. Select the remaining paths that make up your grid and focus on the Stroke pane. Make sure that the Line Weight is set to 1 pt and check the Round Cap button.
Step 5
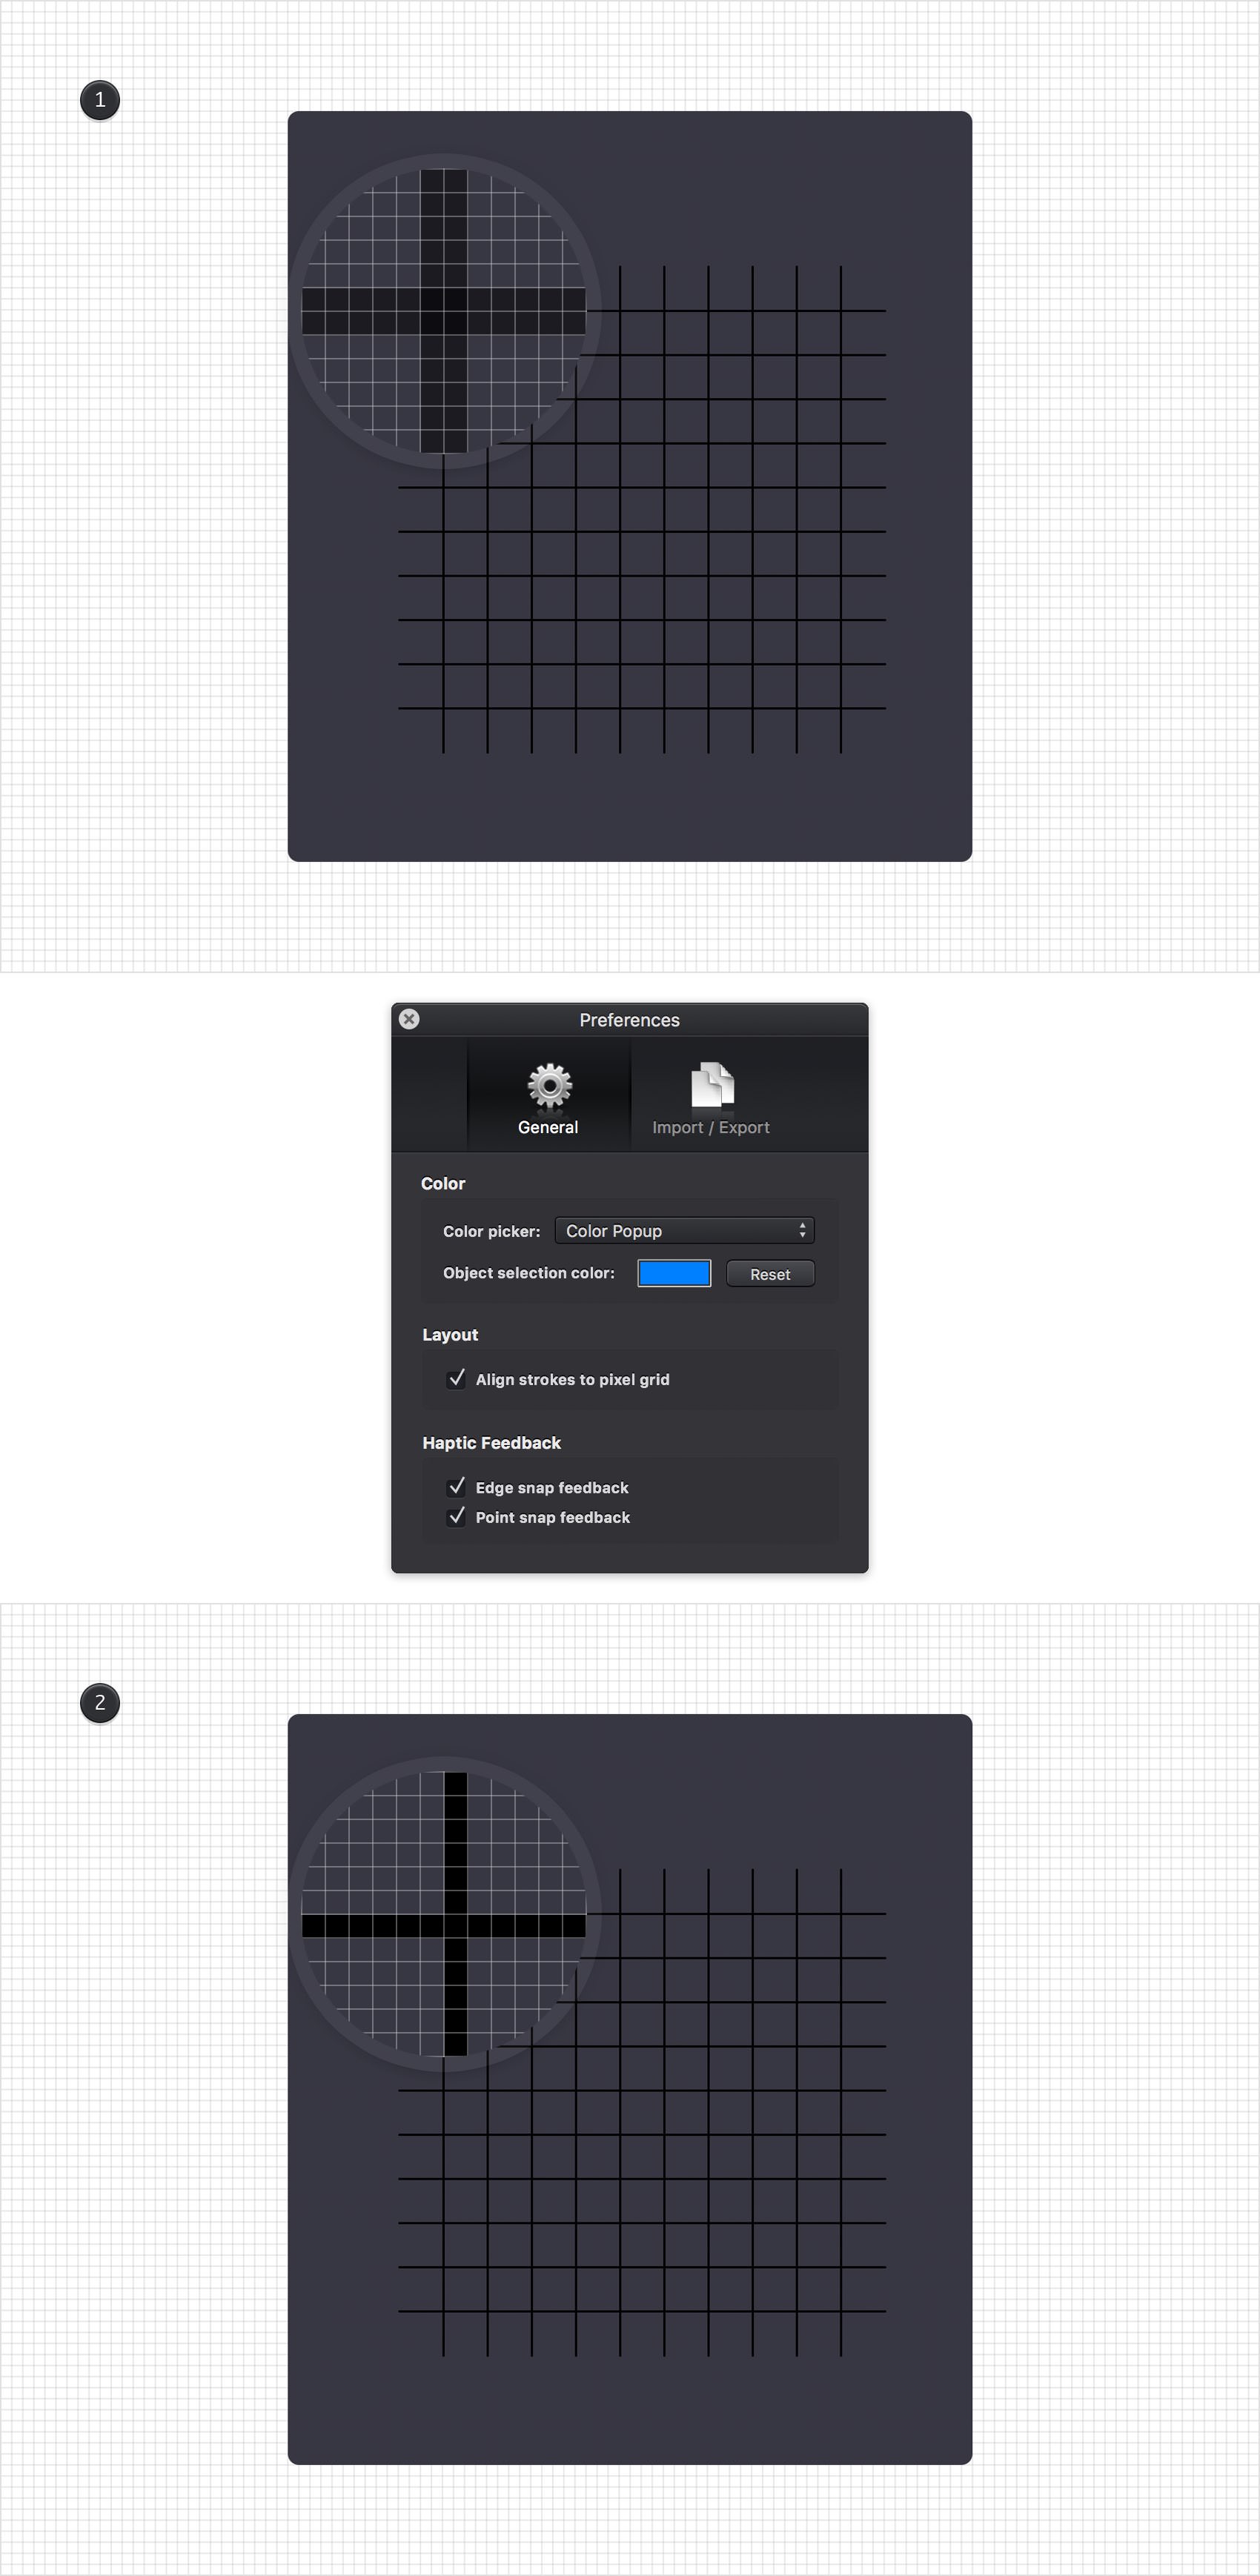
For this step you need to enable the pixel preview which allows you to see how things would look if you decide to save your work as an image. Go to View > Show Pixels and notice how your black paths get a bit pixelated. This happens because your paths are not perfectly aligned to the pixel grid, but it can be fixed pretty easy. Just go to Graphic > Preferences and check that Align strokes to pixel grid box. Once you're done, don't forget to return to View > Show Pixels and disable this feature.
Step 6
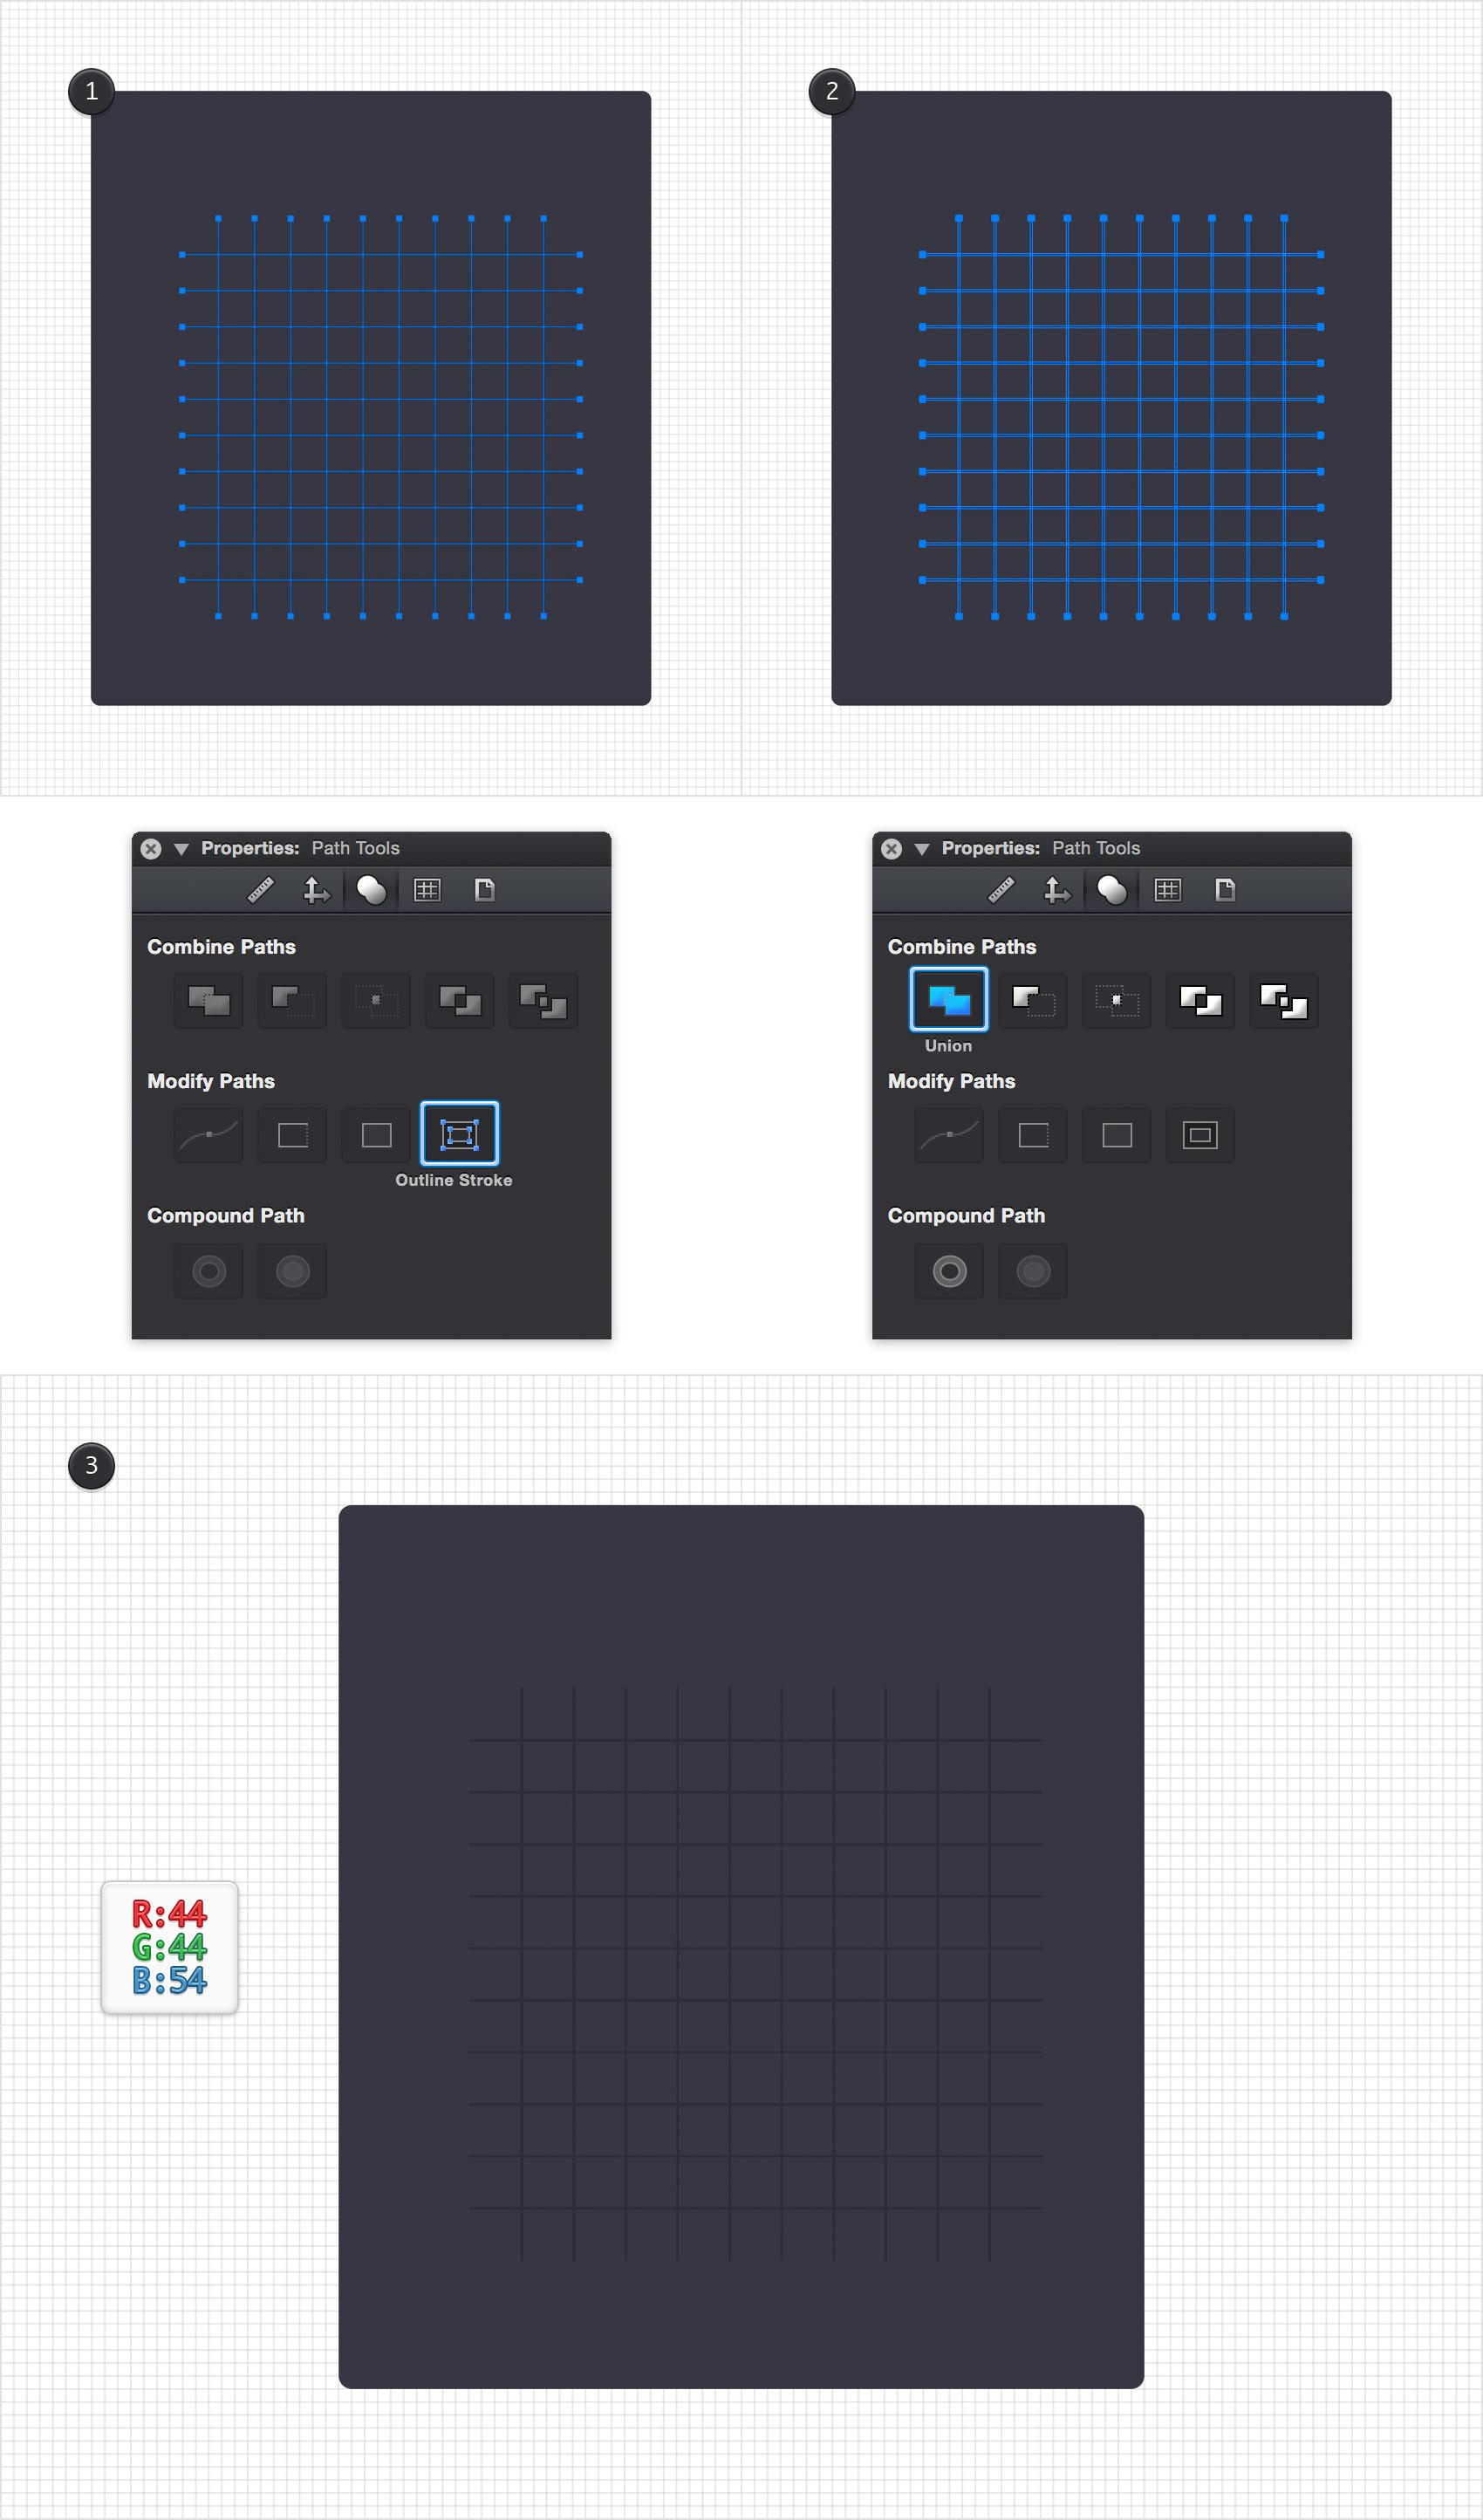
Reselect all your black paths and focus on the Path Tools pane from the Properties panel. First, click the Outline Stroke button and thne click the Union button. Make sure that the resulting shape stays selected, focus on the Effects pane and replace the existing Fill color with R=44 G=44 B=54.
Step 7
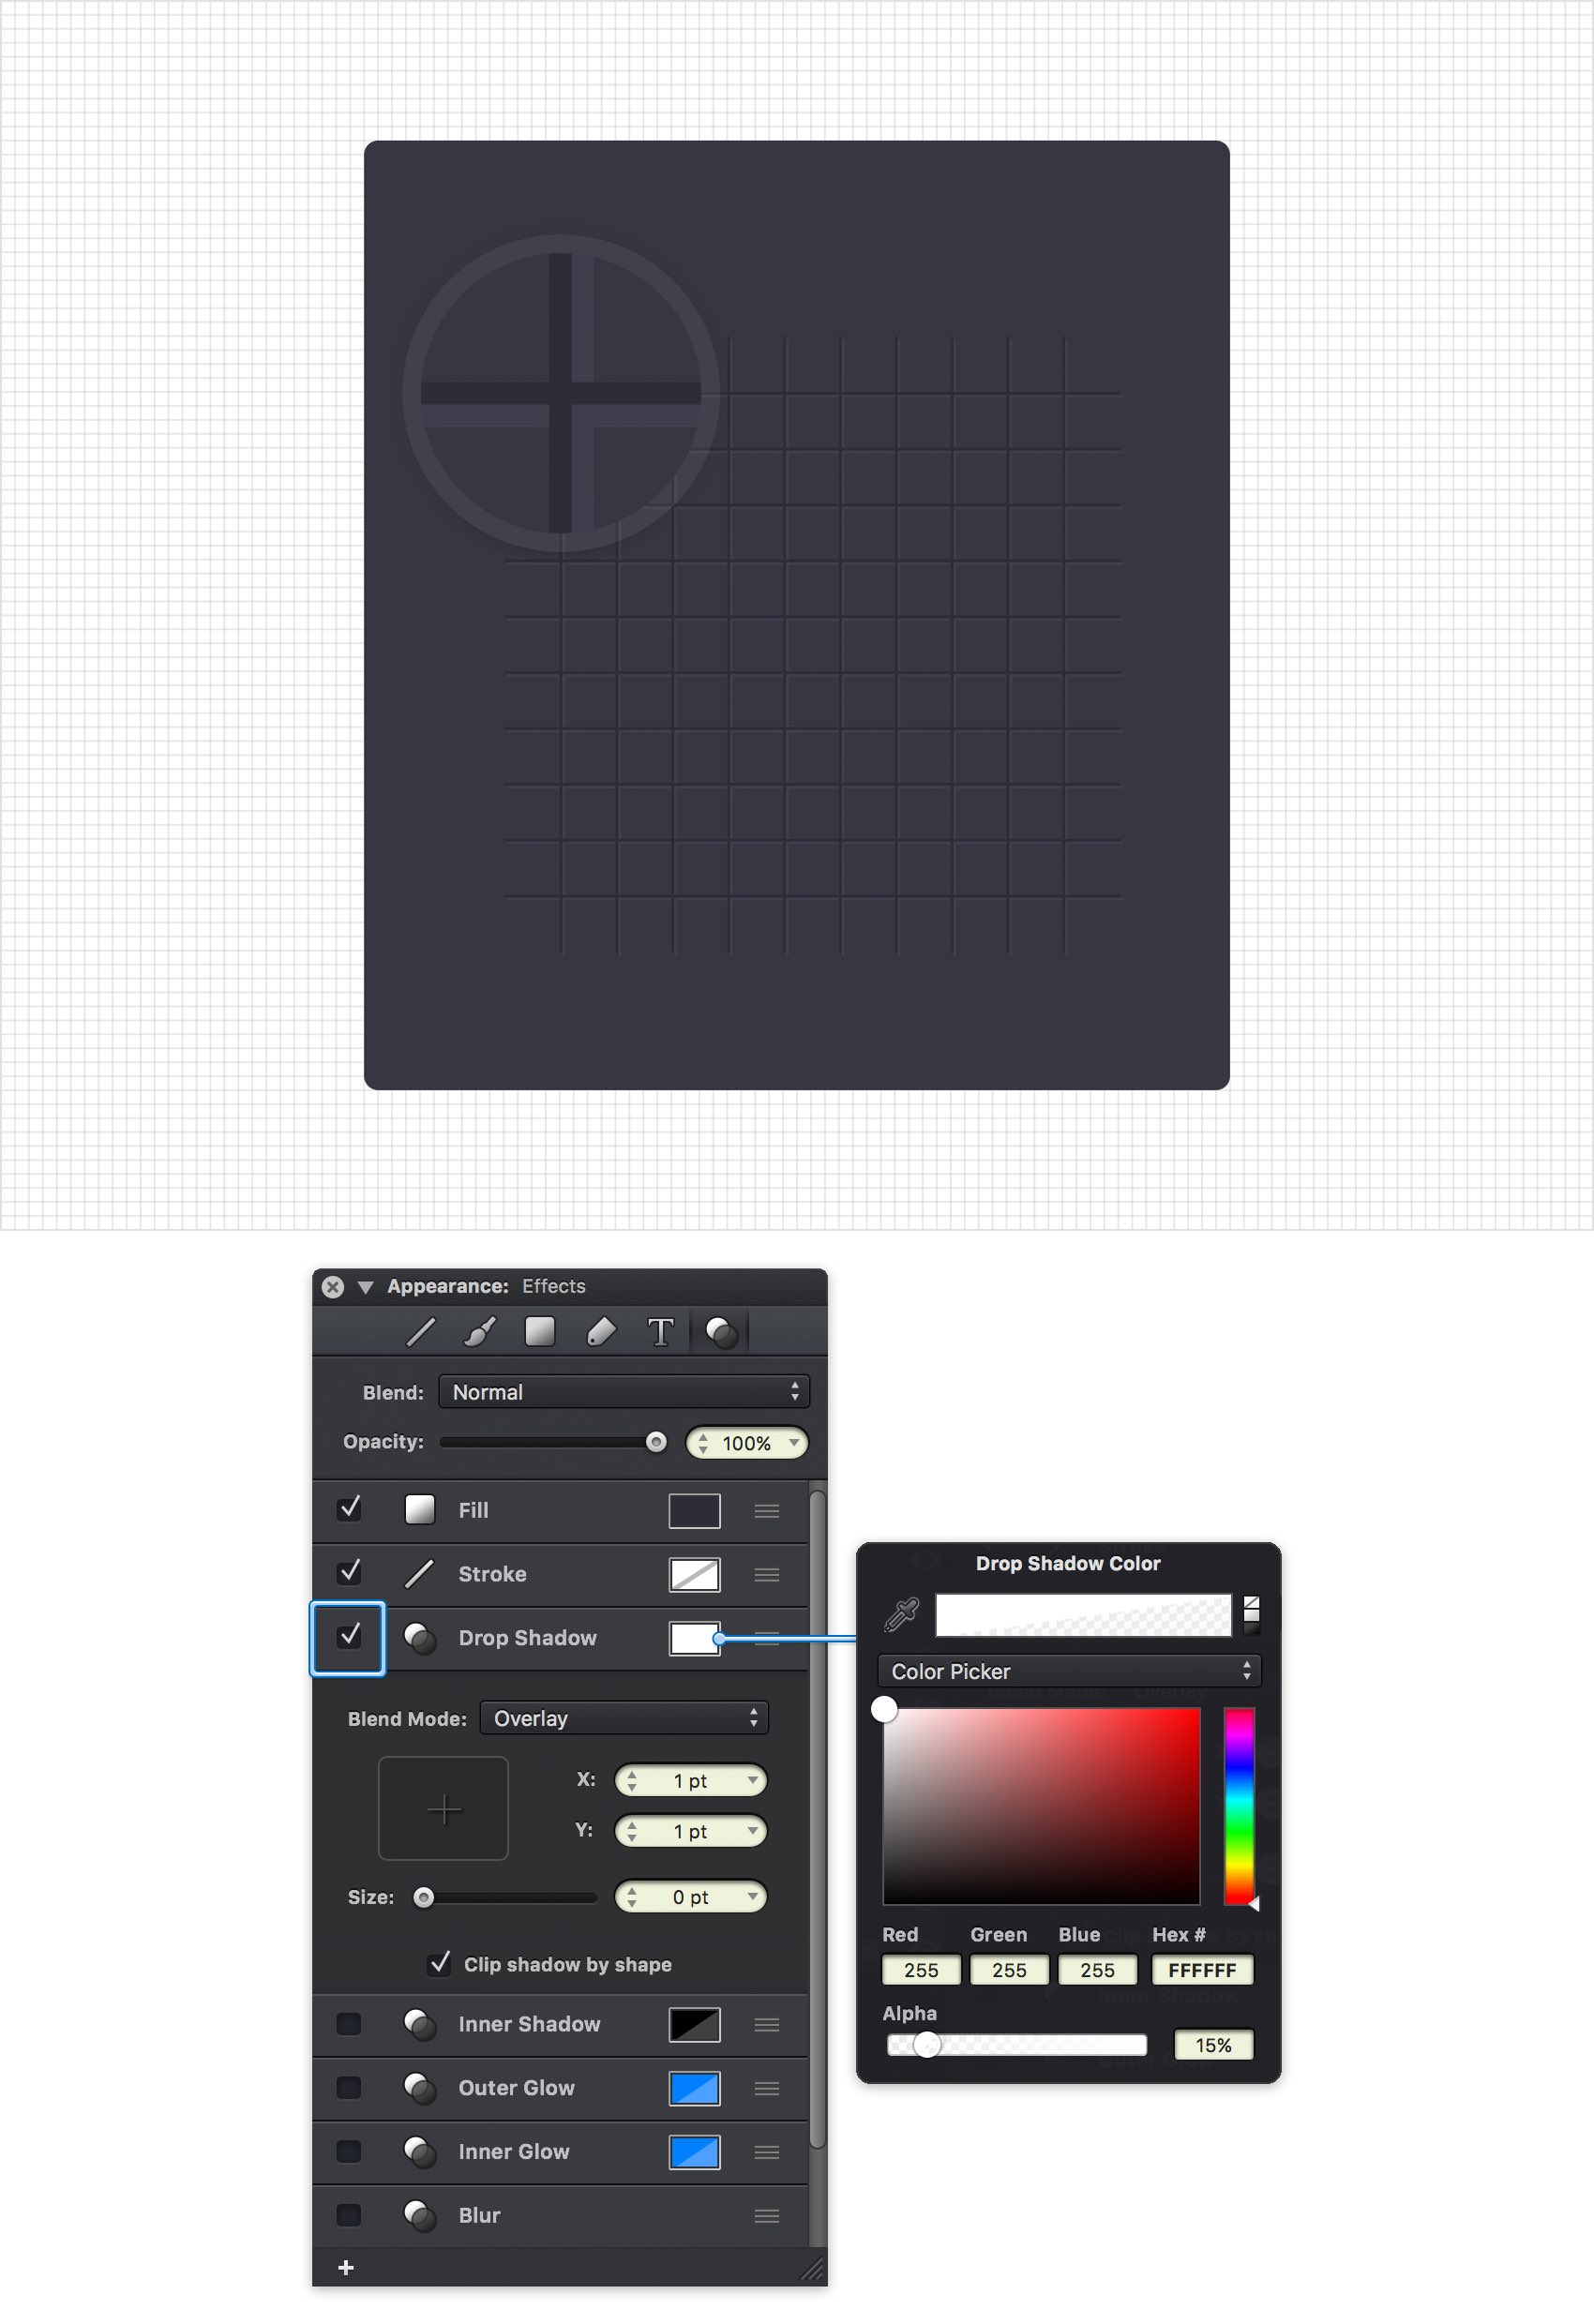
Make sure that the shape made in the previous step is still selected, focus on the Effects pane and check the box that stands for the existing Drop Shadow effect to enable it.
Enter 1 in the X and Y boxes, drag the Size slider to 0, select Overlay from the Blend Mode drop-down menu and then click the color well that stands for this effect. Drag the Alpha slider to 15% and set the color to white (R=255 G=255 B=255).
Step 8
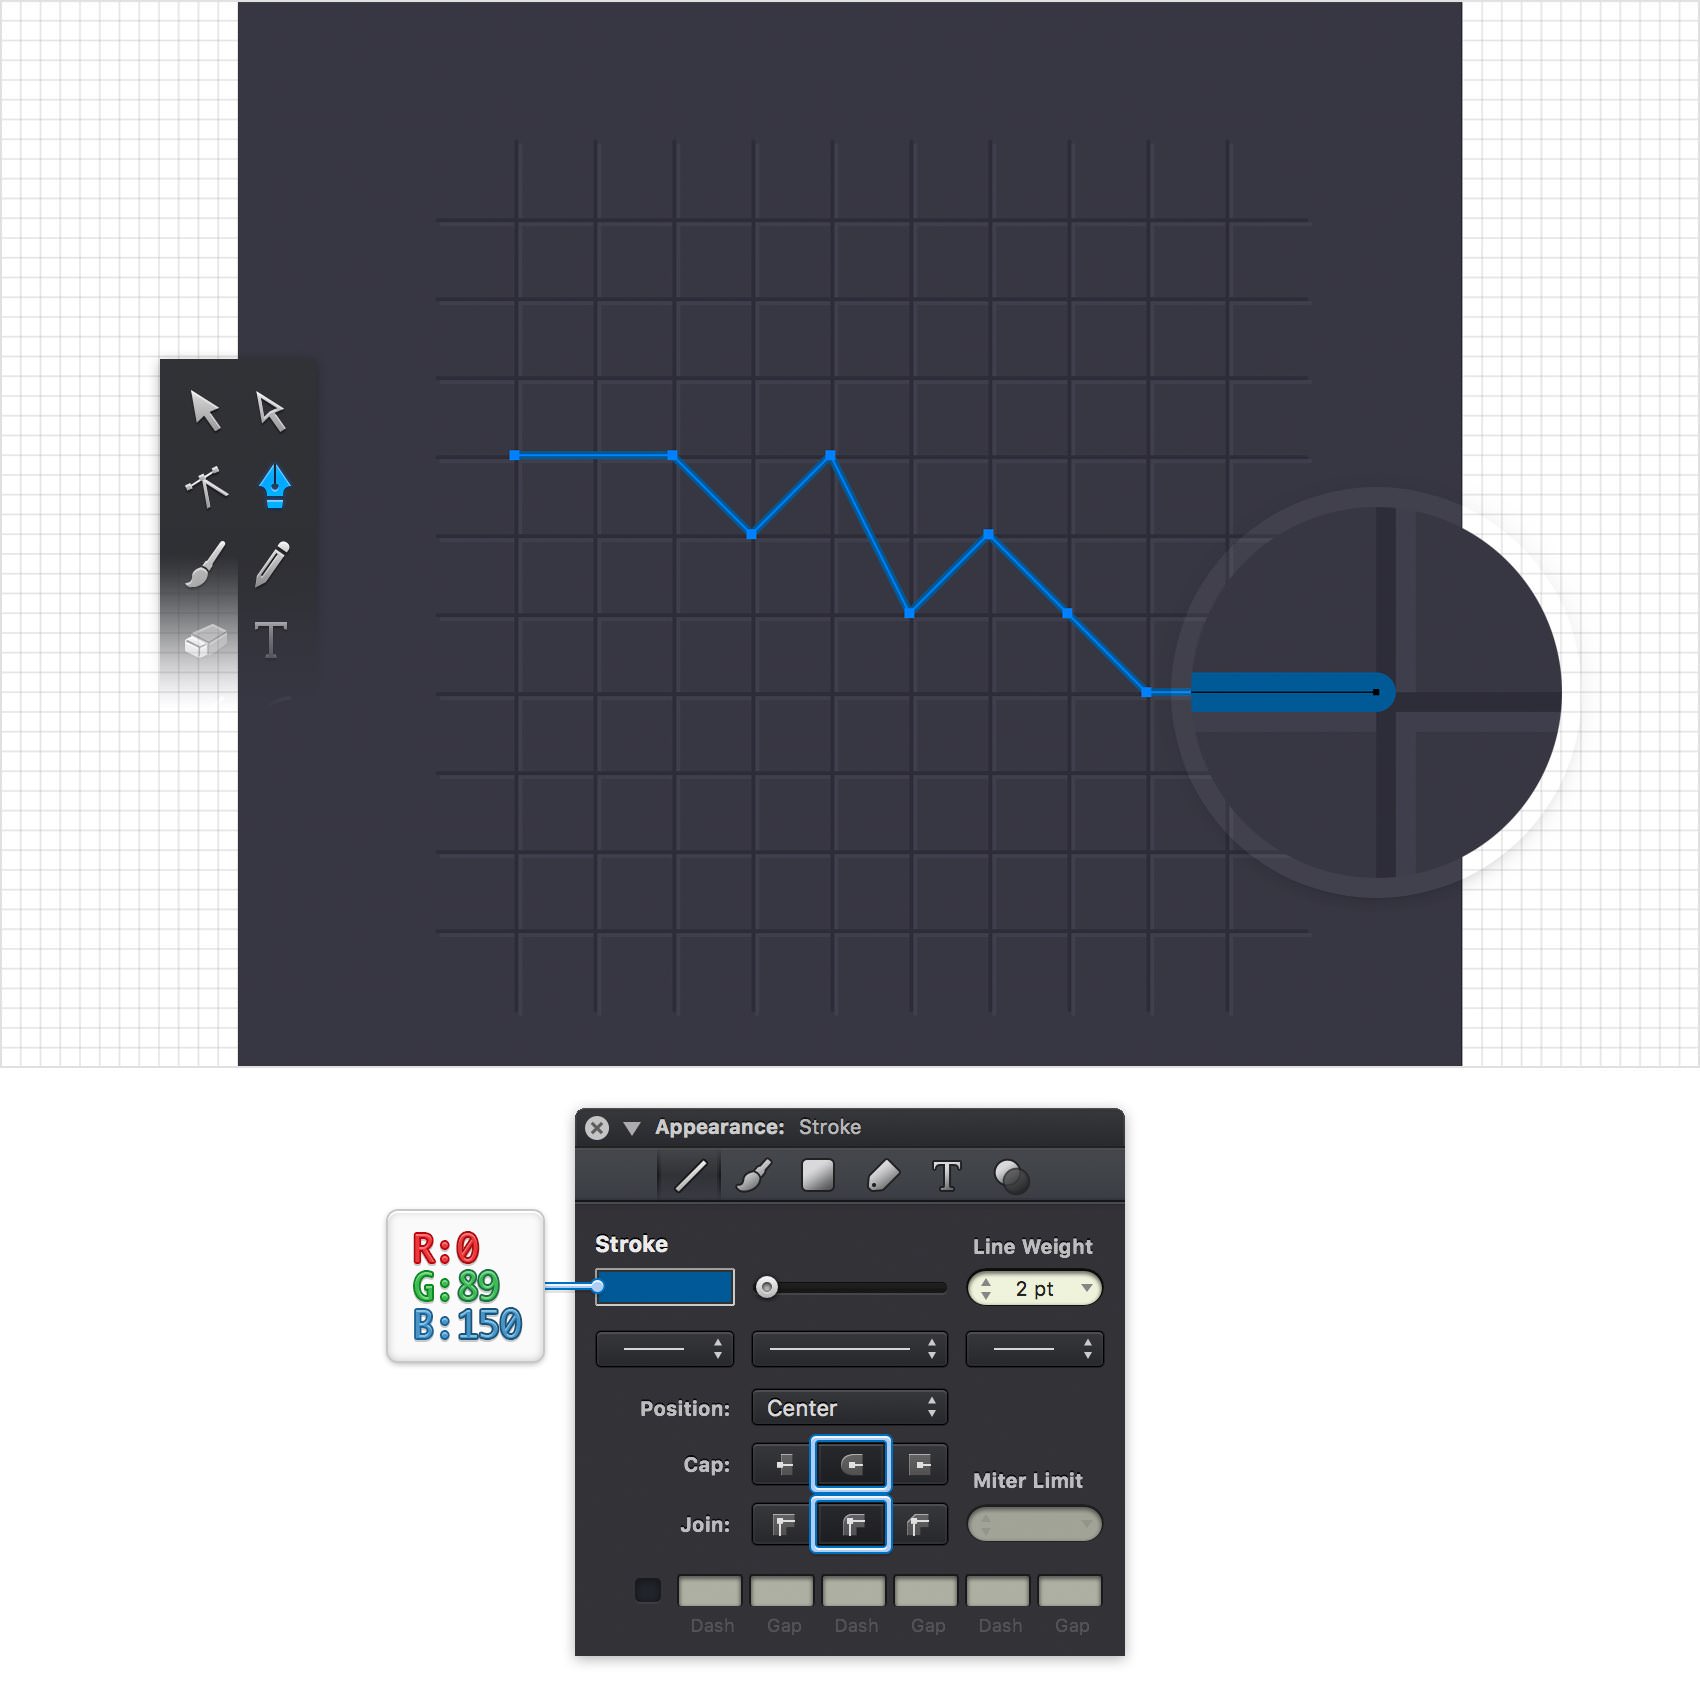
Return to your Toolbar, click the Fill color well and drag the Alpha slider to 0% and then click the Stroke color well. Drag the Alpha slider to 100% and set the color to R=0 G=89 B=150.
Pick the Pen Tool (P), create a simple path roughly as shown in the following image, make sure that it stays selected and focus on the Stroke pane from the Appearance panel. Drag the Line Weight slider to 2 pt and then check the Round Cap and Round Join buttons.
Step 9
Make sure that your blue path stays selected and focus on the Effects pane. Activate the existing Drop Shadow effect and enter the attributes shown in the following image.
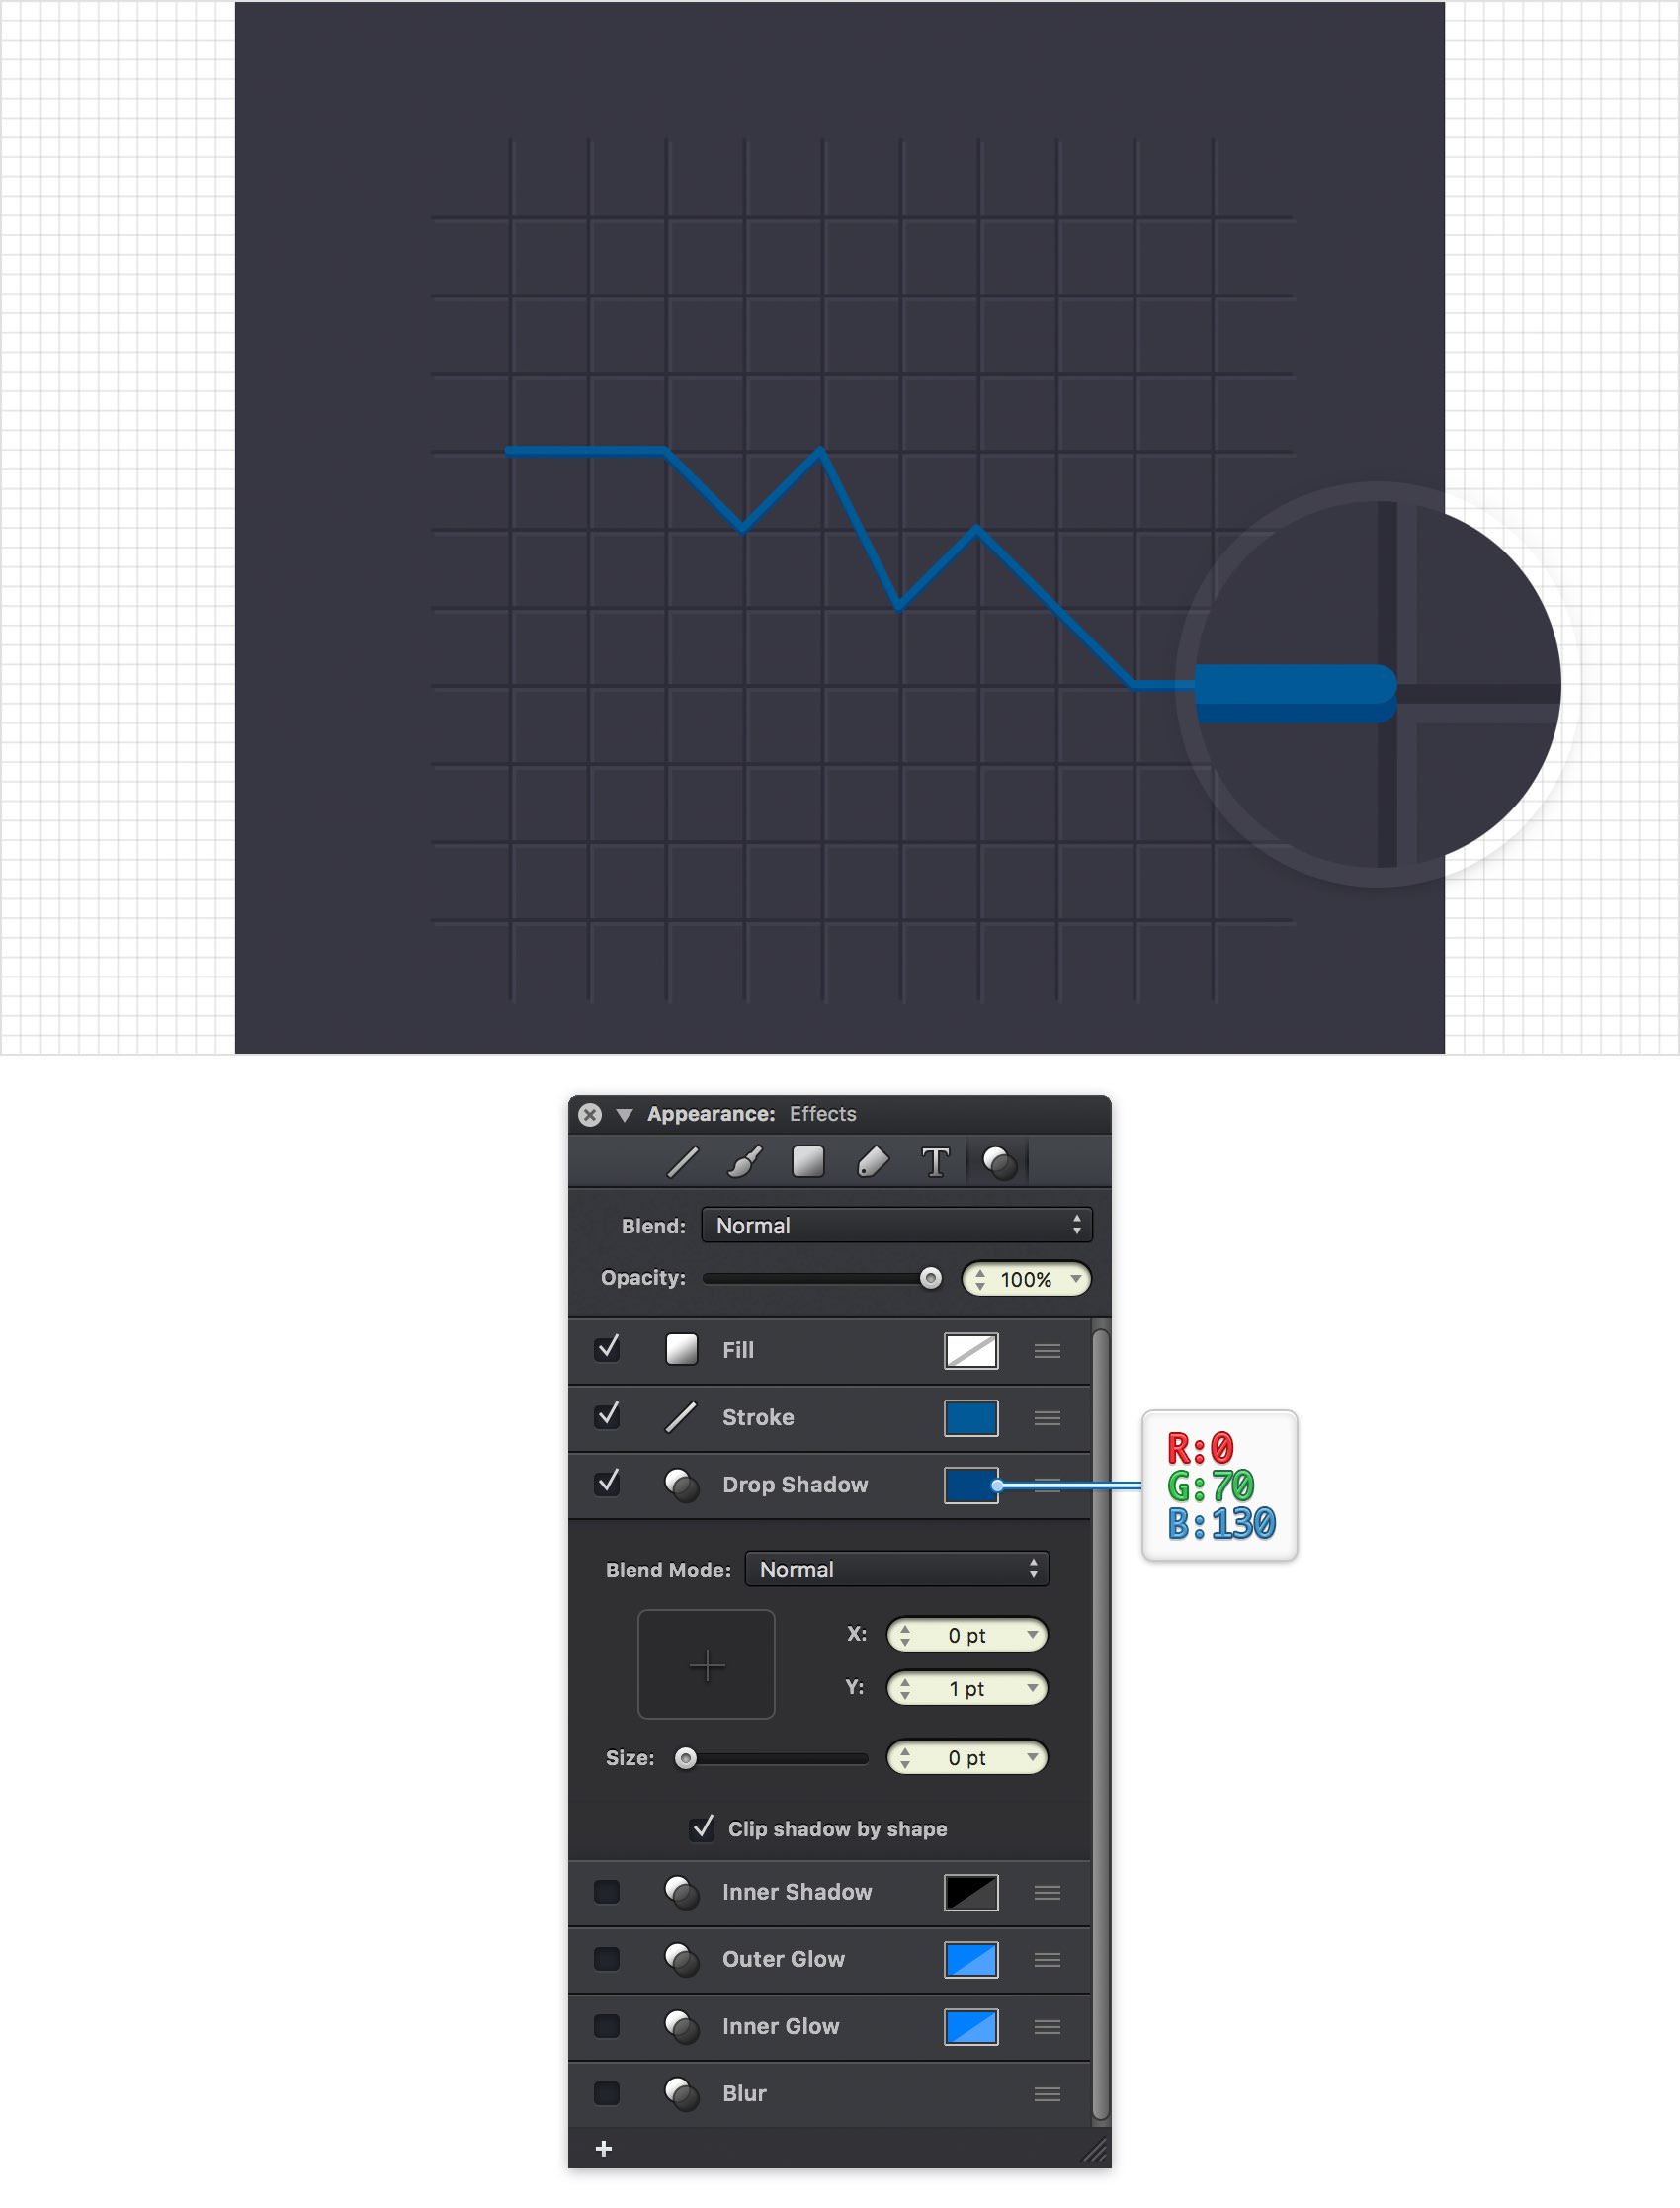
Step 10
Make sure that your blue path is still selected, keep focusing on the Effects pane and add a second Drop Shadow using the plus button located in the bottom, left corner of the pane. Select this new effect, make sure that it lies below the other Drop Shadow and then add the attributes shown in the following image.
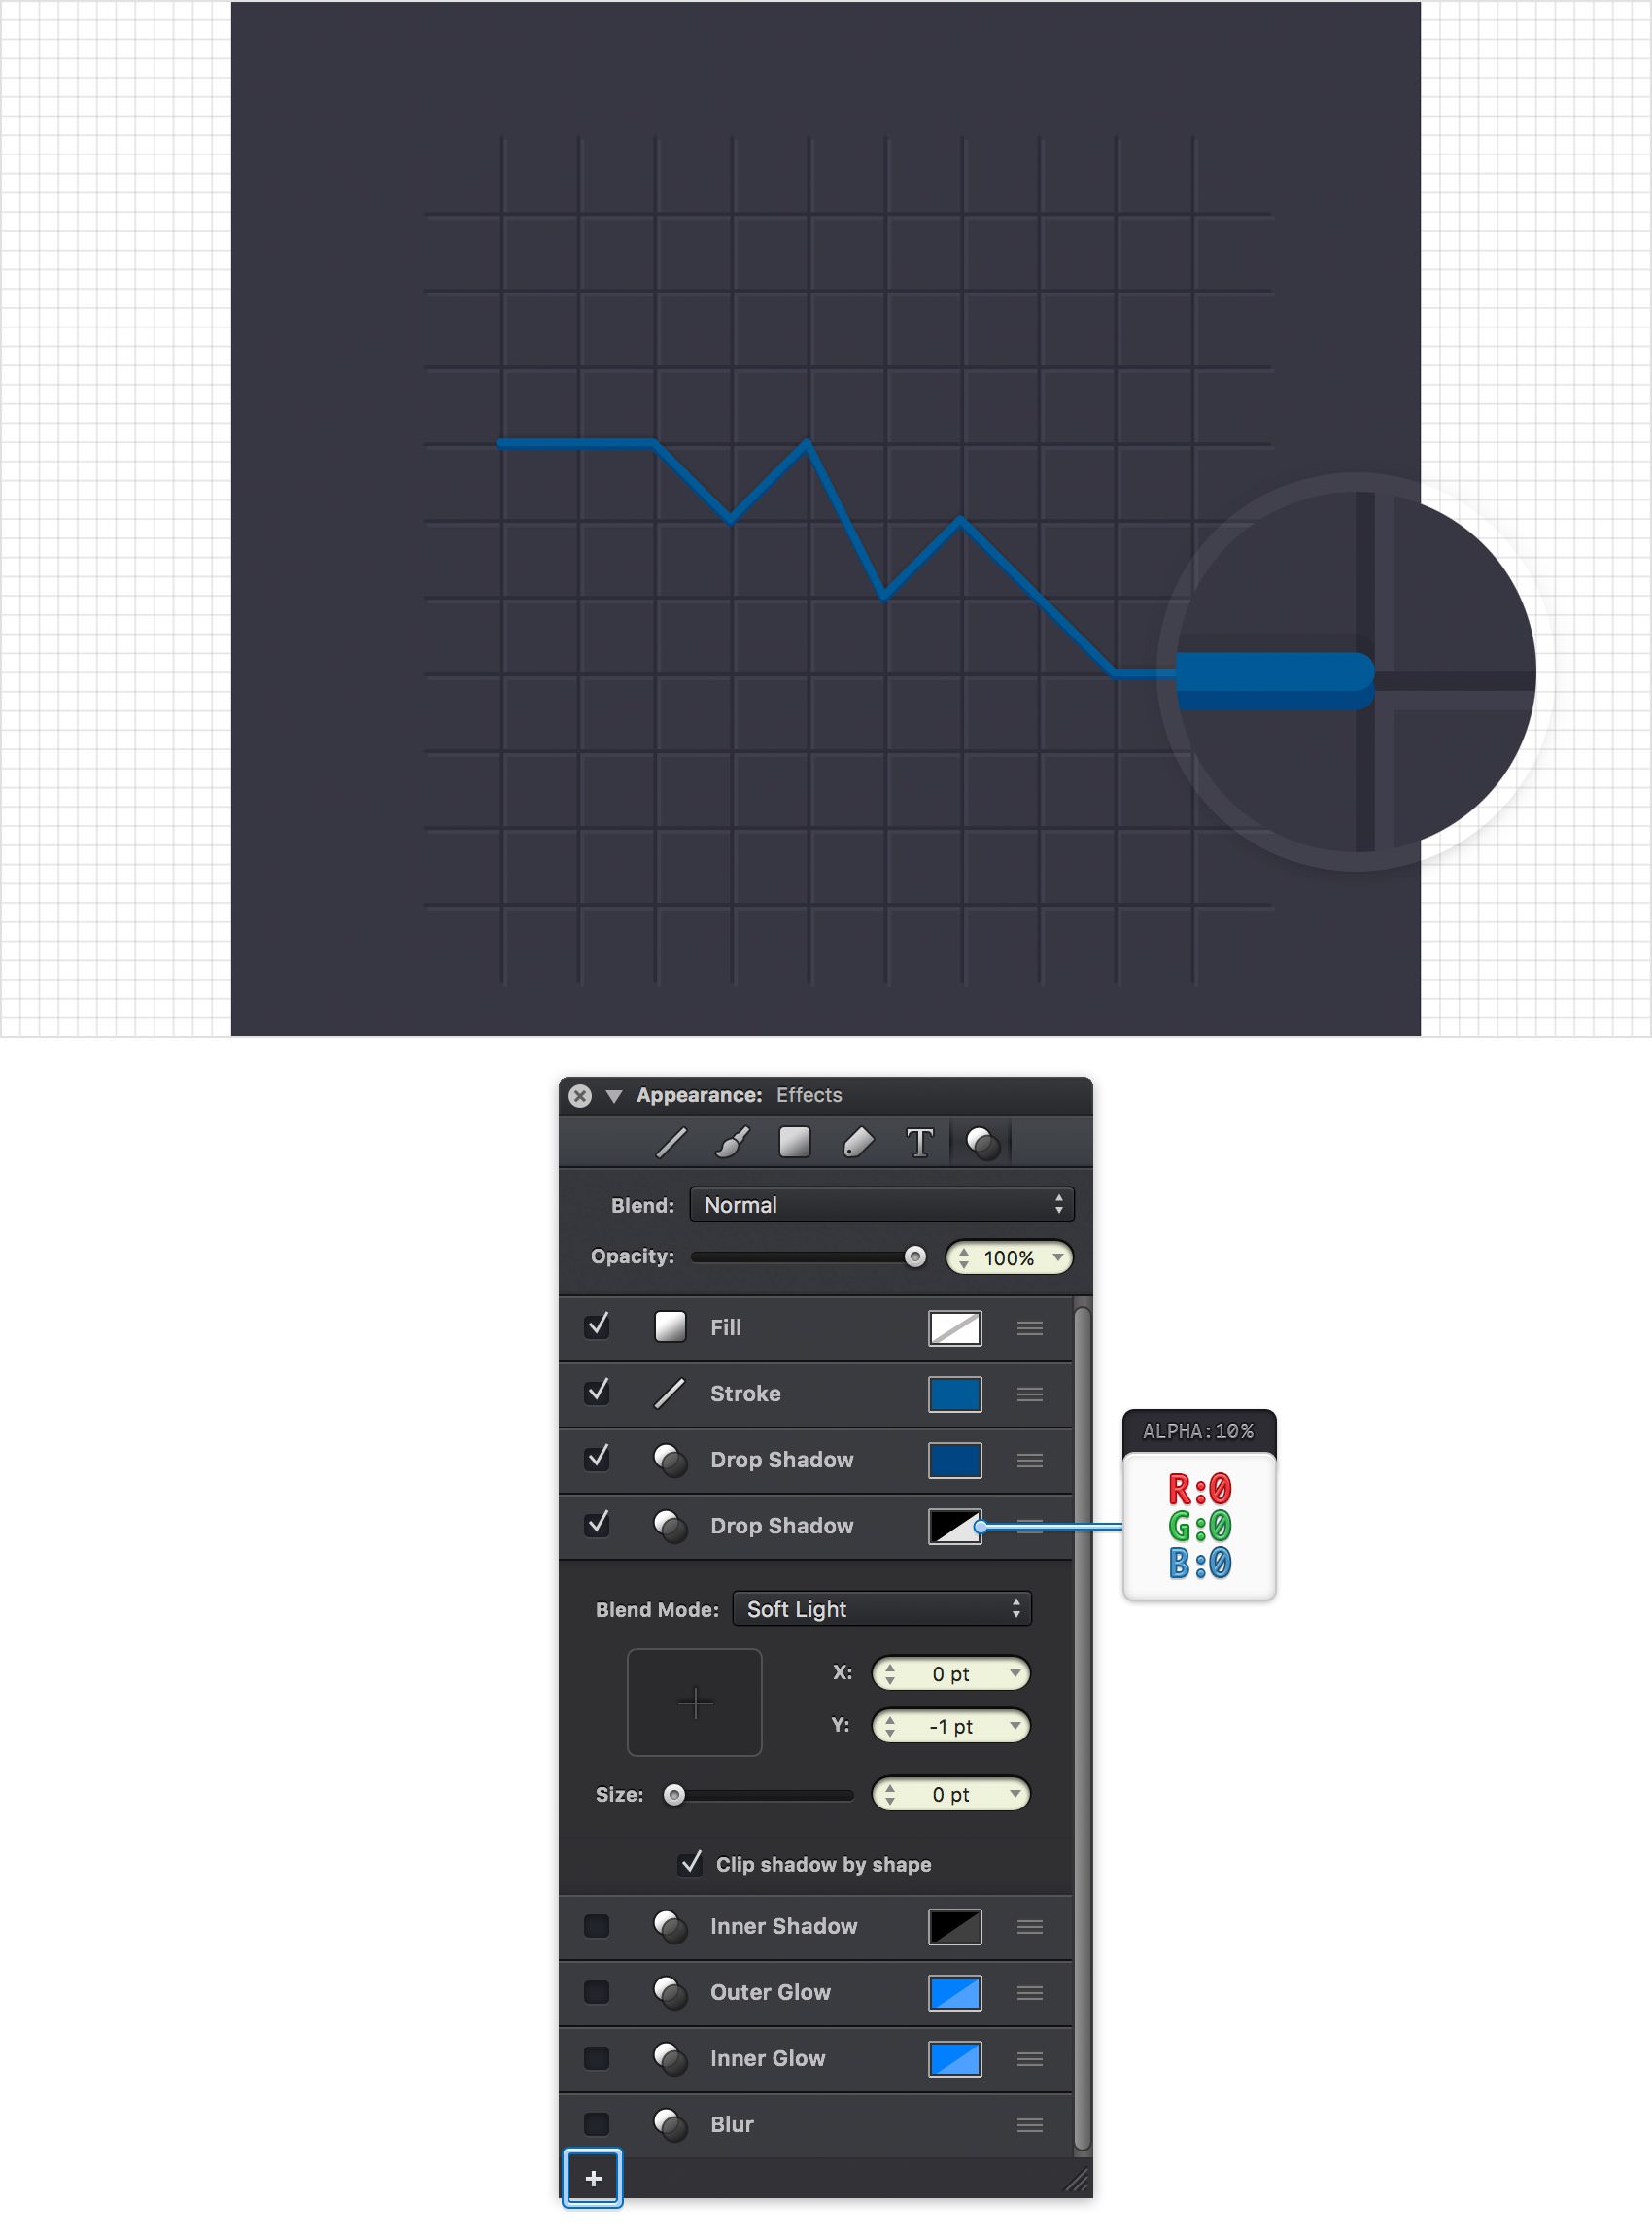
Step 11
Make sure that your blue path is still selected, keep focusing on the Effects pane and add a third Drop Shadow. Place it below the existing effects and then enter the attributes shown in the following image.
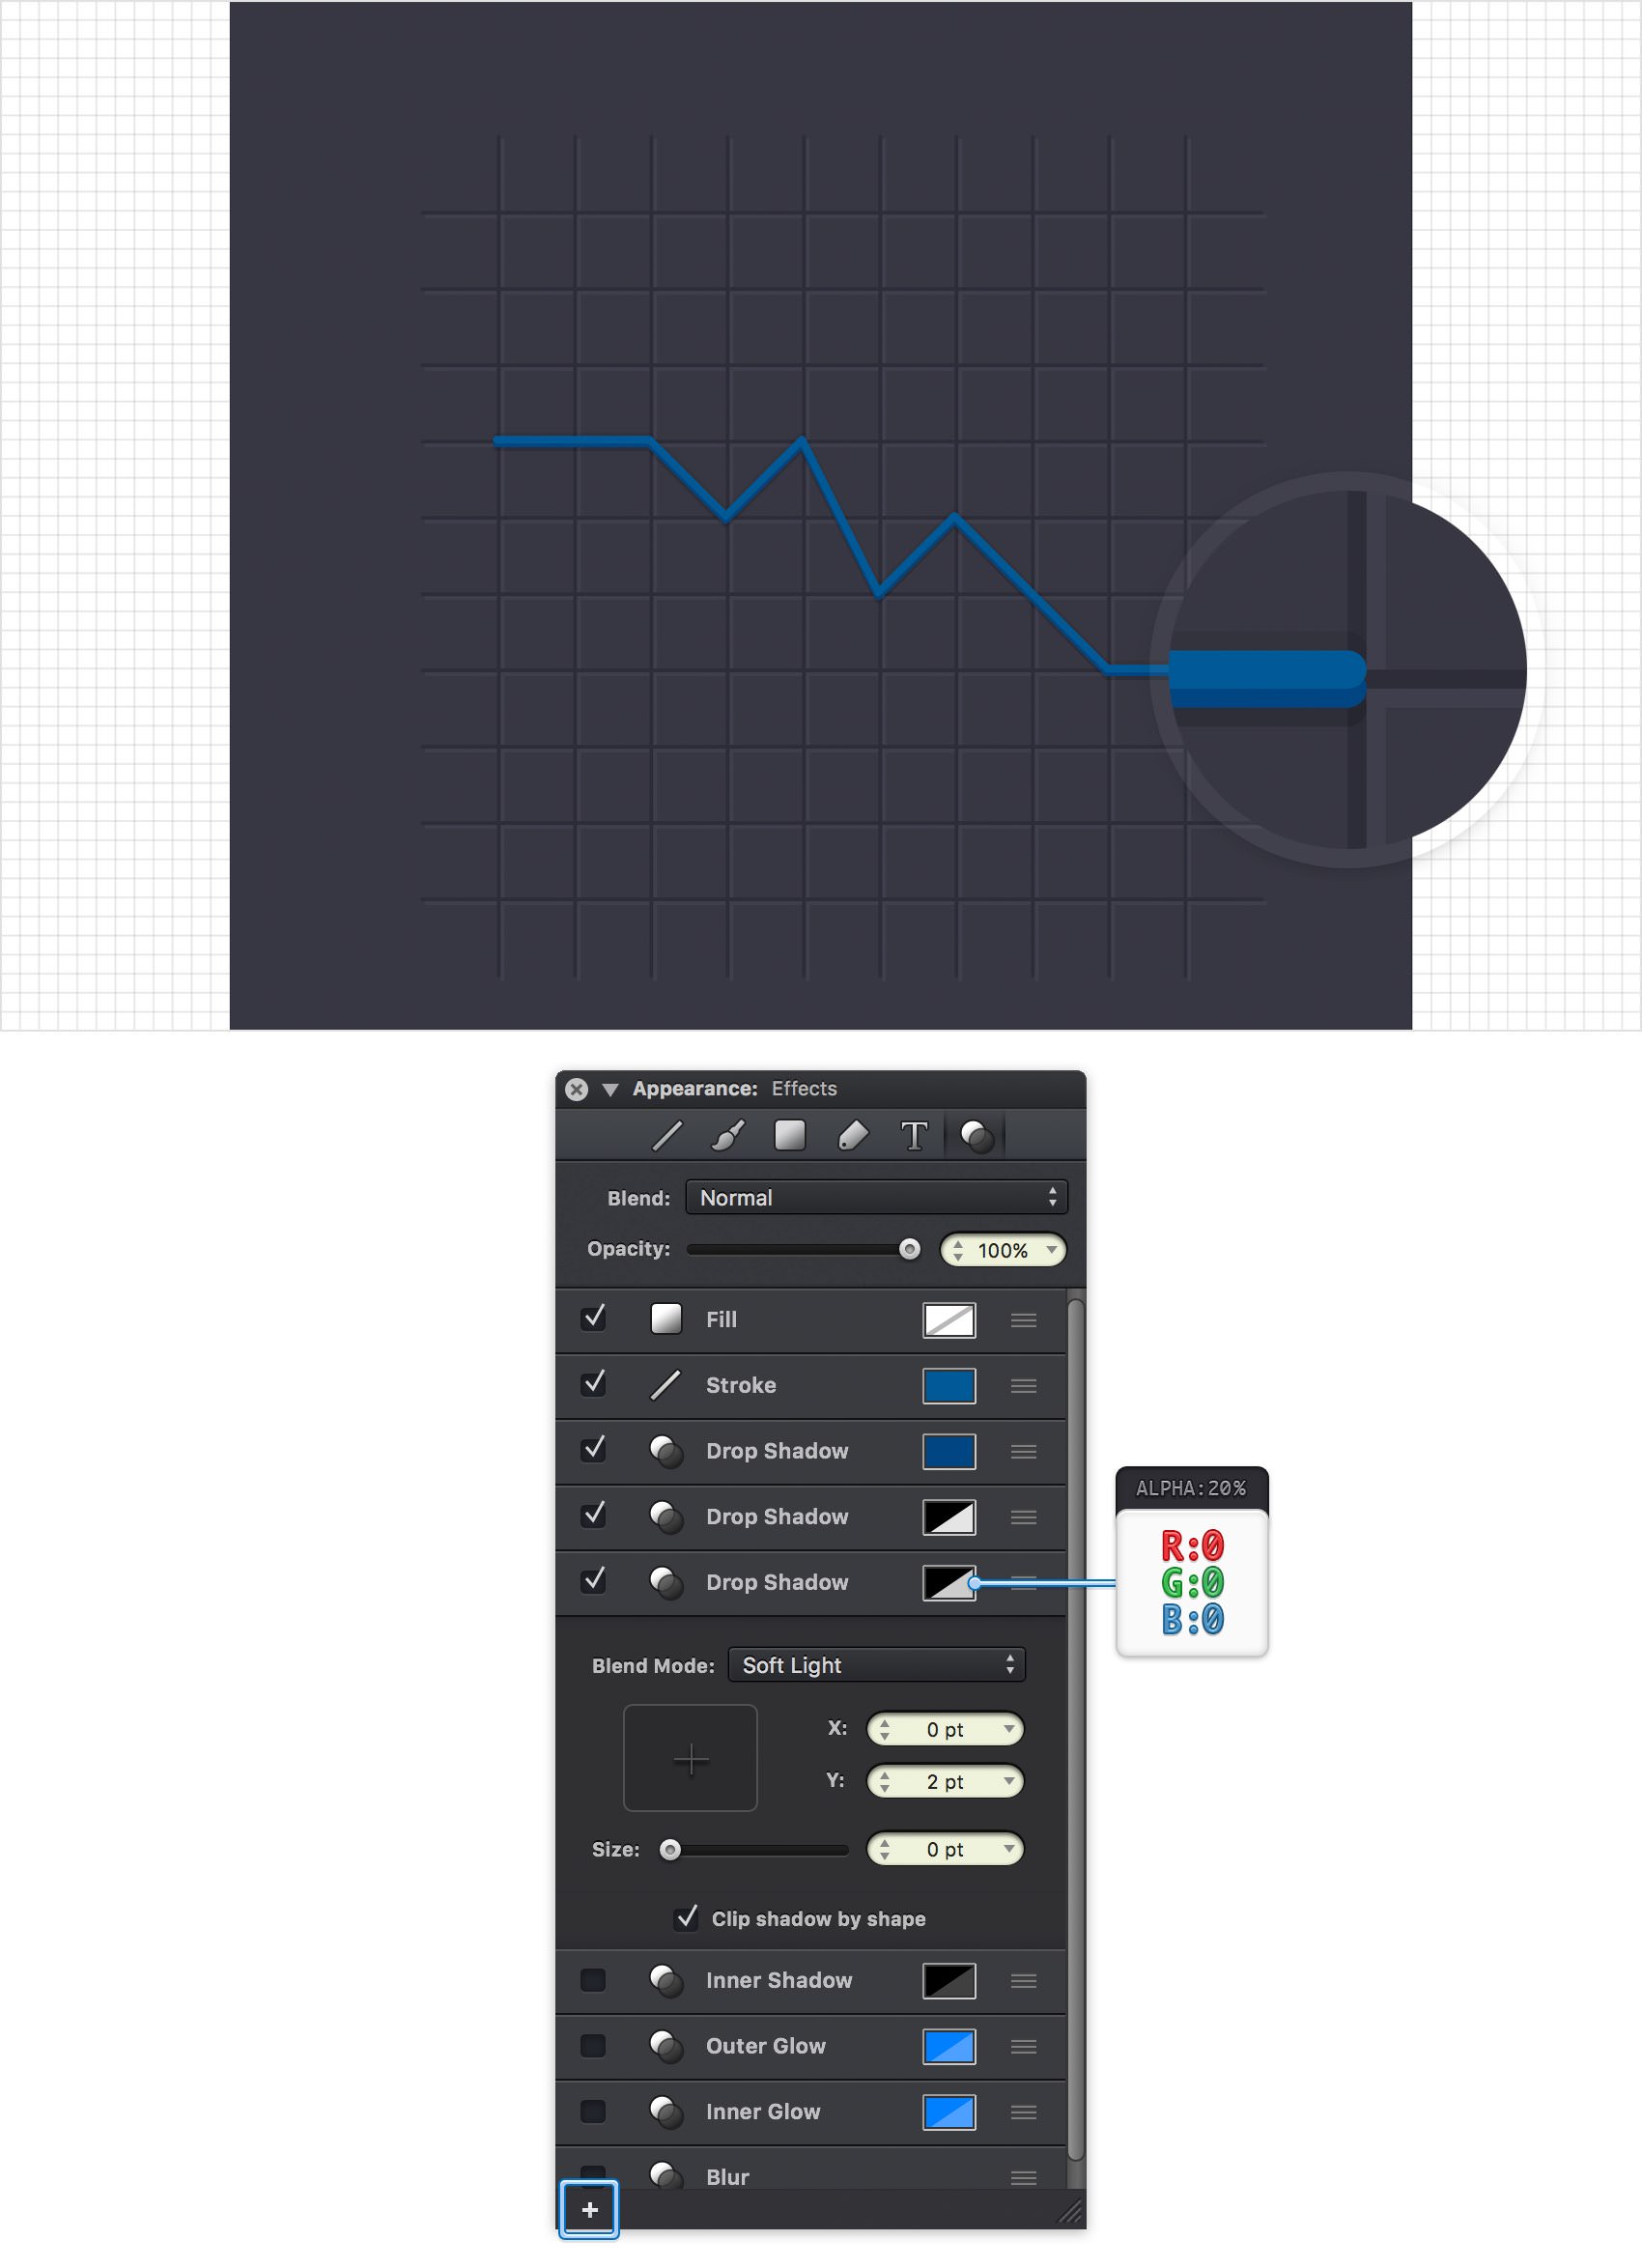
Step 12
Make sure that your blue path is still selected, keep focusing on the Effects pane and add a fourth Drop Shadow. Place it below the existing effects and then enter the attributes shown in the following image.
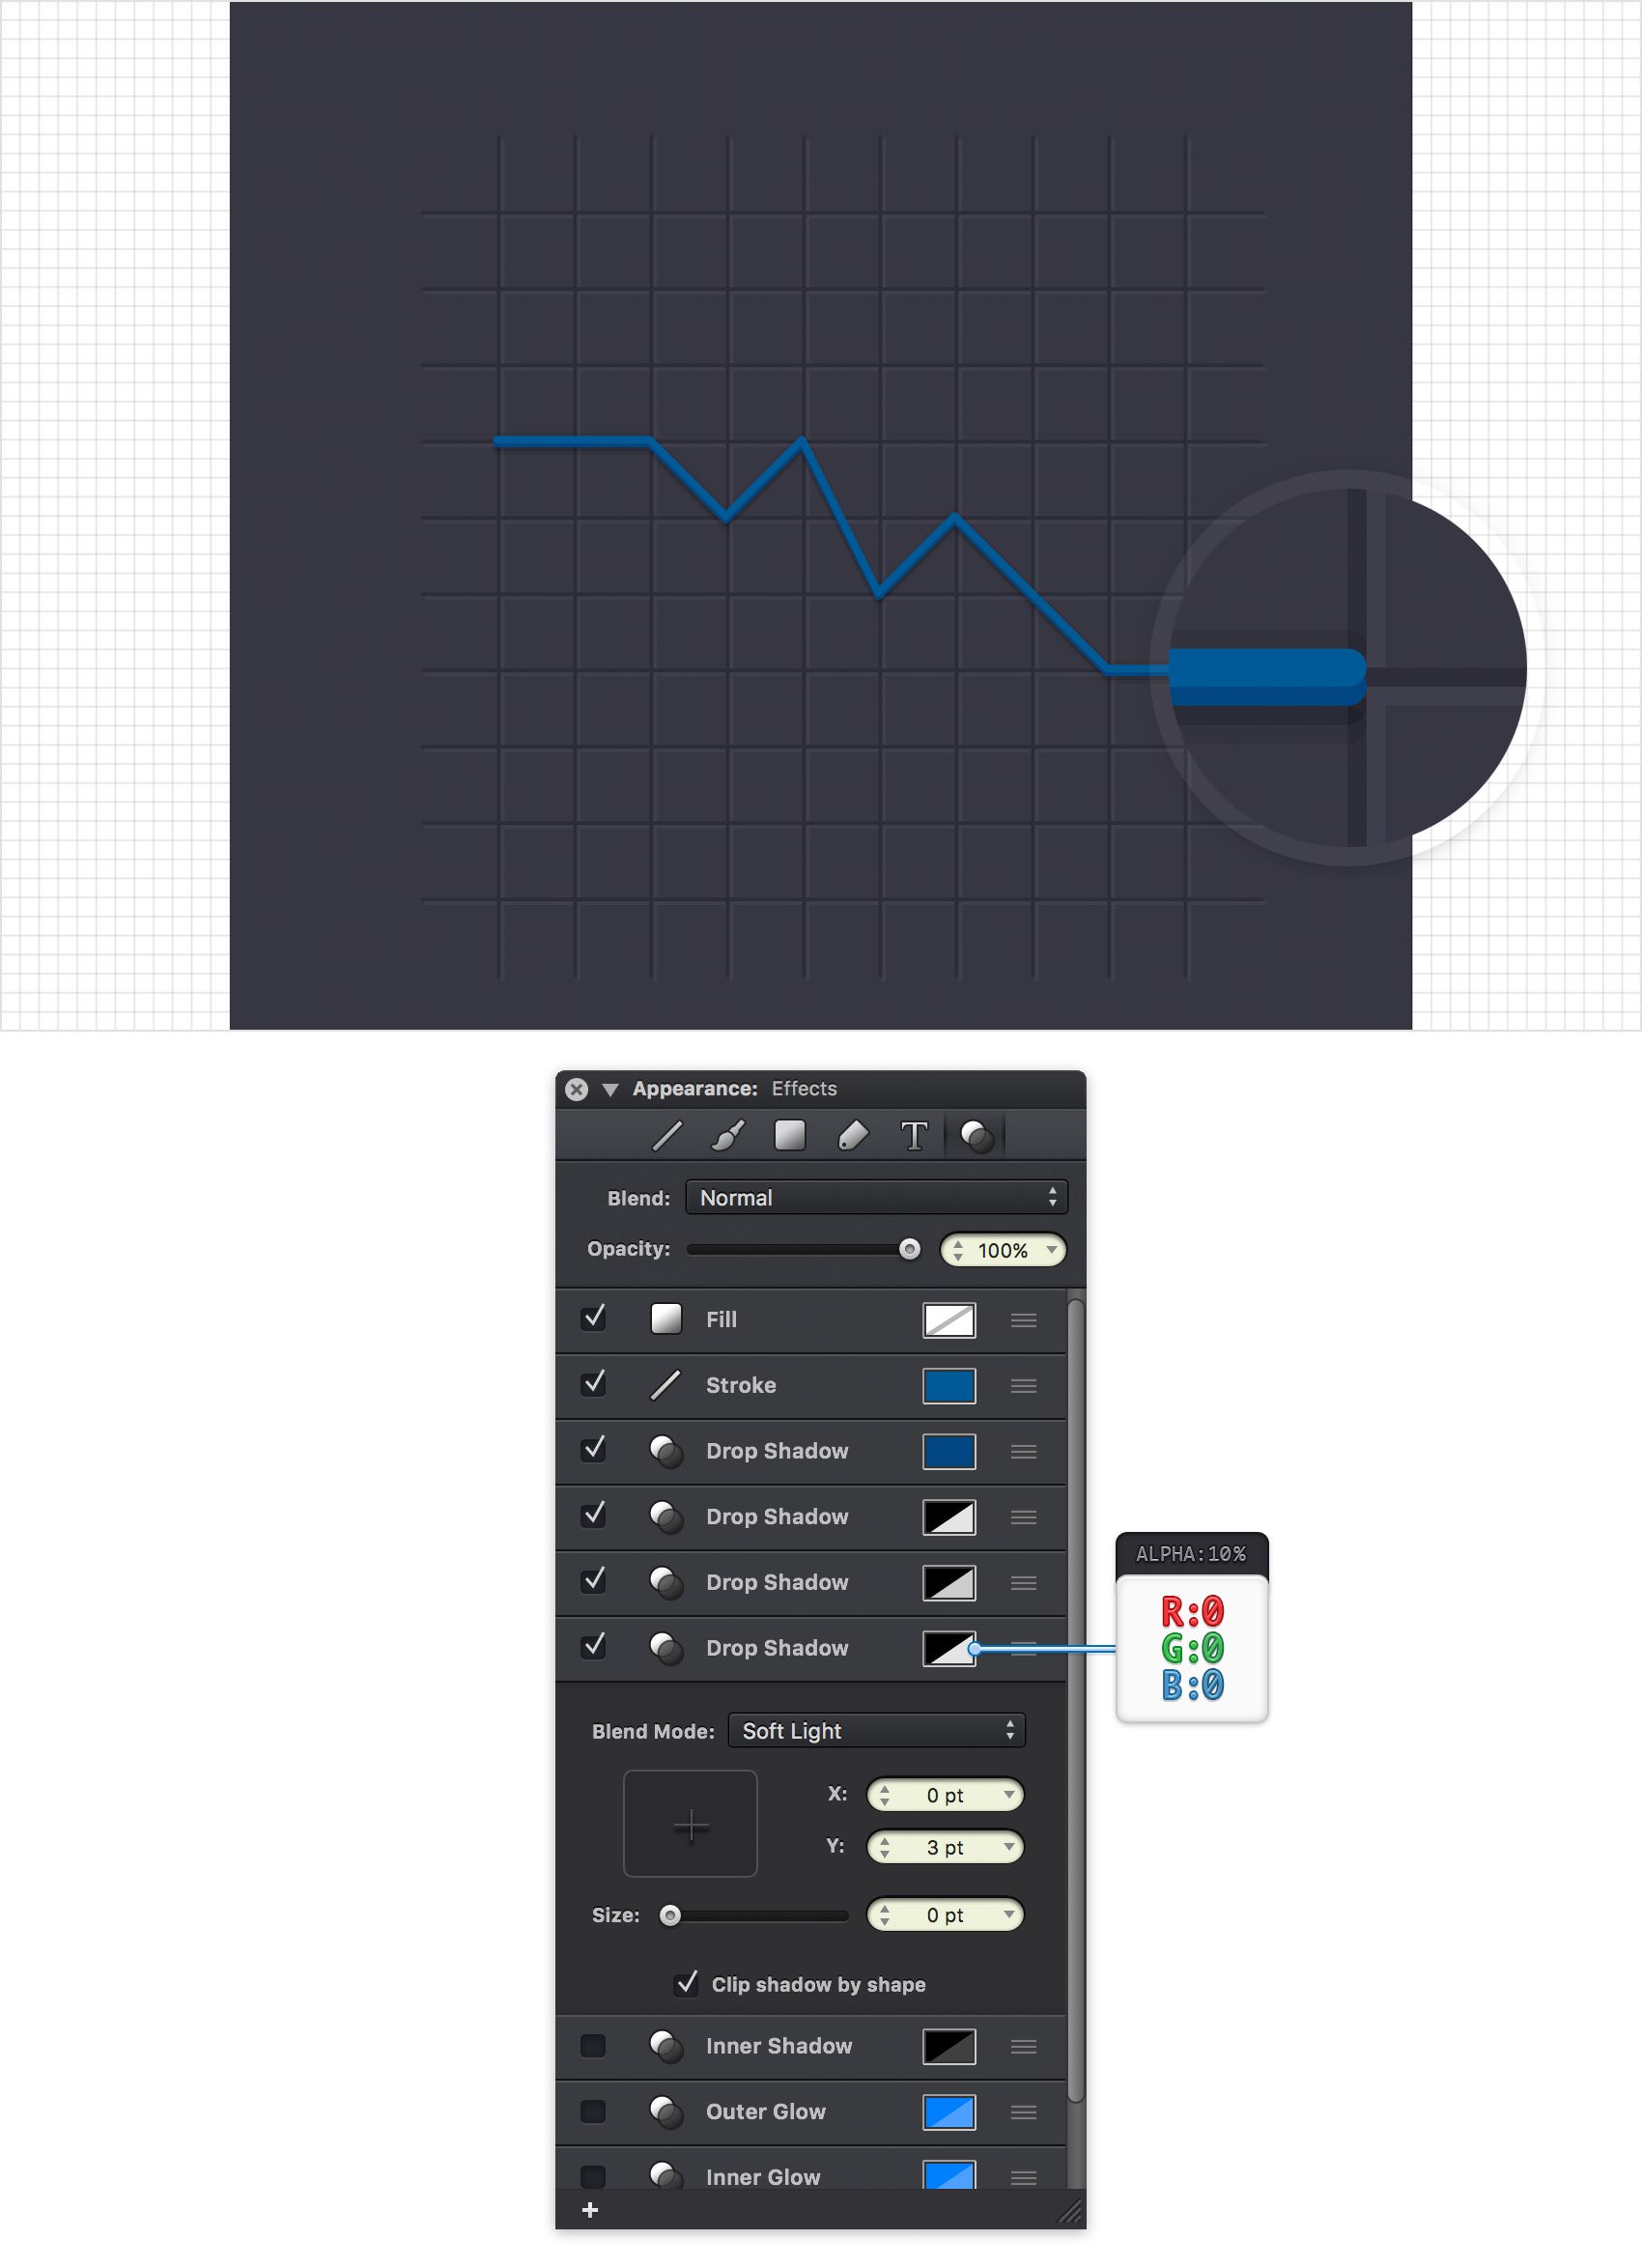
Step 13
Make sure that your blue path is still selected, keep focusing on the Effects pane and add a fifth Drop Shadow. Place it below the existing effects and then enter the attributes shown in the following image.
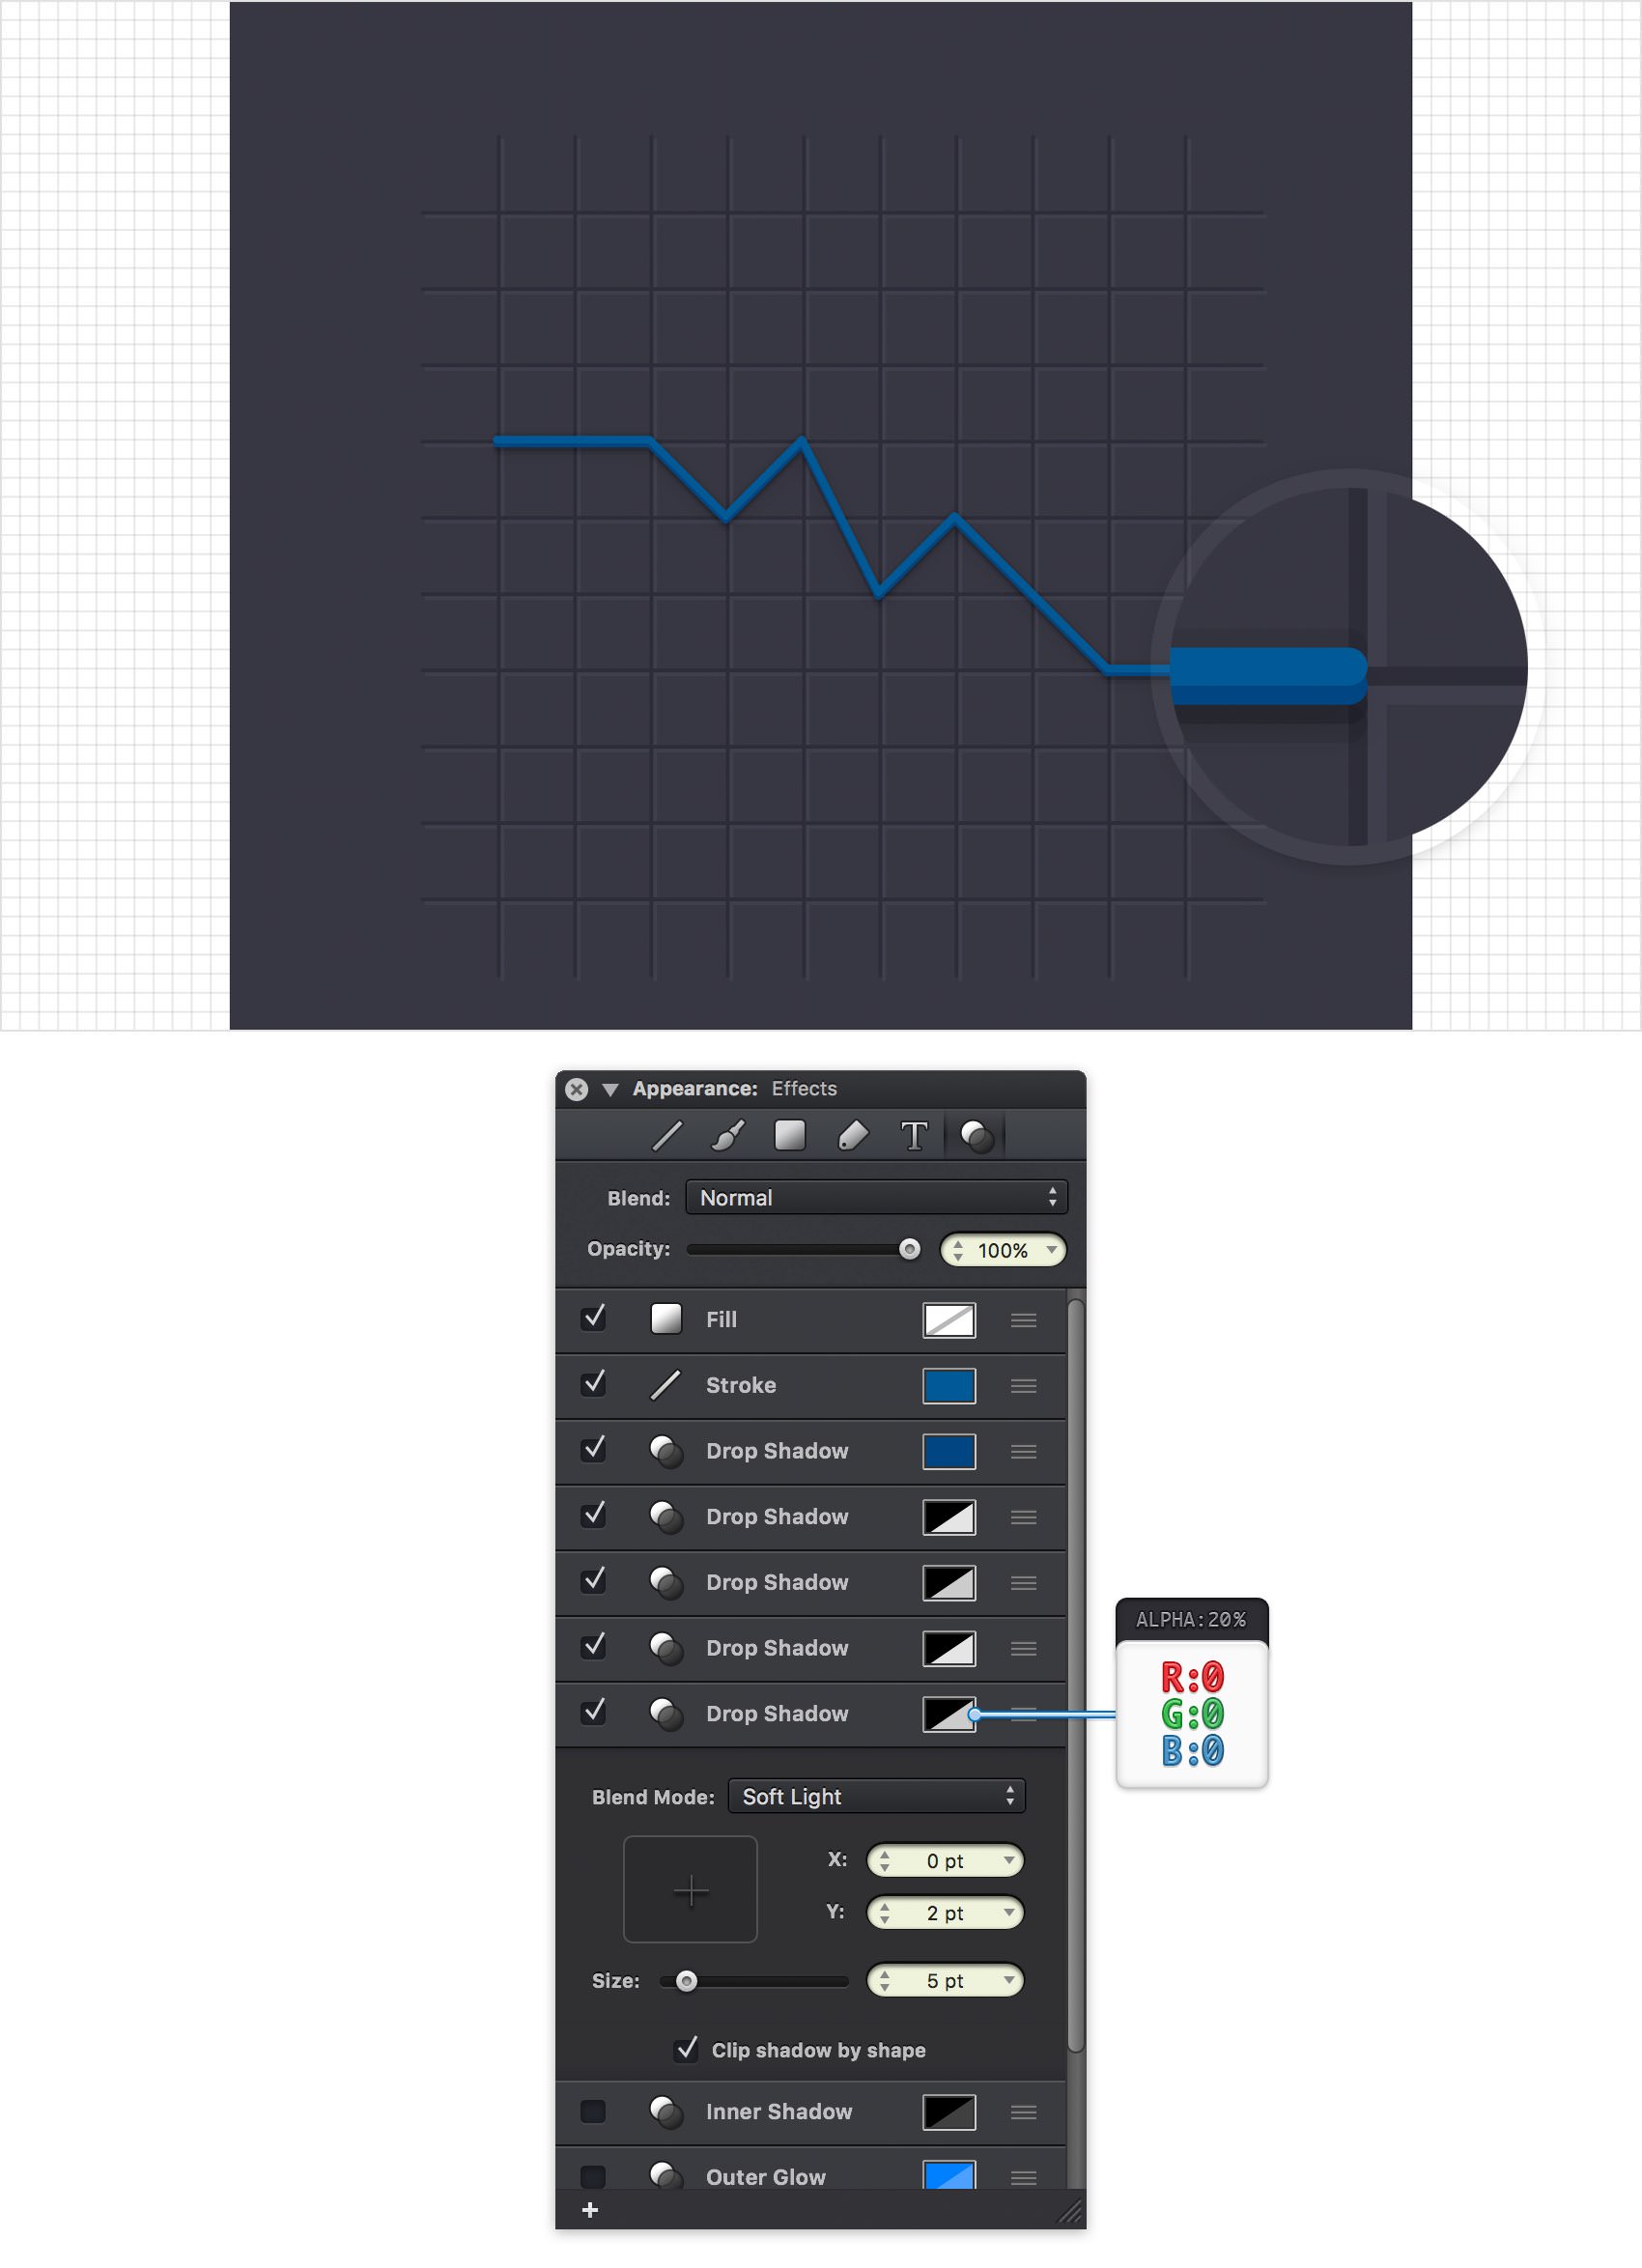
Step 14
Make sure that your blue path is still selected, keep focusing on the Effects pane and activate the existing Inner Shadow. Place it below the existing effects and then enter the attributes shown in the following image.
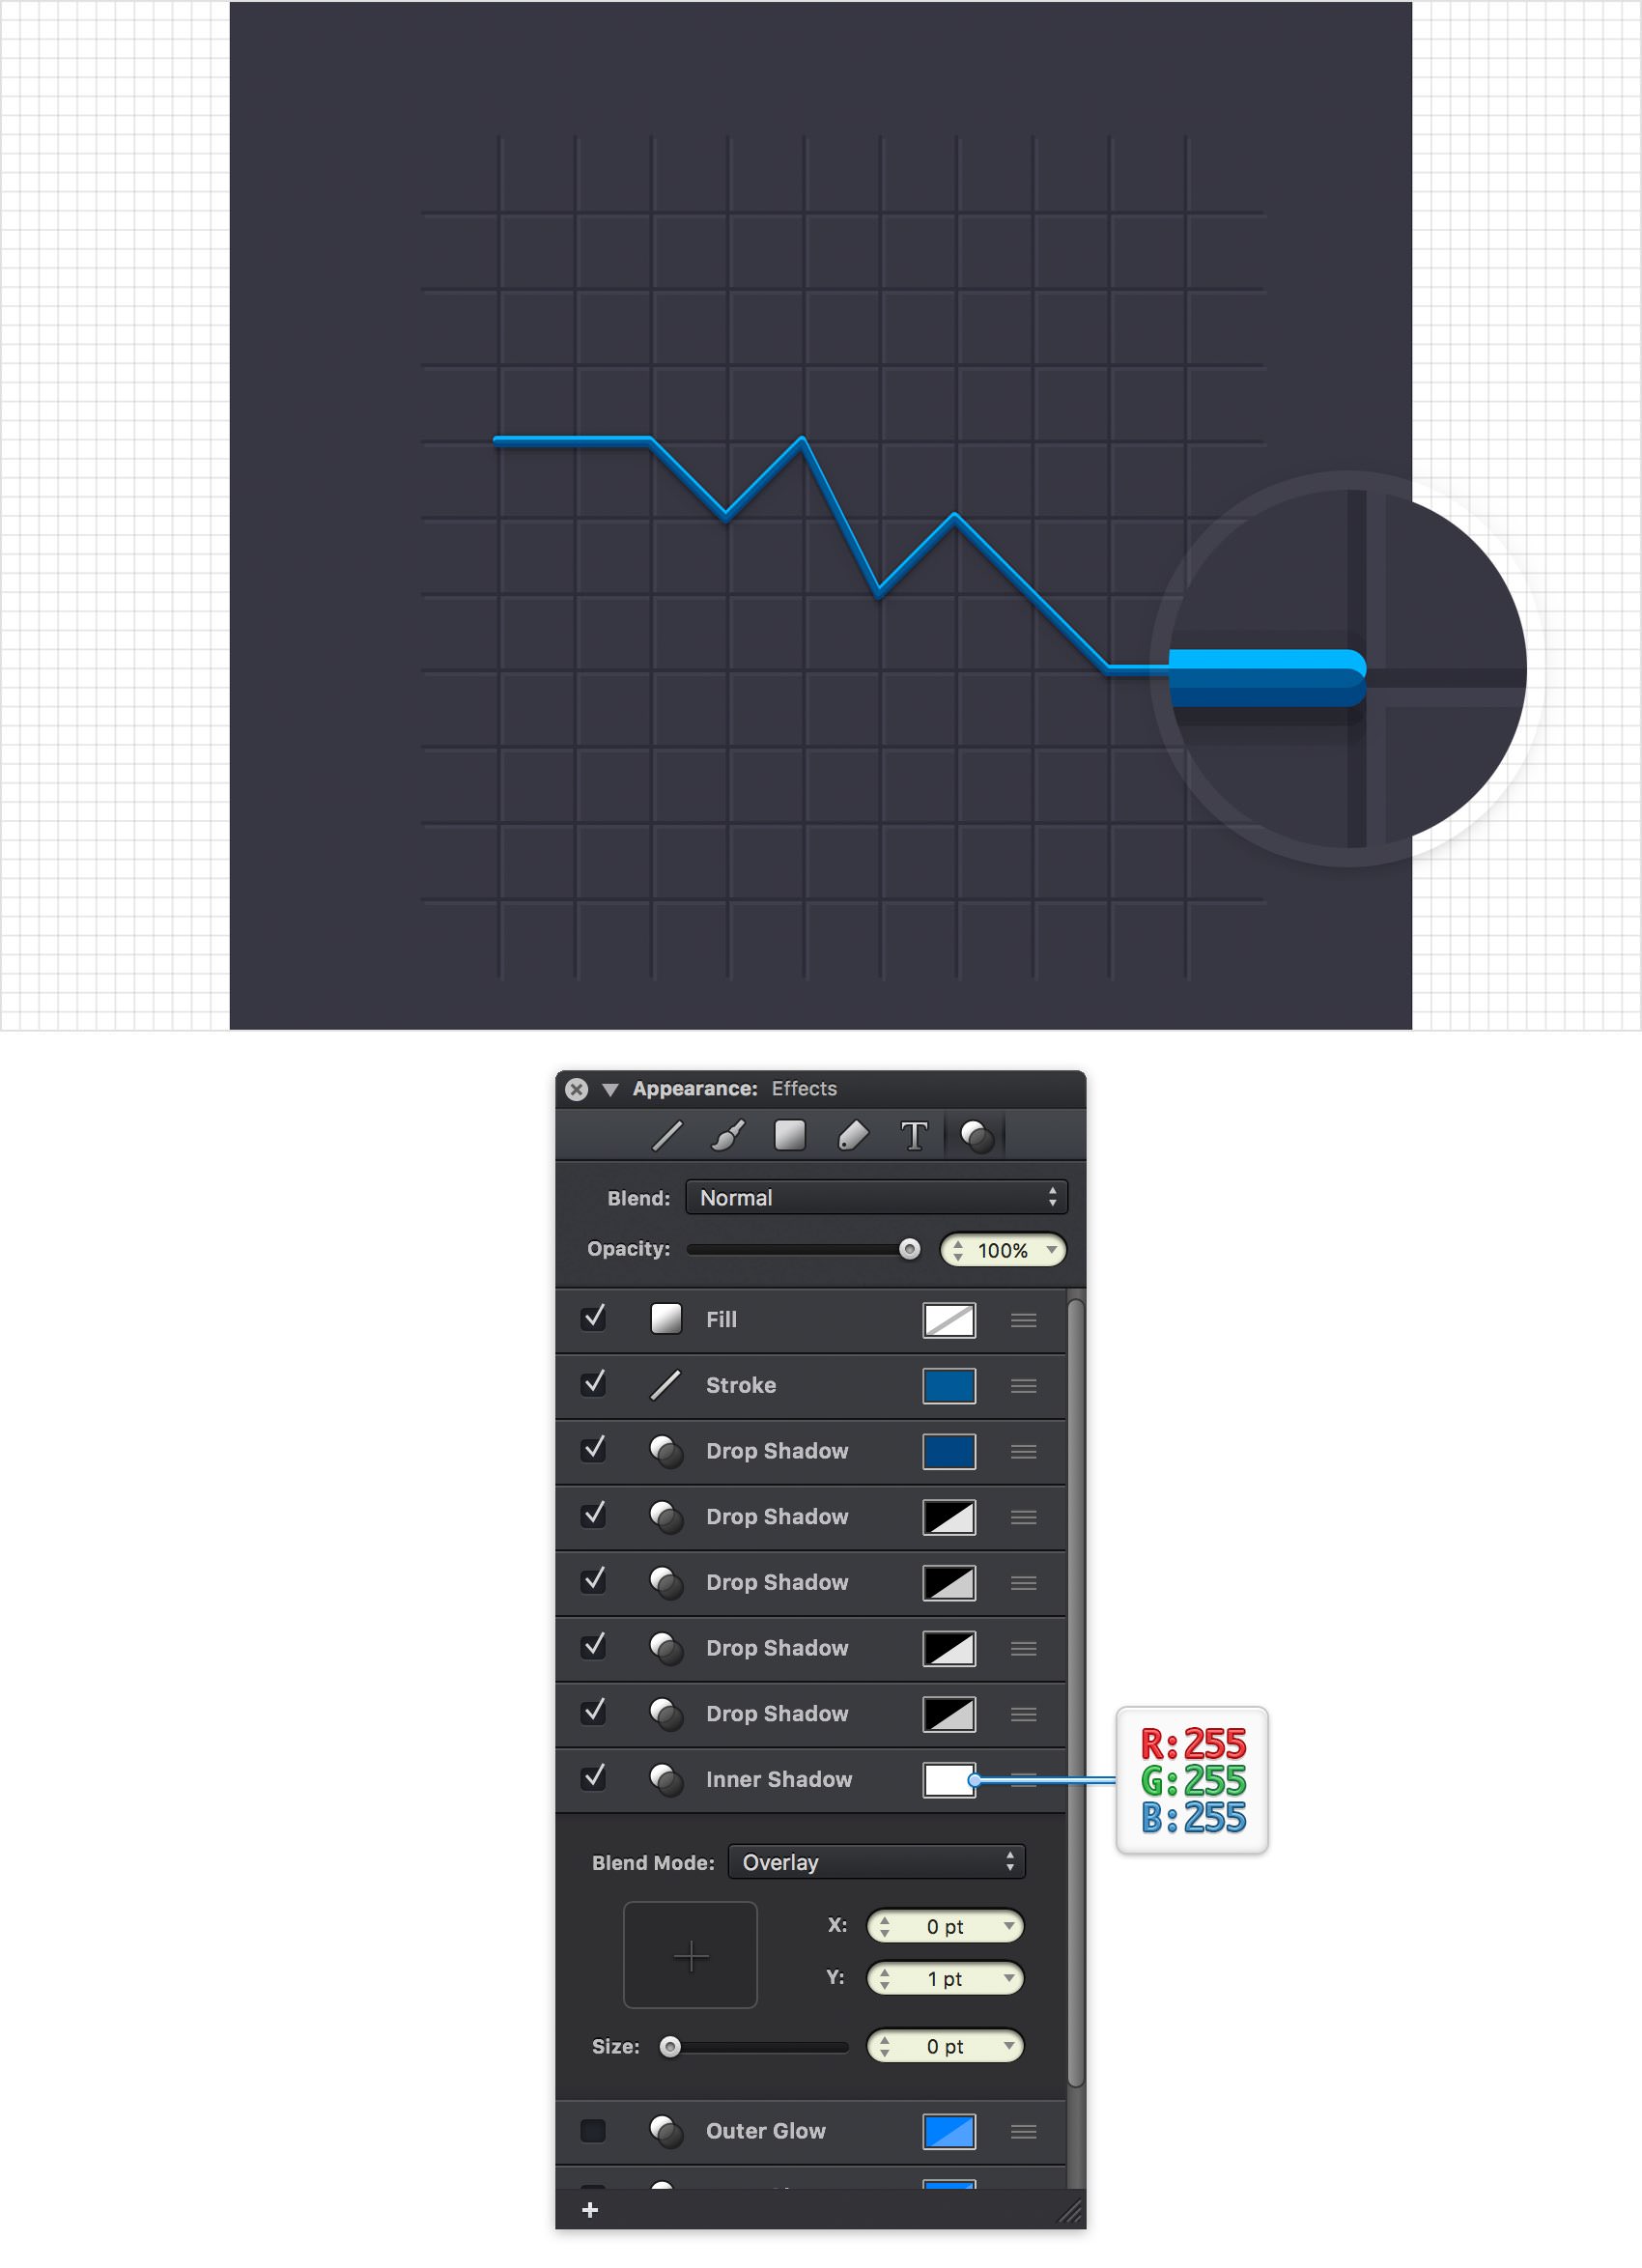
Step 15
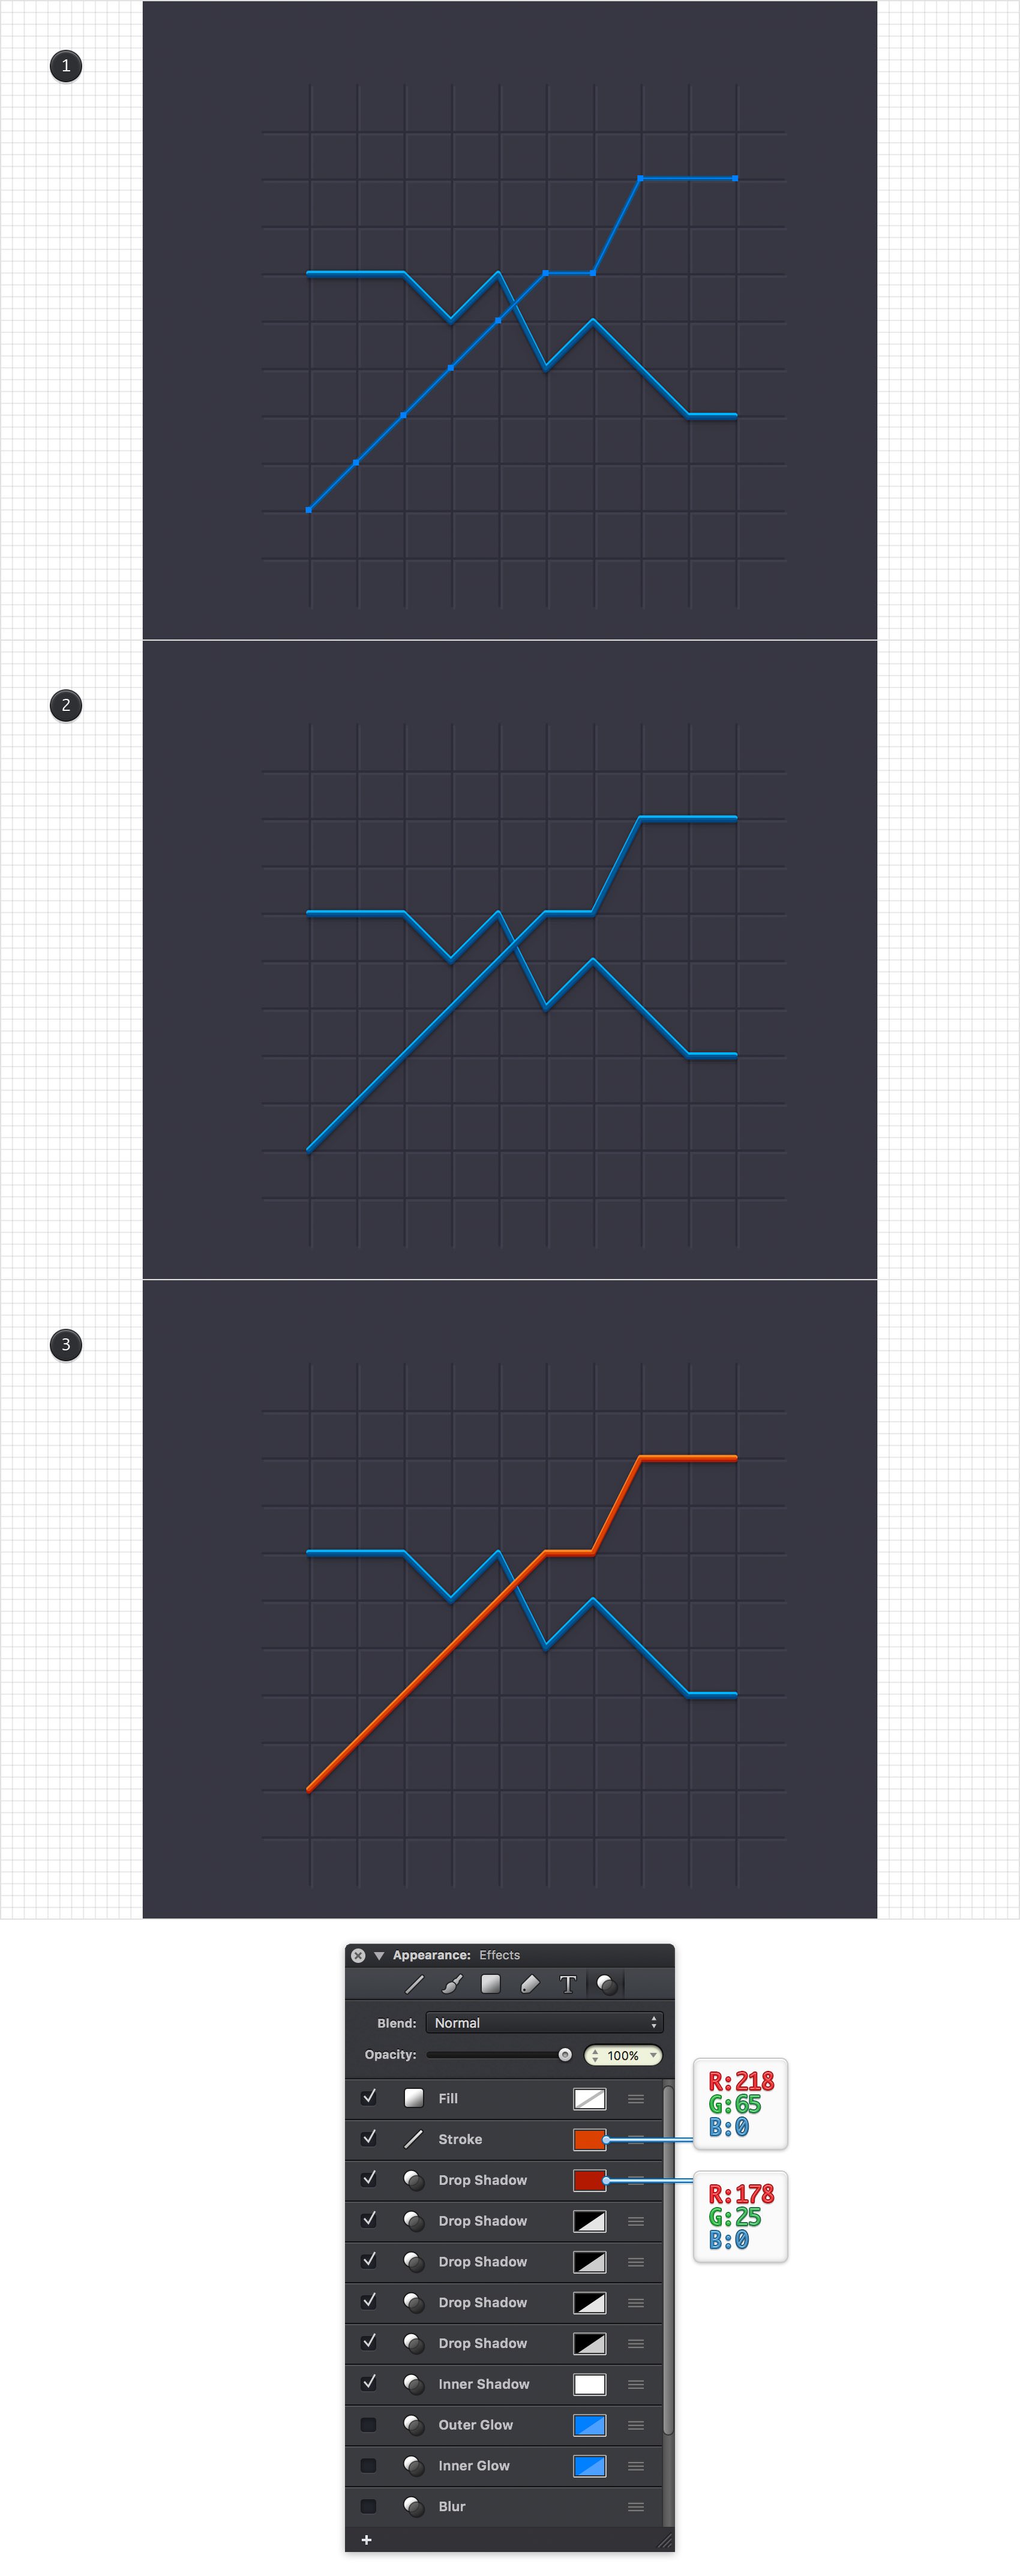
Select your blue path, right click anywhere on your canvas and go to Copy Style. Pick the Pen Tool (P), create a second path as shown in the first image, right click again and this time go to Paste Style.
Make sure that your new path stays selected and focus on the Effects pane. First, select the Stroke and replace the existing color with R=218 G=65 B=0 and then select the top Drop Shadow effect and replace the existing color with R=178 G=25 B=0.
Step 16
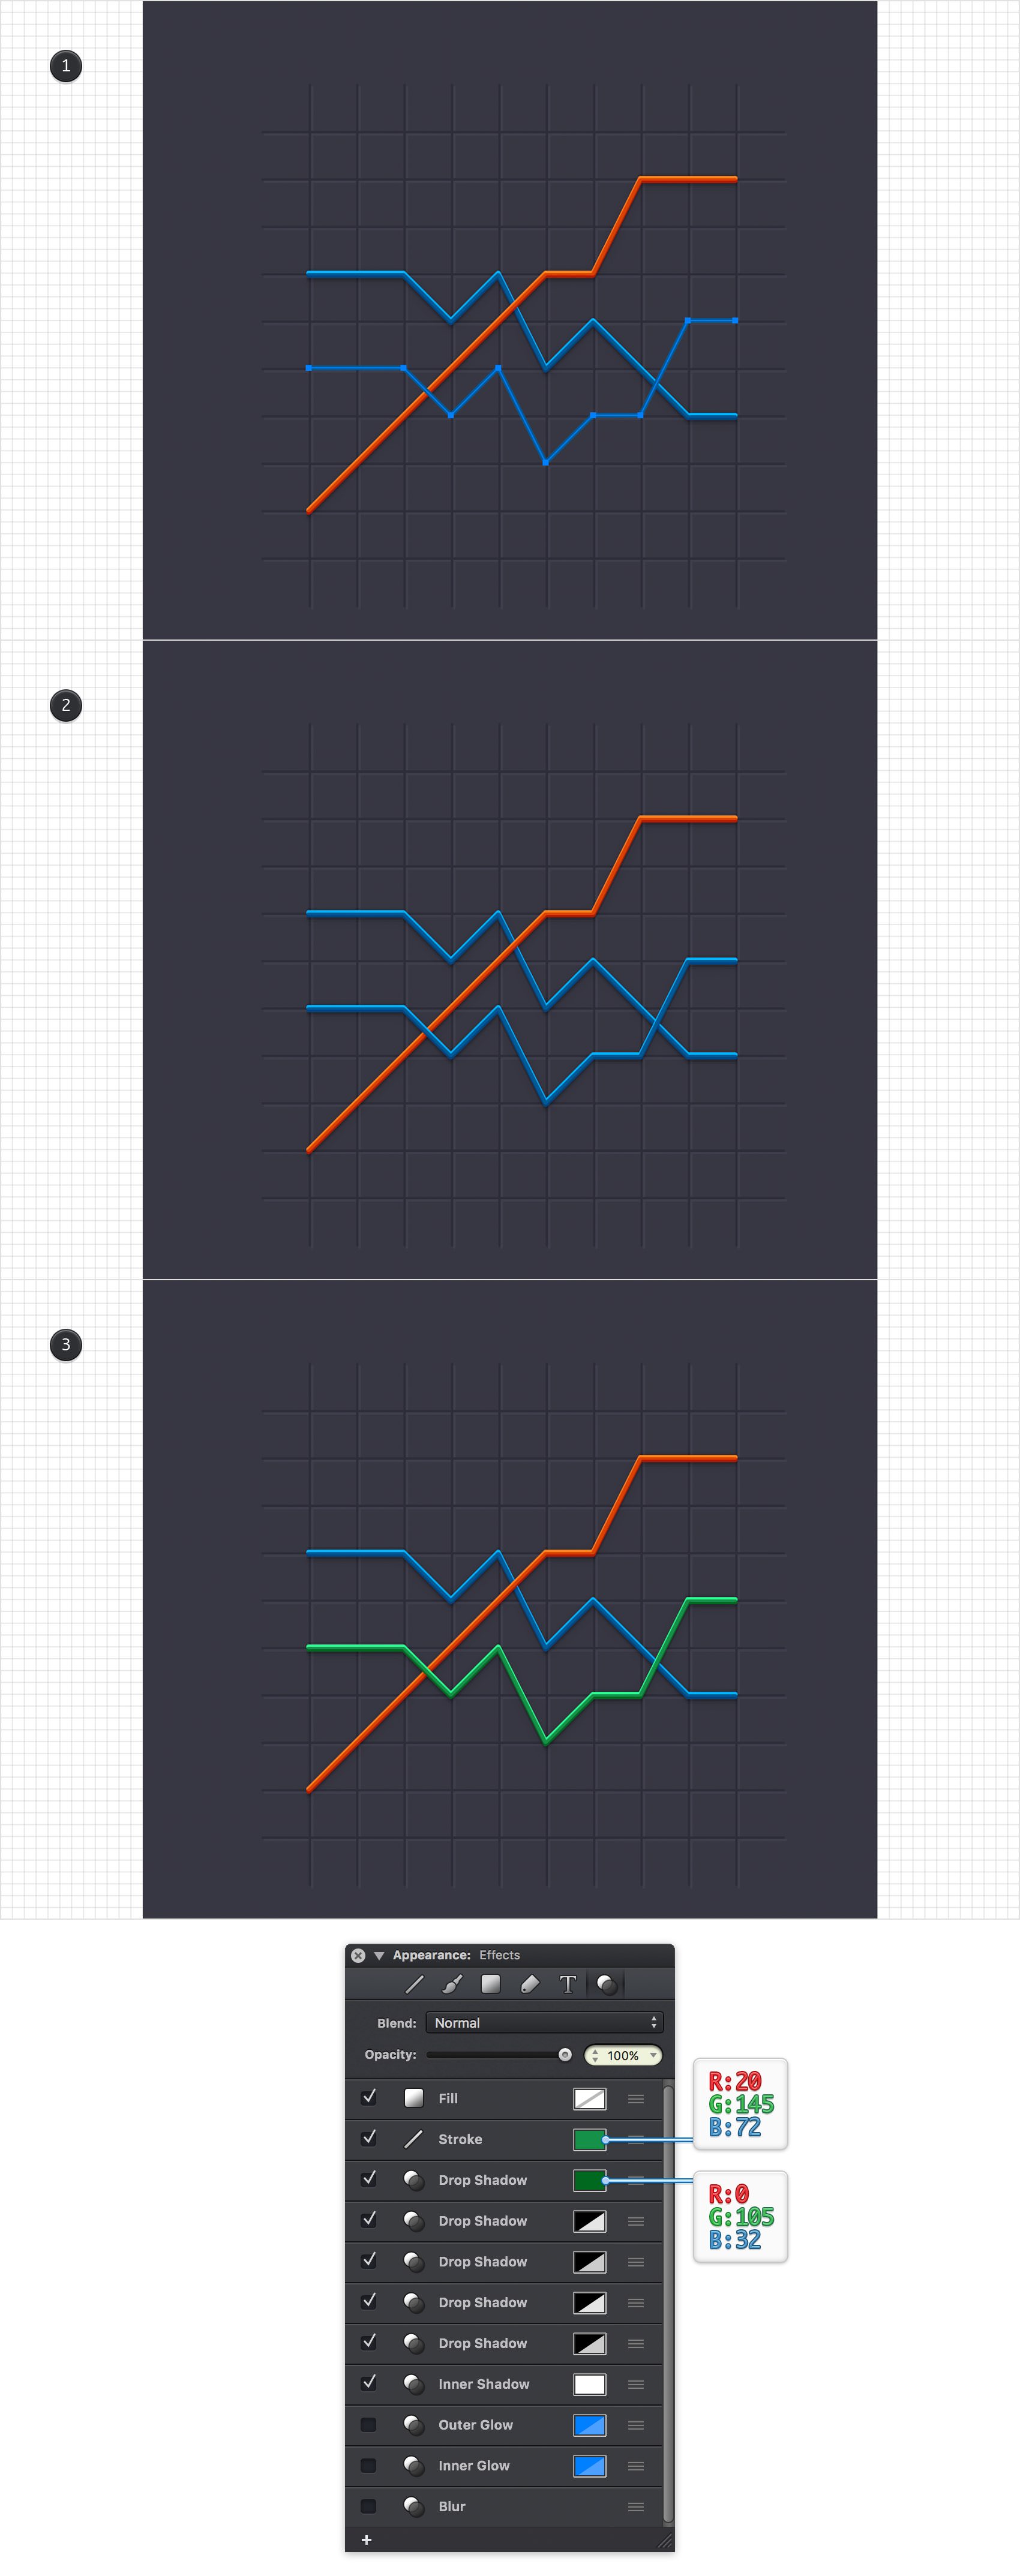
Reselect the Pen Tool (P) and create a third path as shown in the first image. Make sure that this new path stays selected, right click anywhere on you canvas and go to Paste Style. Move to the Effects pane, select the Stroke and replace the existing color with R=20 G=145 B=72 and then select the top Drop Shadow effect and replace the existing color with R=0 G=105 B=32.
Step 17
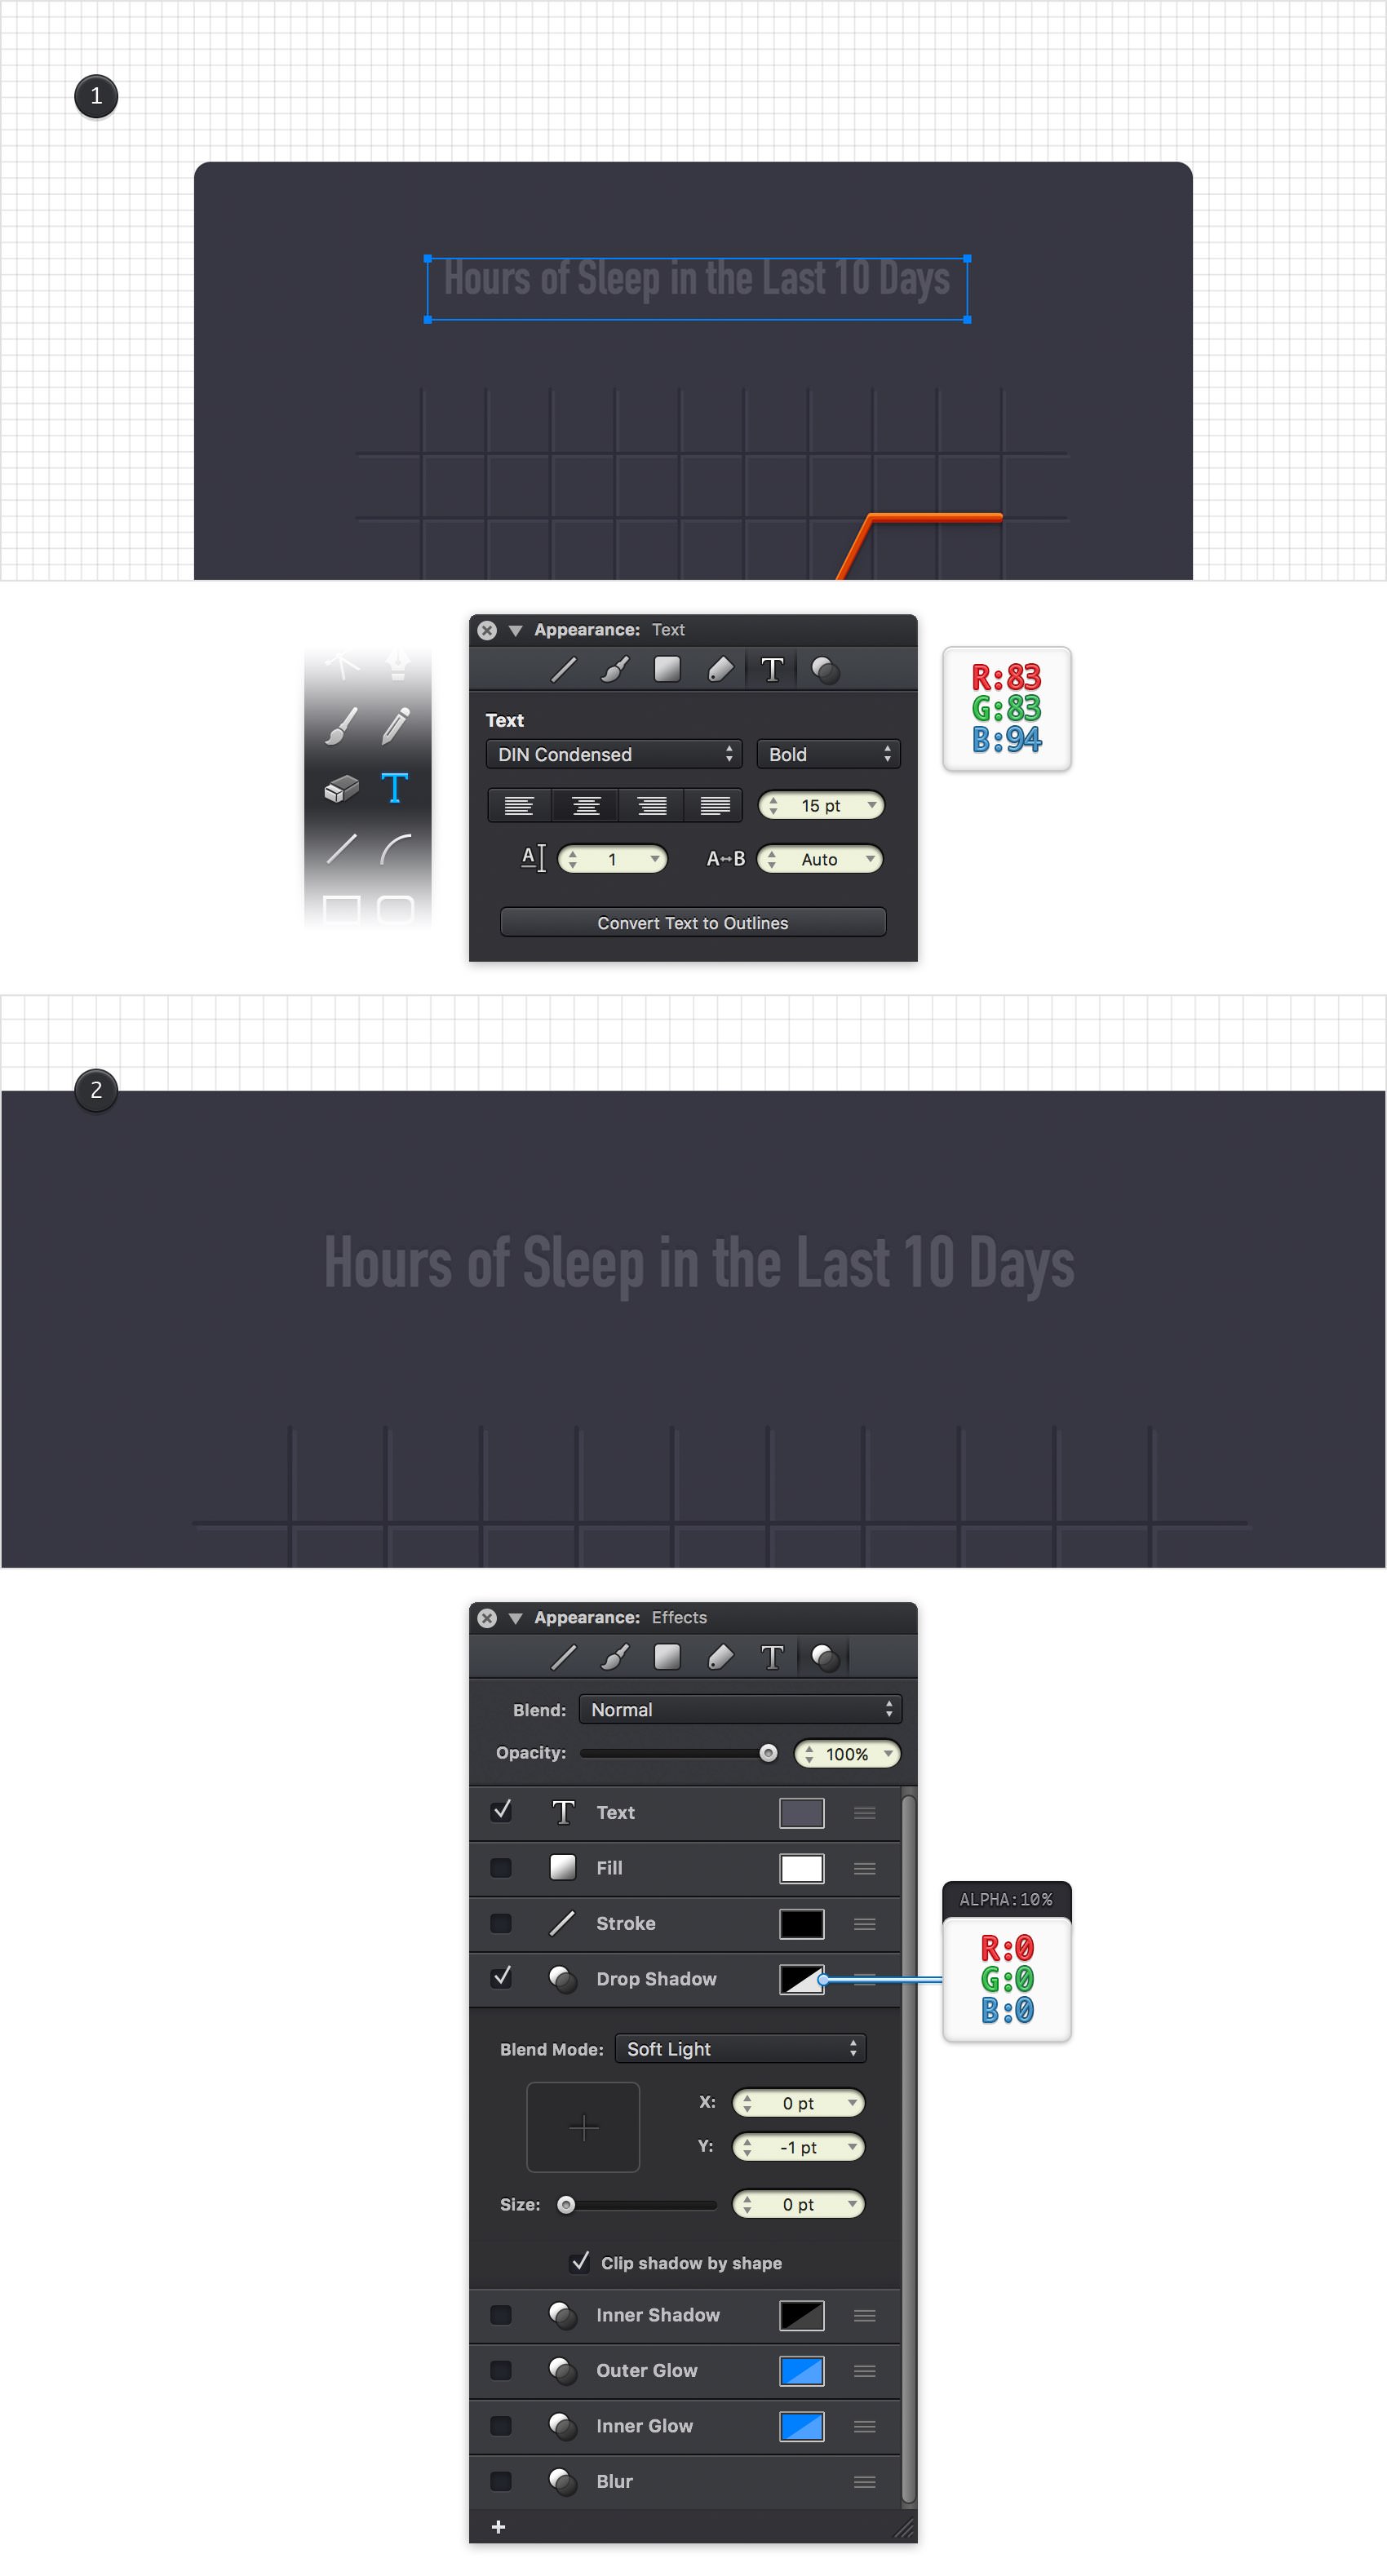
Return to your Toolbar, make the Stroke invisible and then set the Fill color to R=83 G=83 B=94.
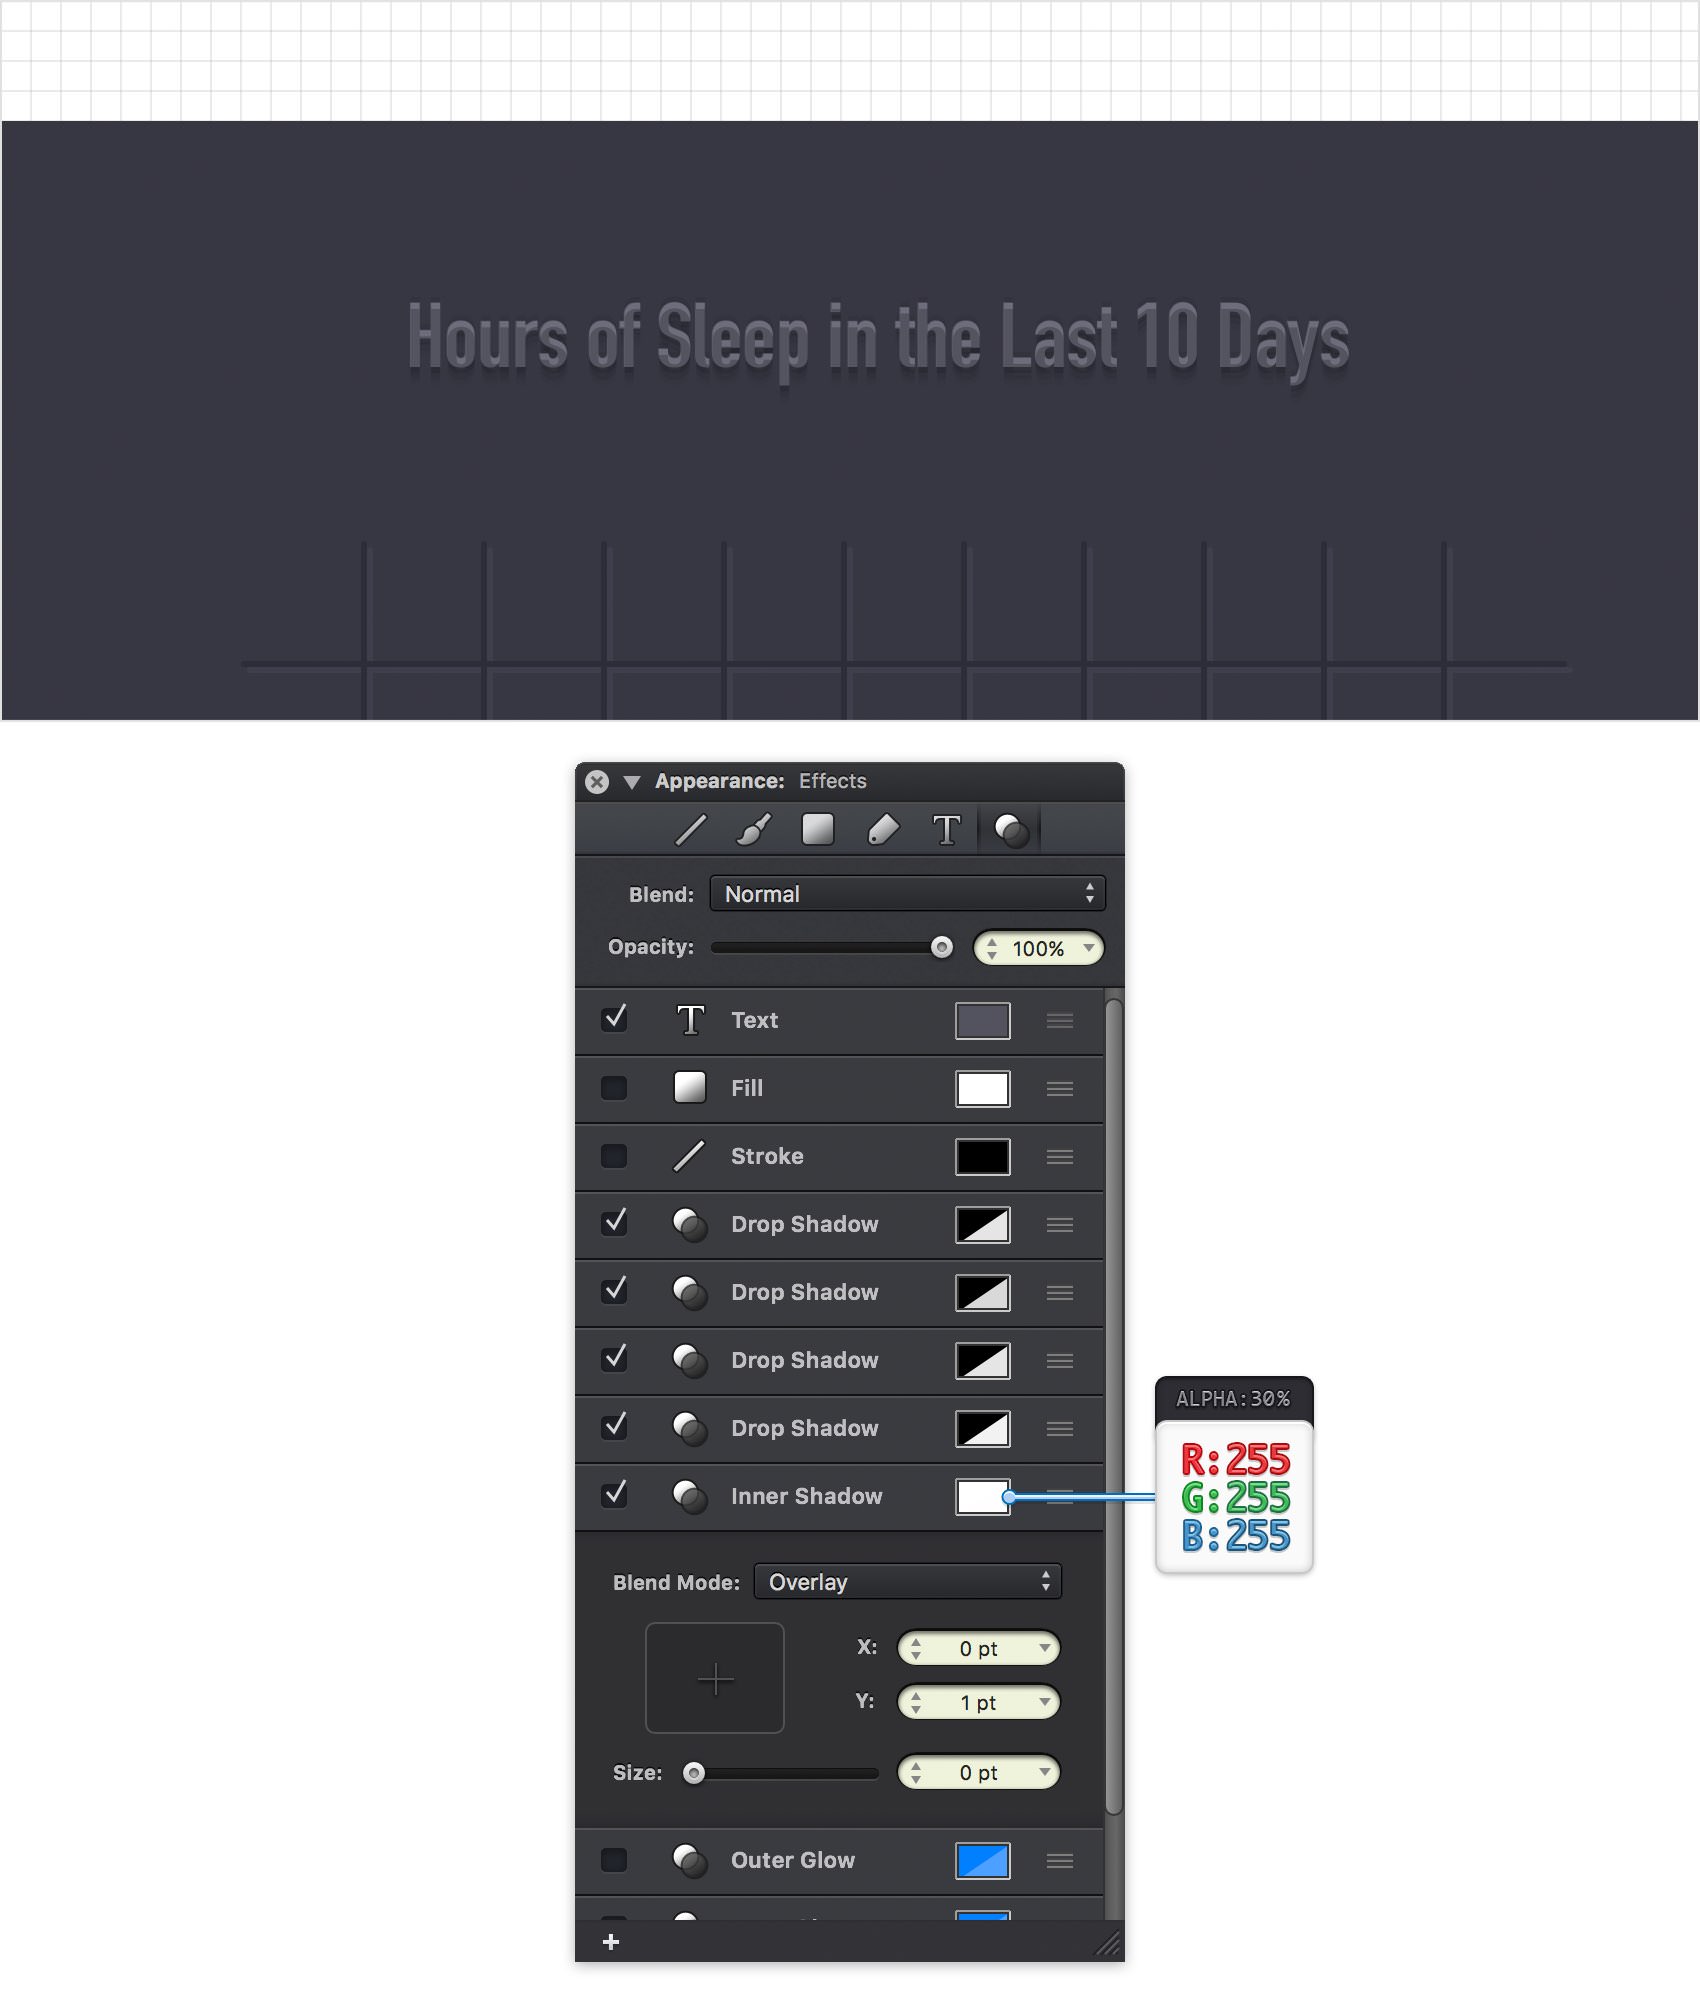
Pick the Text Tool (T), click on your canvas and then focus on the Text pane from the Appearance panel. Select the DIN Condensed font, make it Bold and set the size to 15 pt. Now, type your piece of text and place it as shown in the first image. Make sure that it stays selected and go to the Effects pane. Activate the existing Drop Shadow effect and enter the attributes shown in the following image.
Step 18
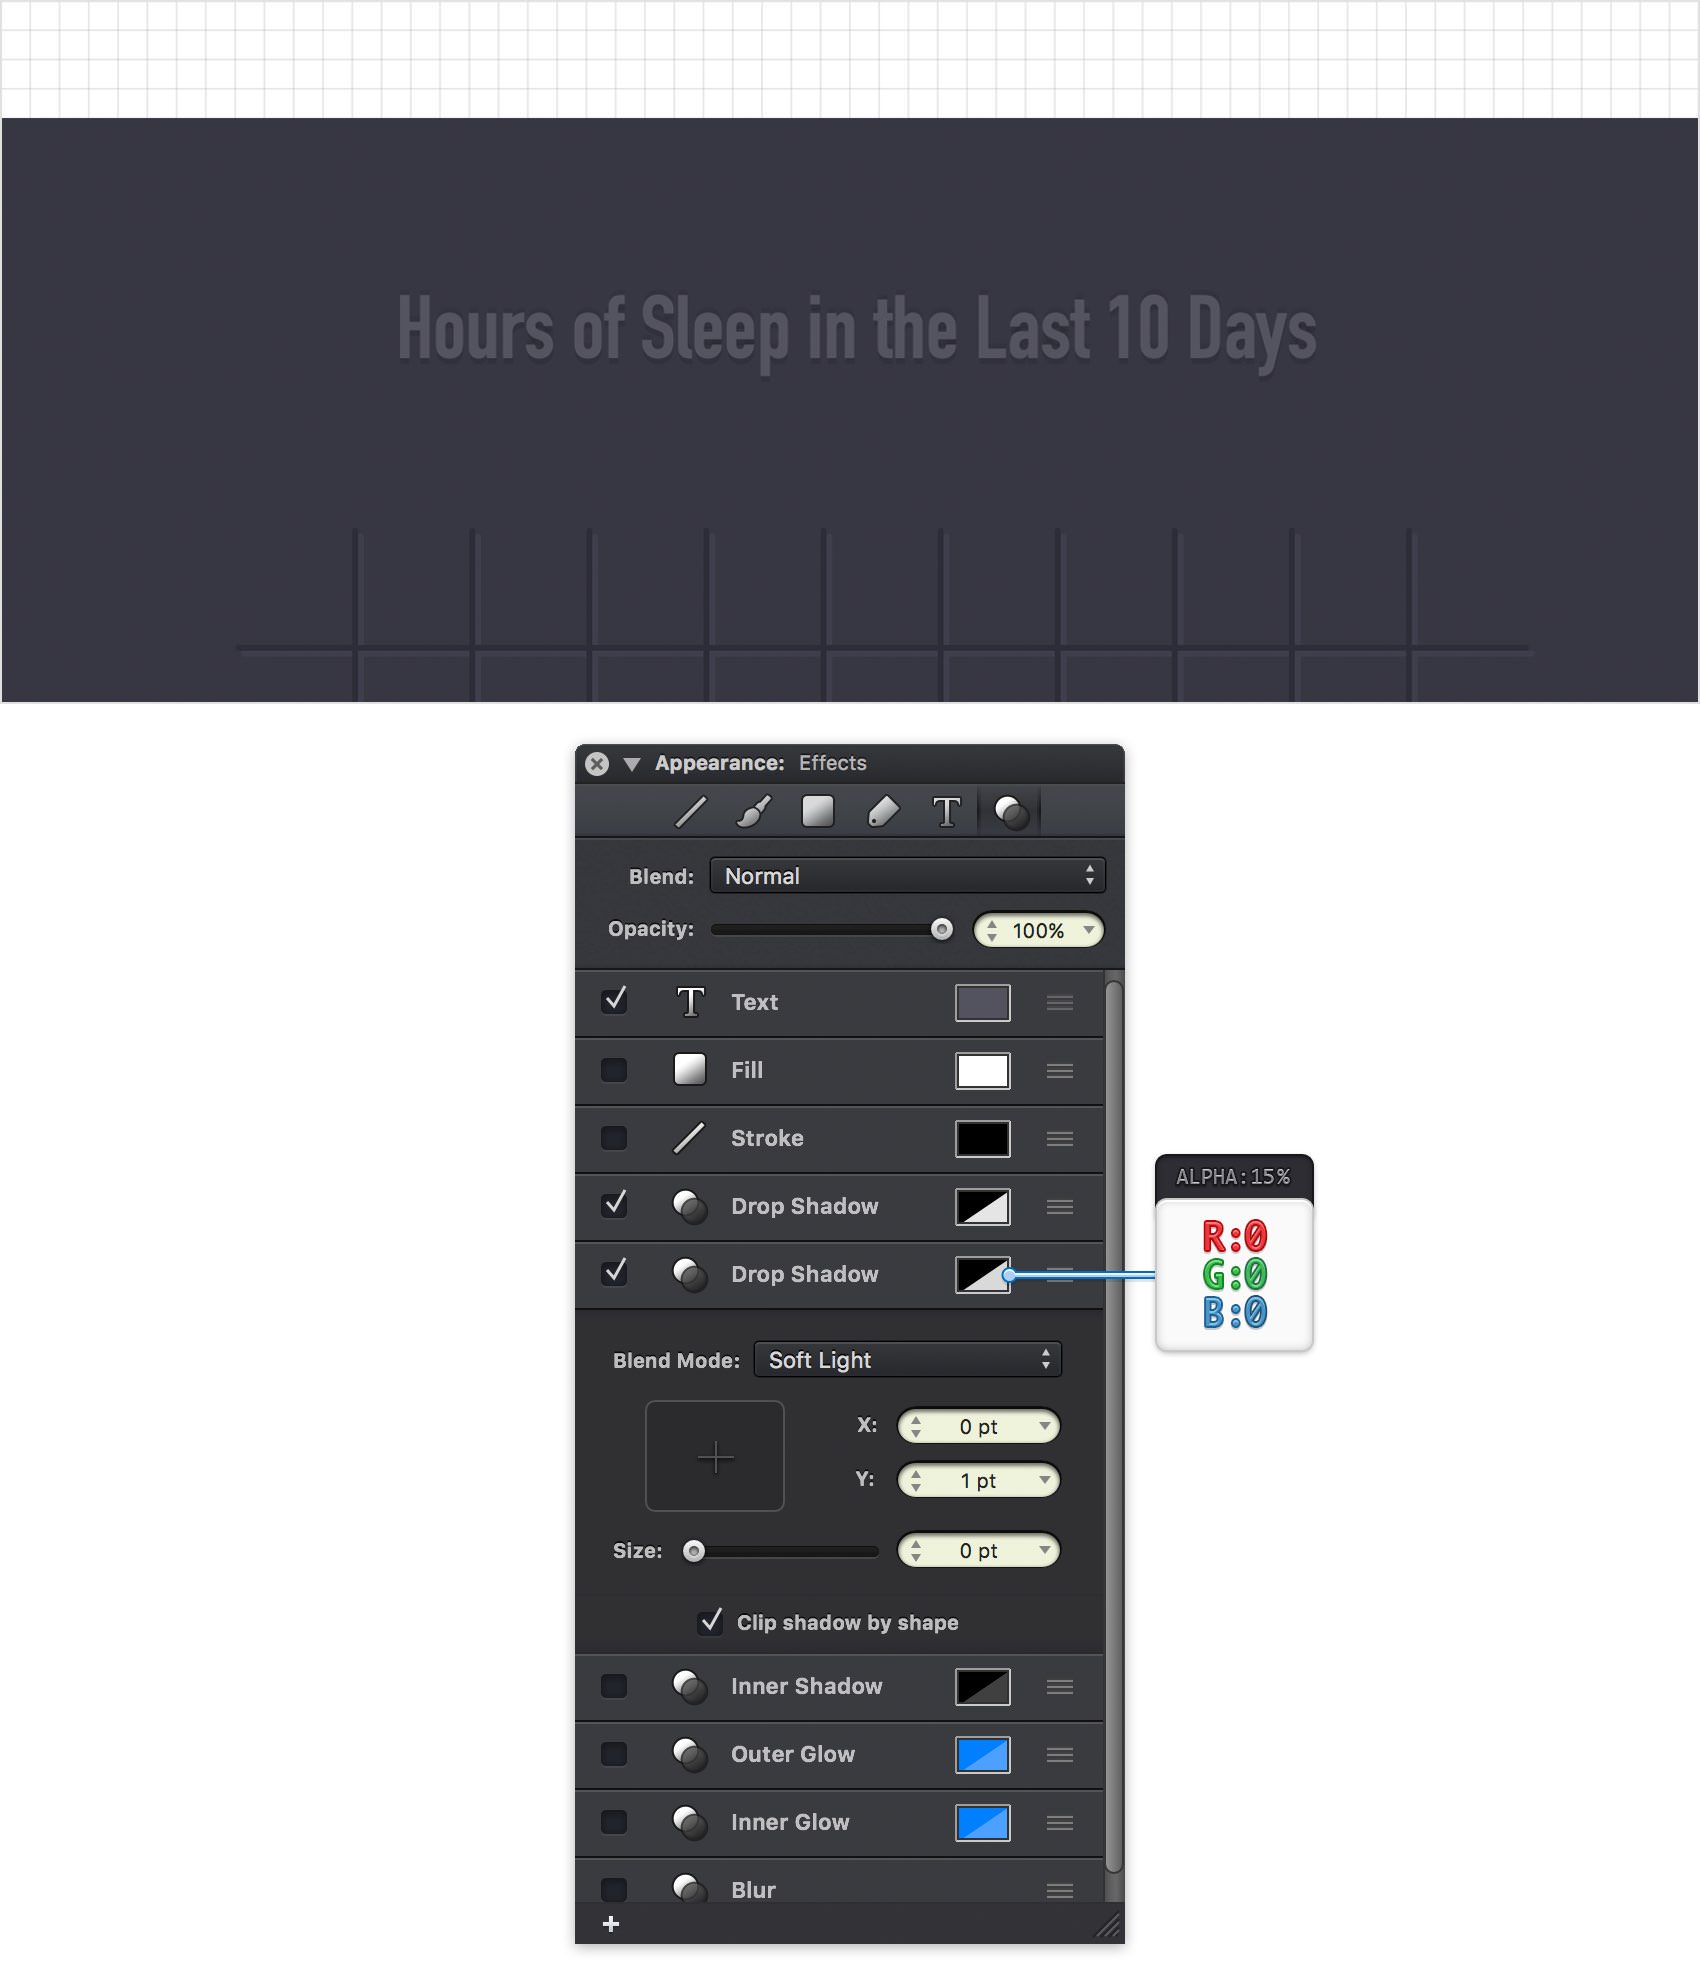
Make sure that your piece of text is still selected and keep focusing on the Effects pane. Add a second Drop Shadow, select it and enter the attributes shown in the following image.
Step 19
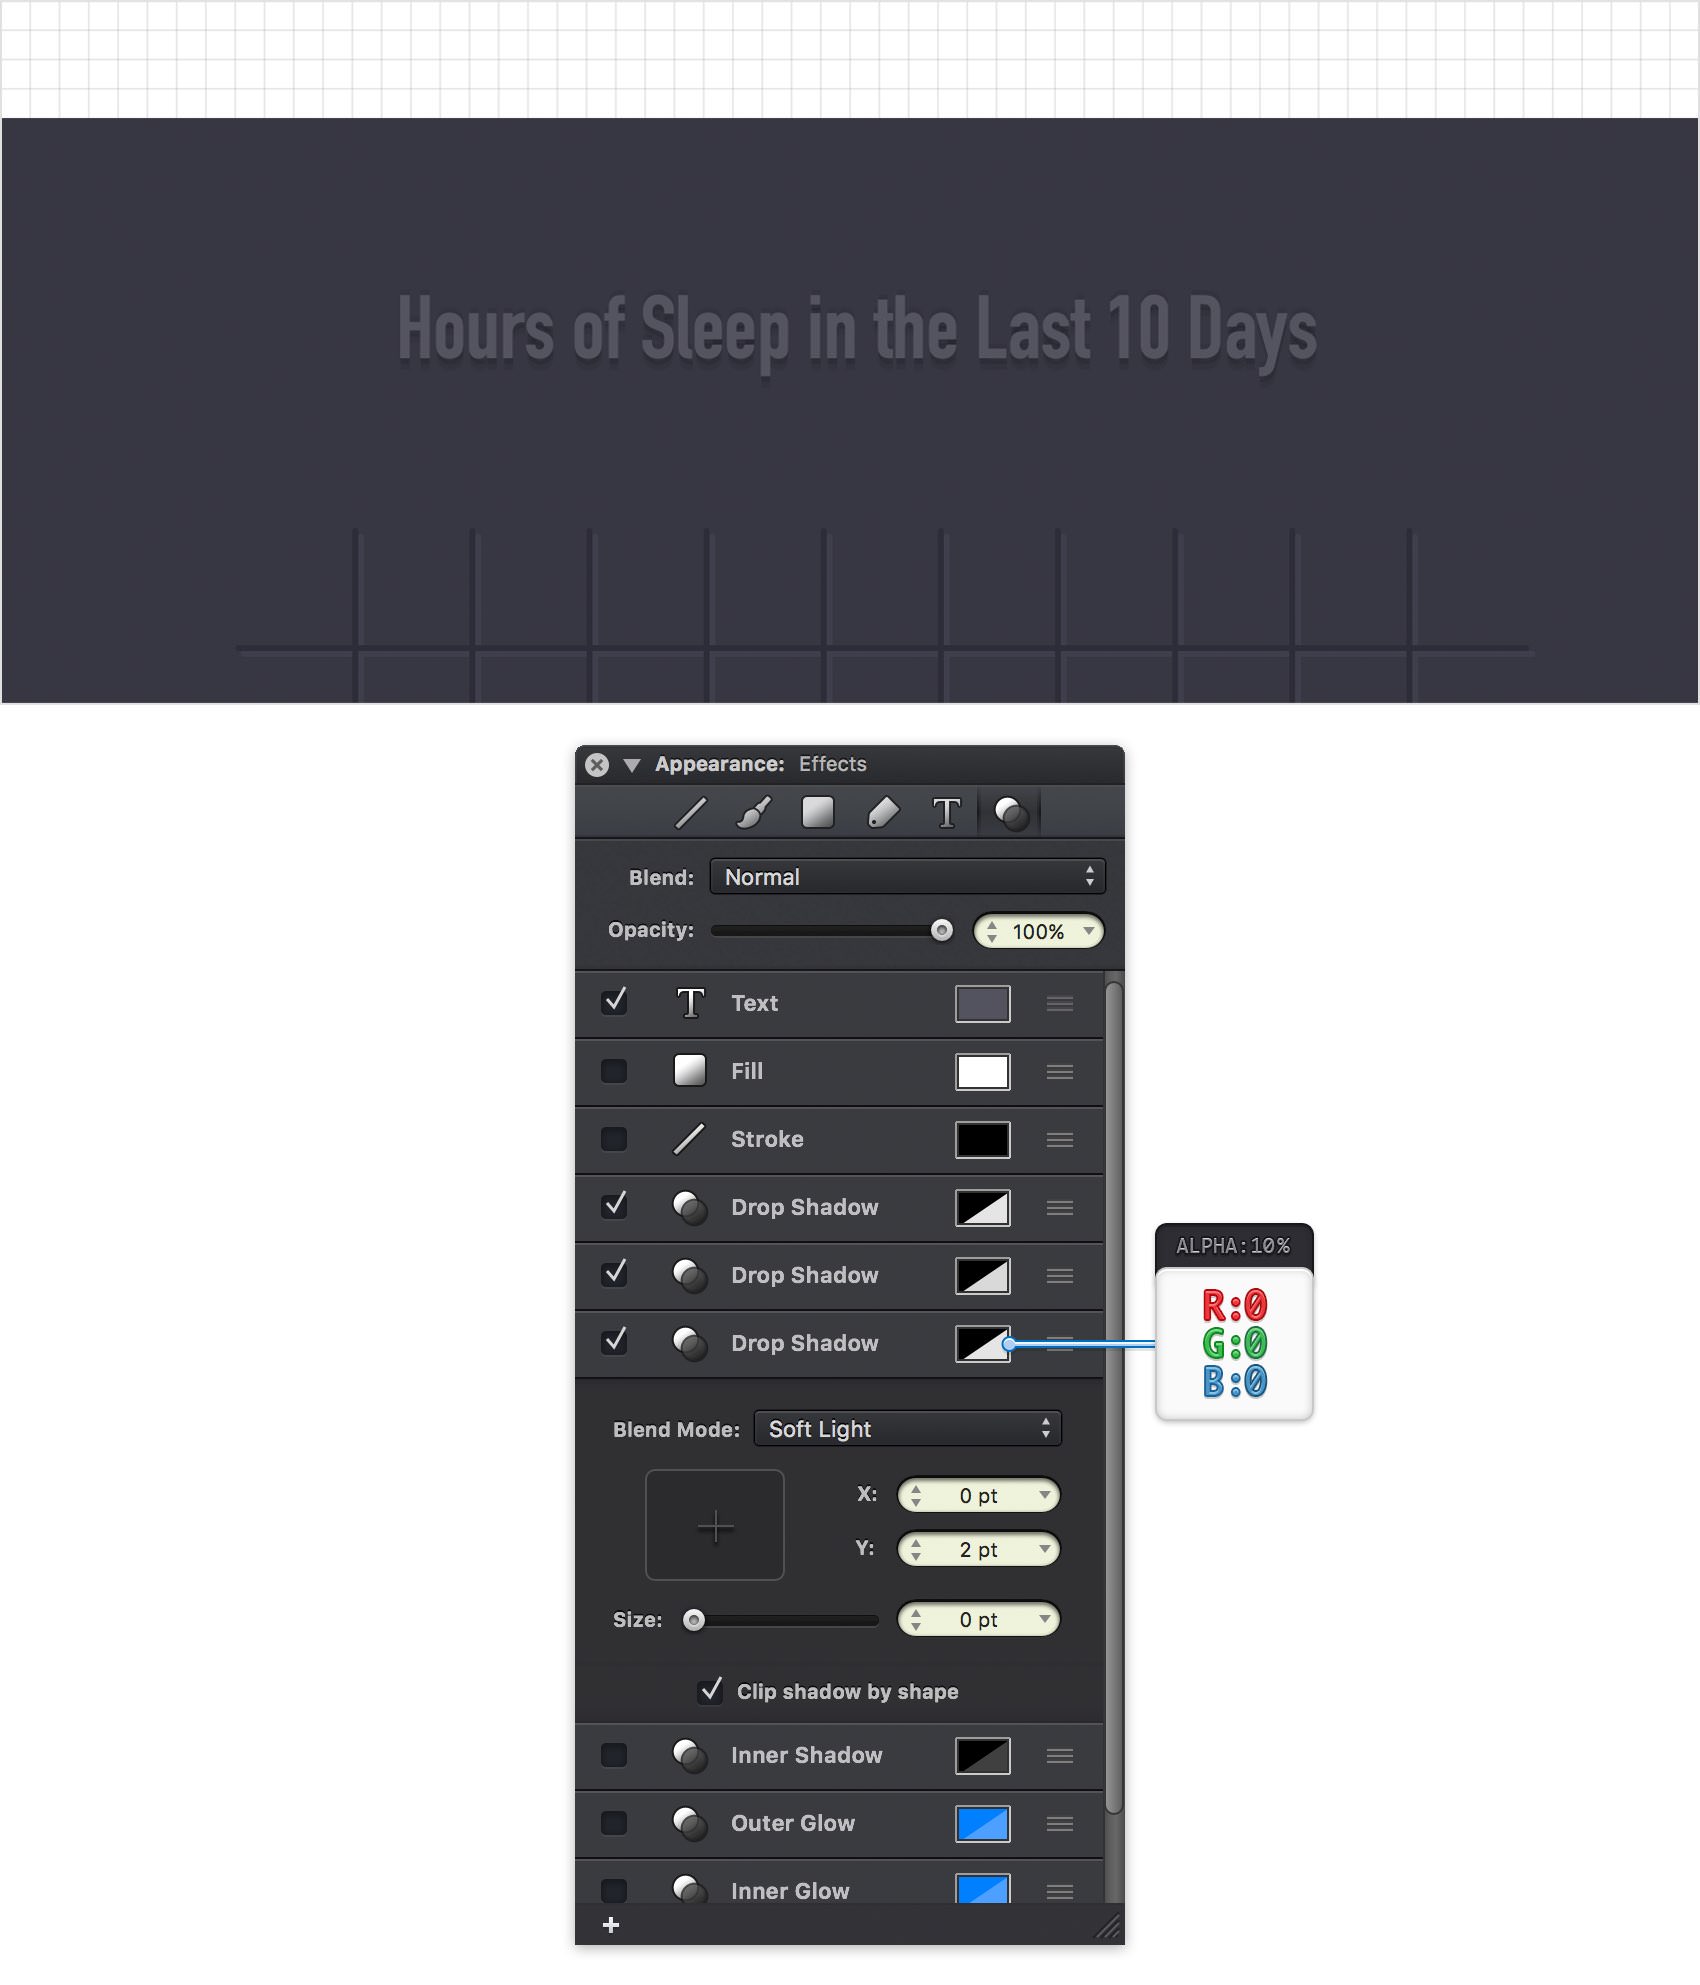
Make sure that your piece of text is still selected and keep focusing on the Effects pane. Add a third Drop Shadow, select it and enter the attributes shown in the following image.
Step 20
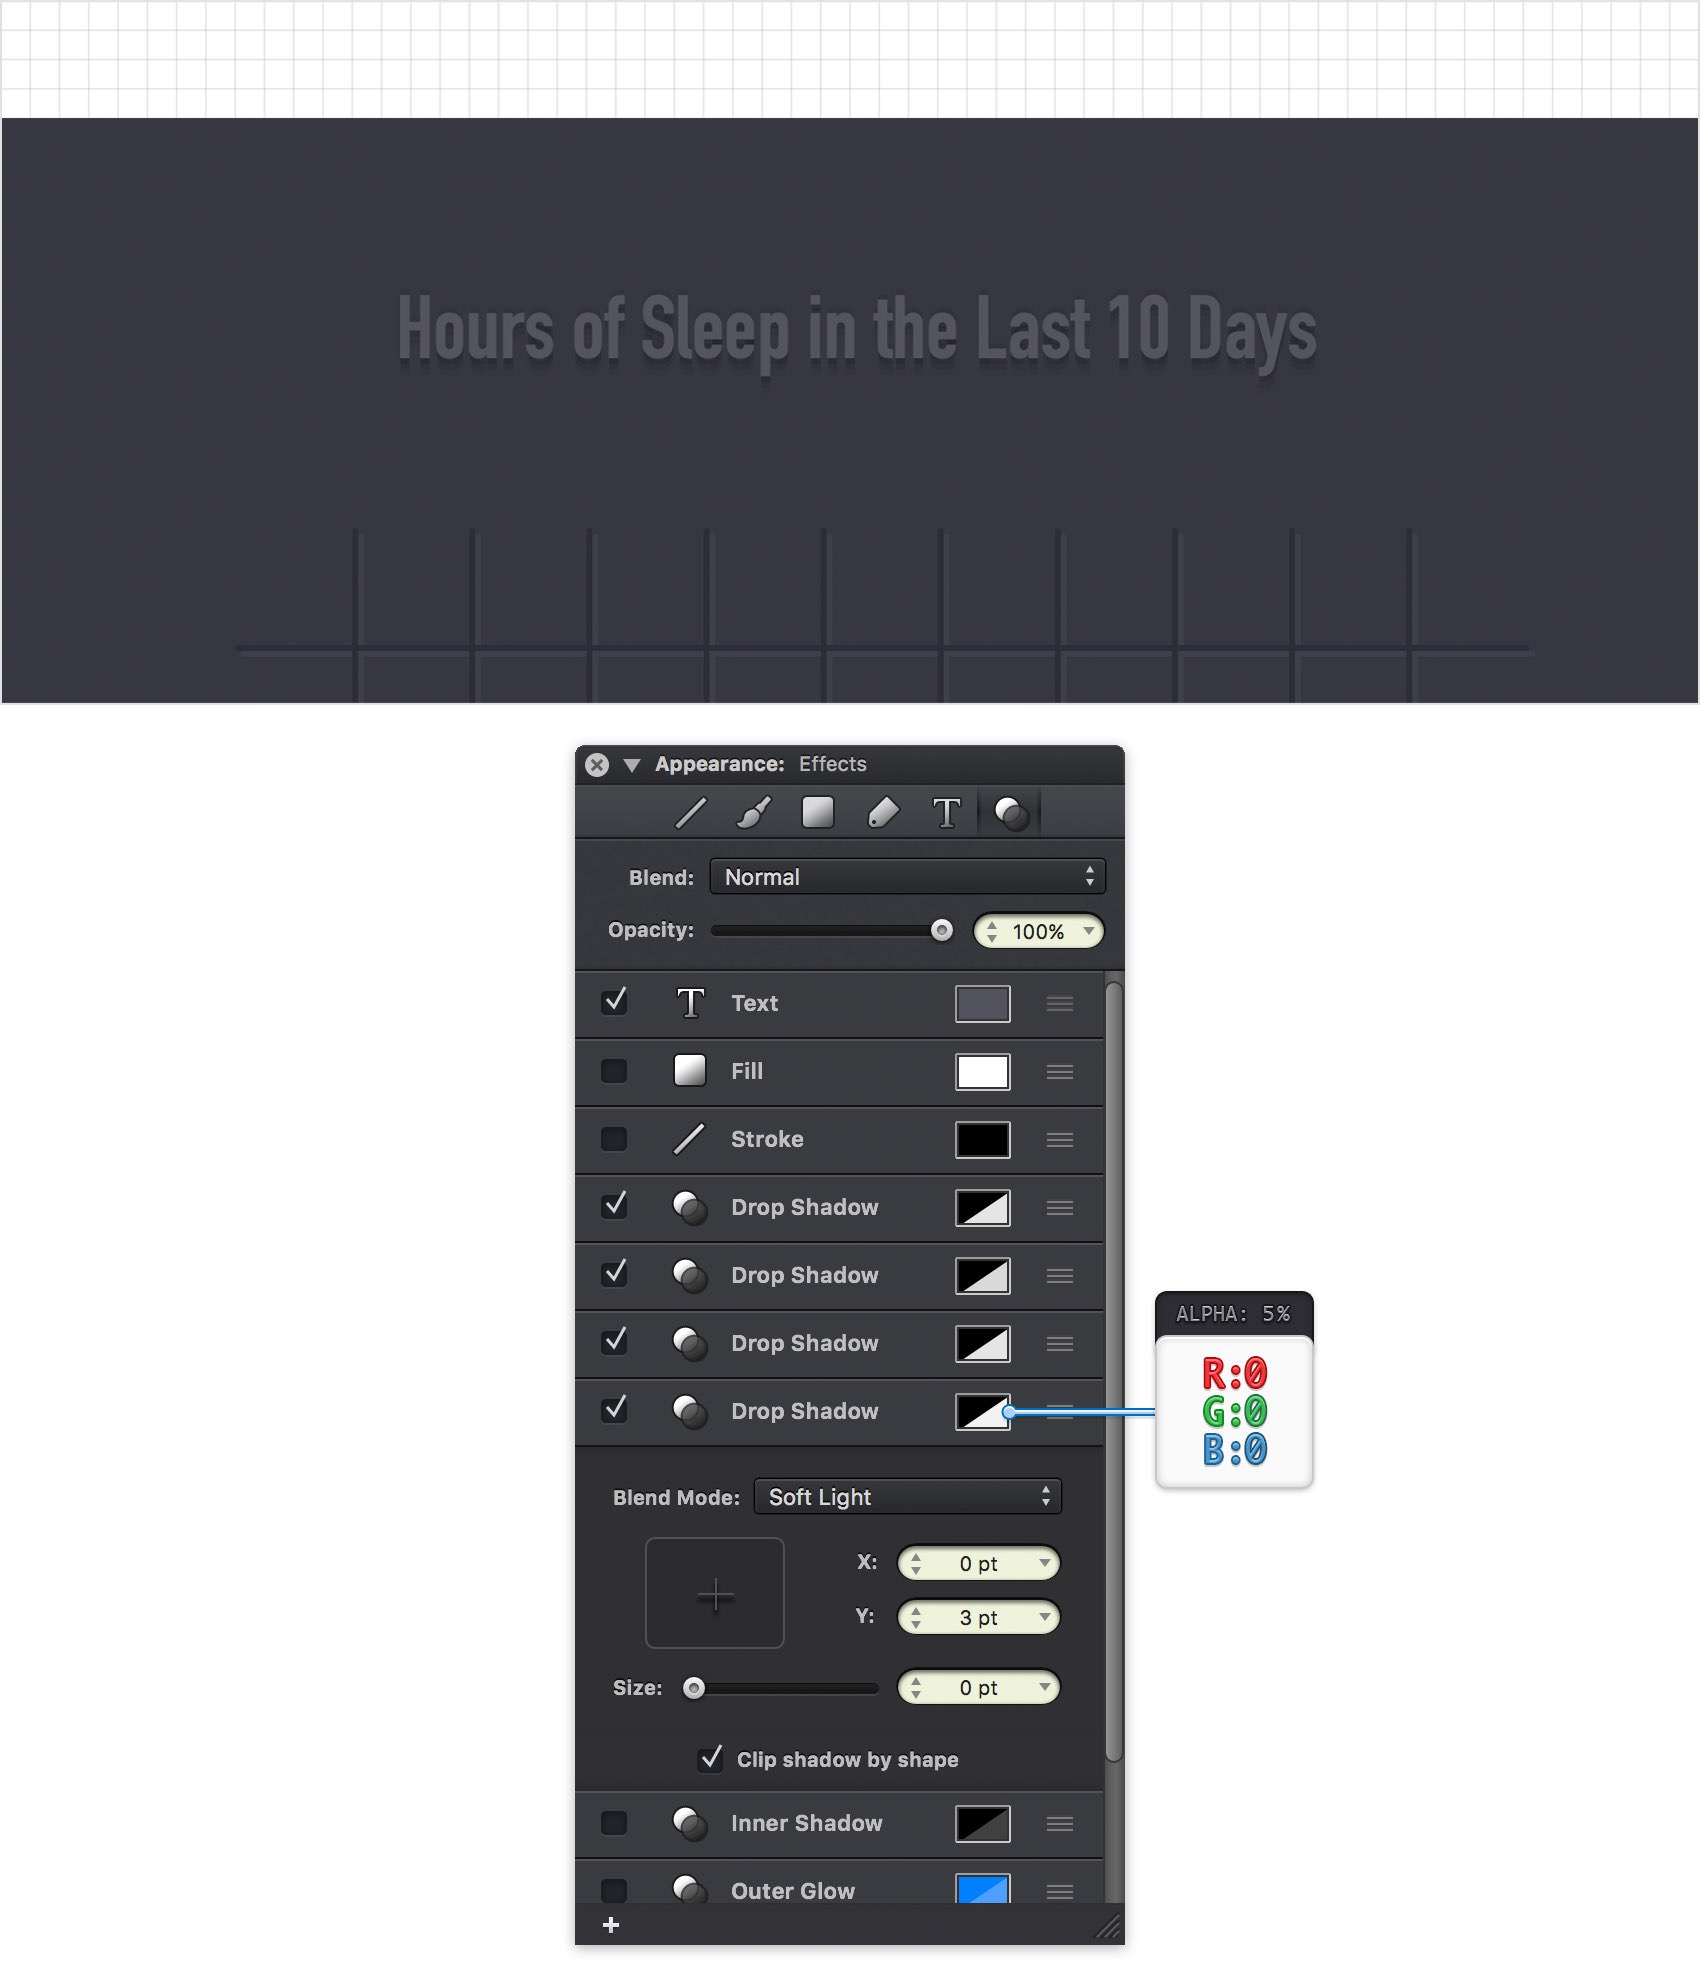
Make sure that your piece of text is still selected and keep focusing on the Effects pane. Add a fourth Drop Shadow, select it and enter the attributes shown in the following image.
Step 21
Make sure that your piece of text is still selected and keep focusing on the Effects pane. Activate the existing Inner Shadow and enter the attributes shown in the following image.
Step 22
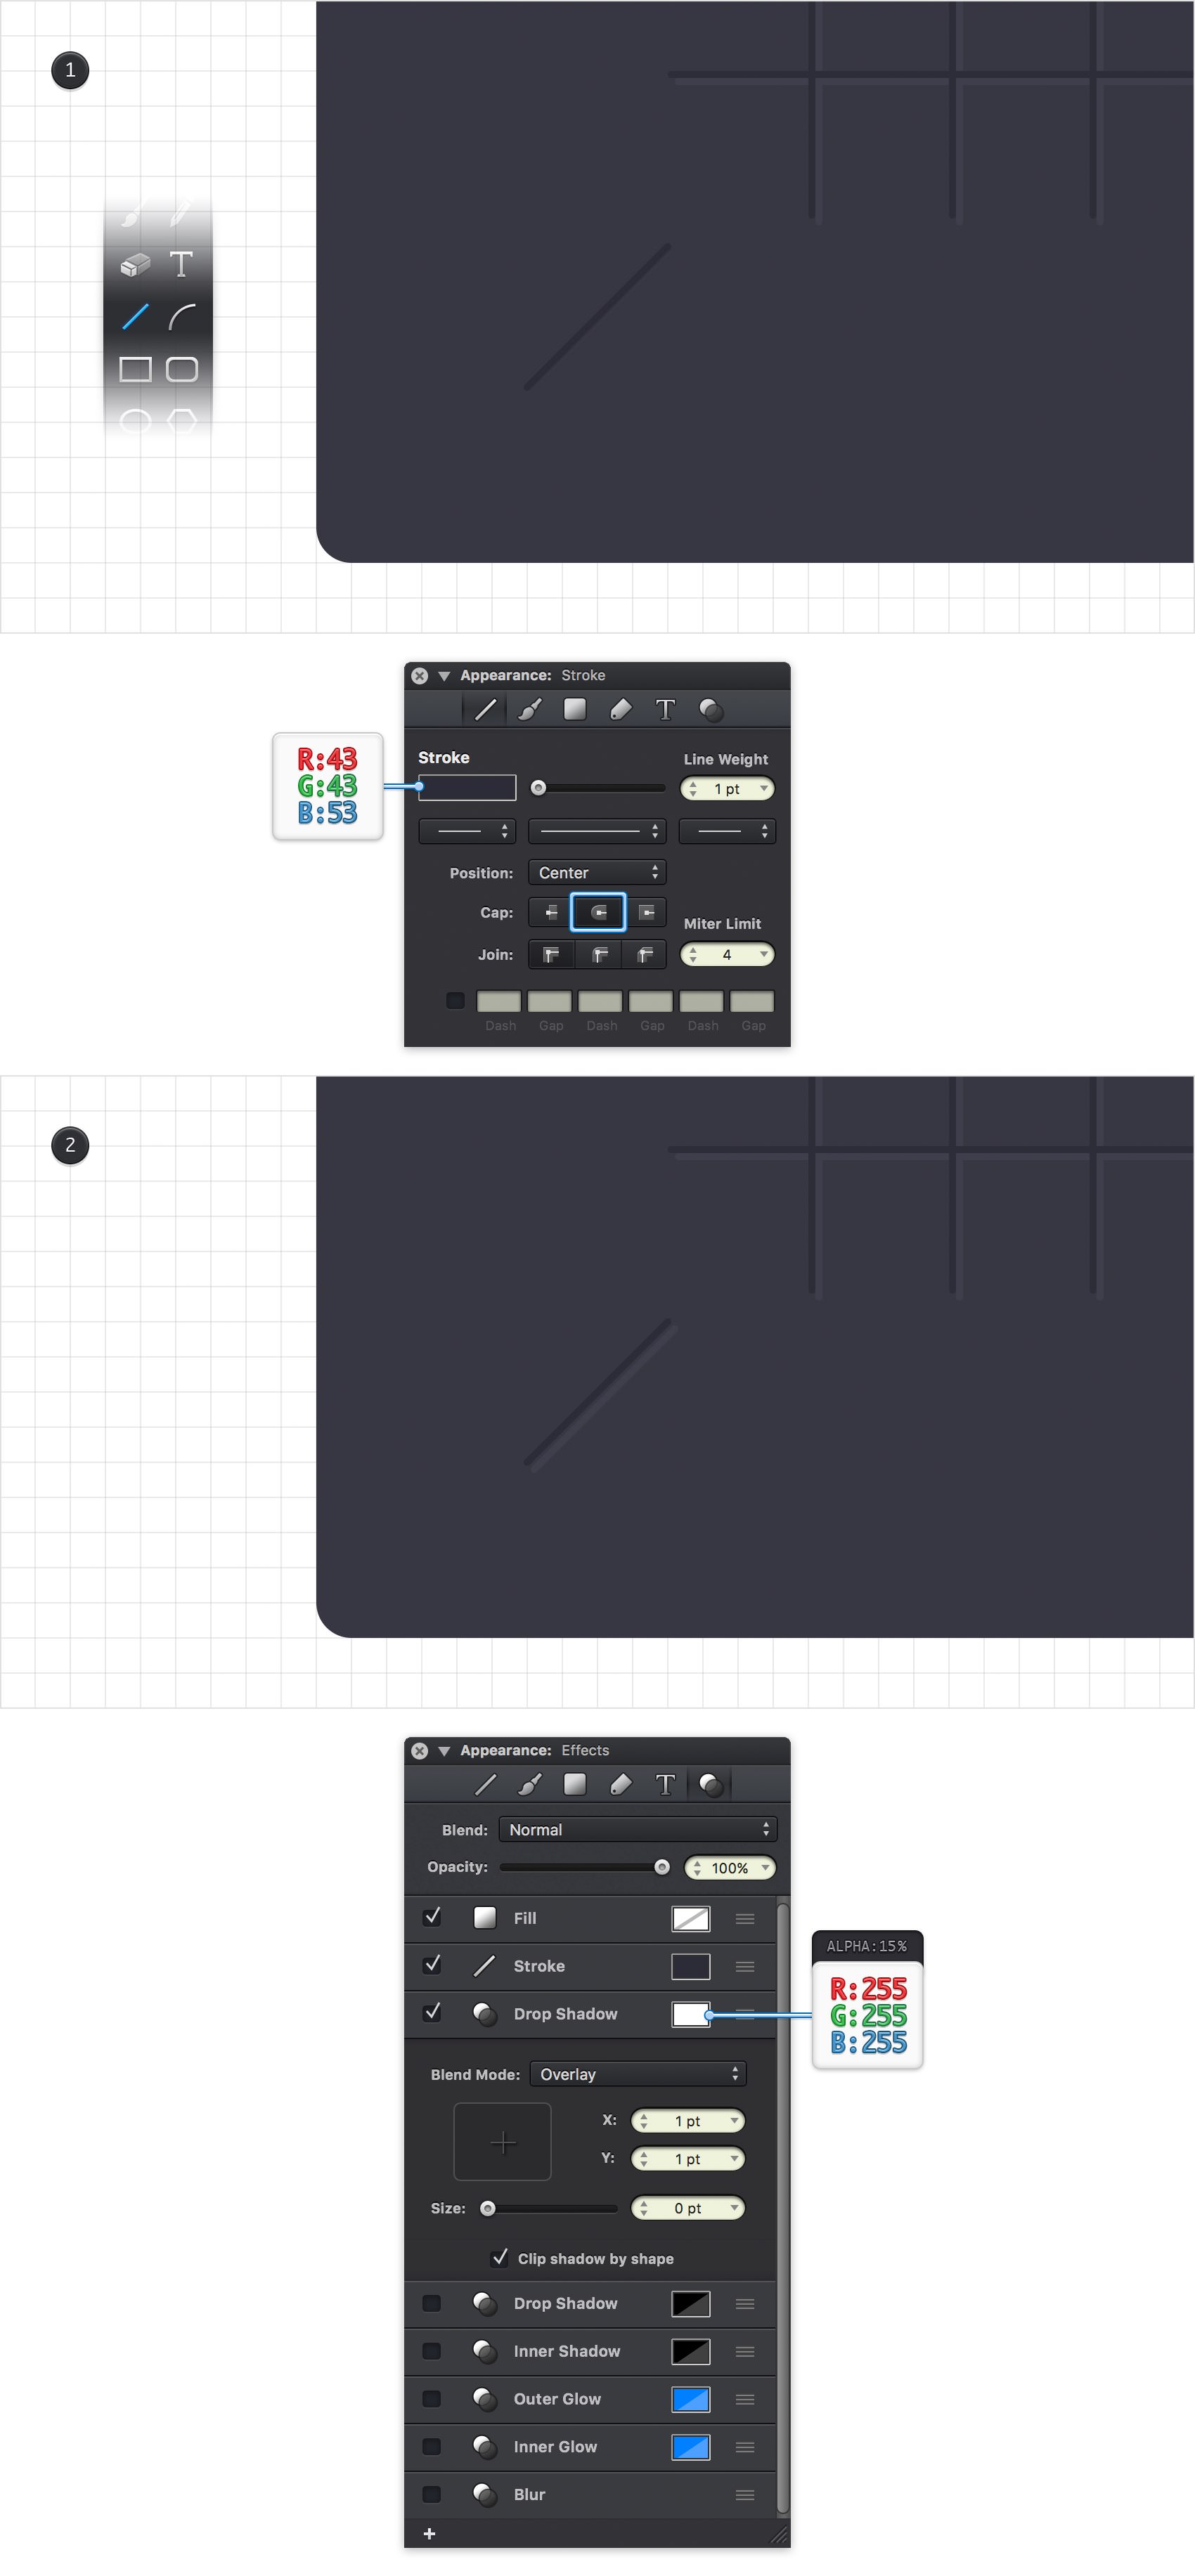
Get back to your Toolbar, make the Fill invisible and then set the Stroke color to R=43 G=43 B=53.
Using the Line Tool (L), create an oblique path as shown in the first image. Make sure that it stays selected and focus on the Stroke pane. Check the Round Cap button and make sure that the Line Weight slider is set to 1 pt and then move to the Effects pane. Activate the existing Drop Shadow effect and enter the attributes shown in the following image.
Step 23
Get back to your Toolbar, make the Stroke invisible and set the Fill color to R=83 G=83 B=94.
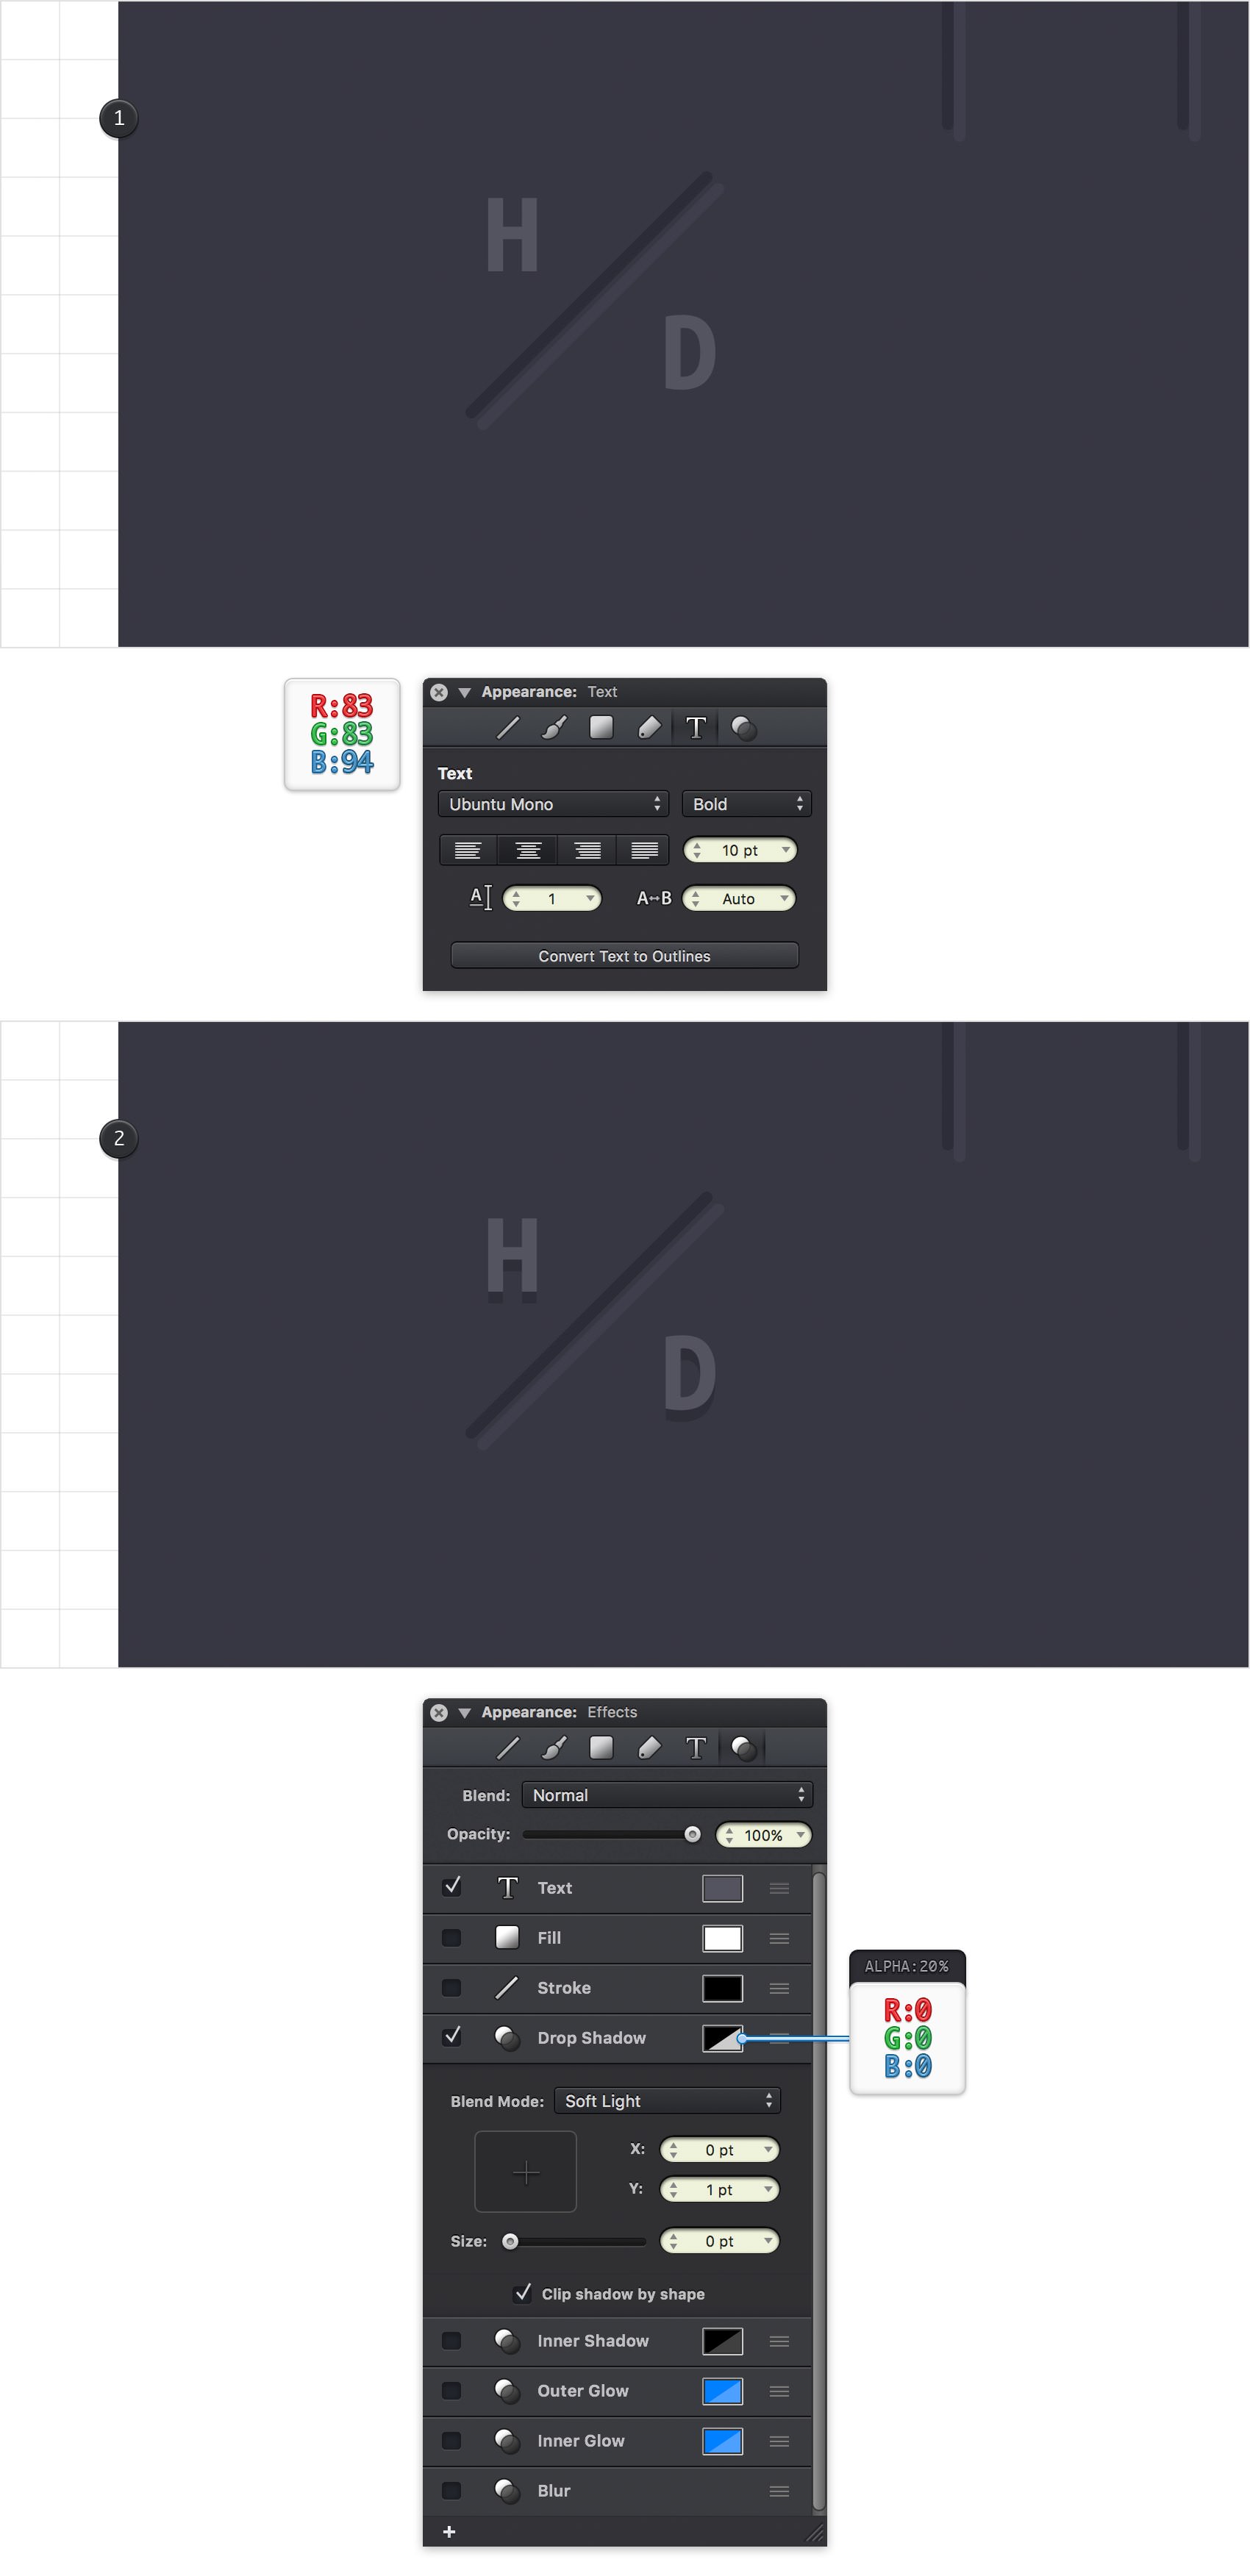
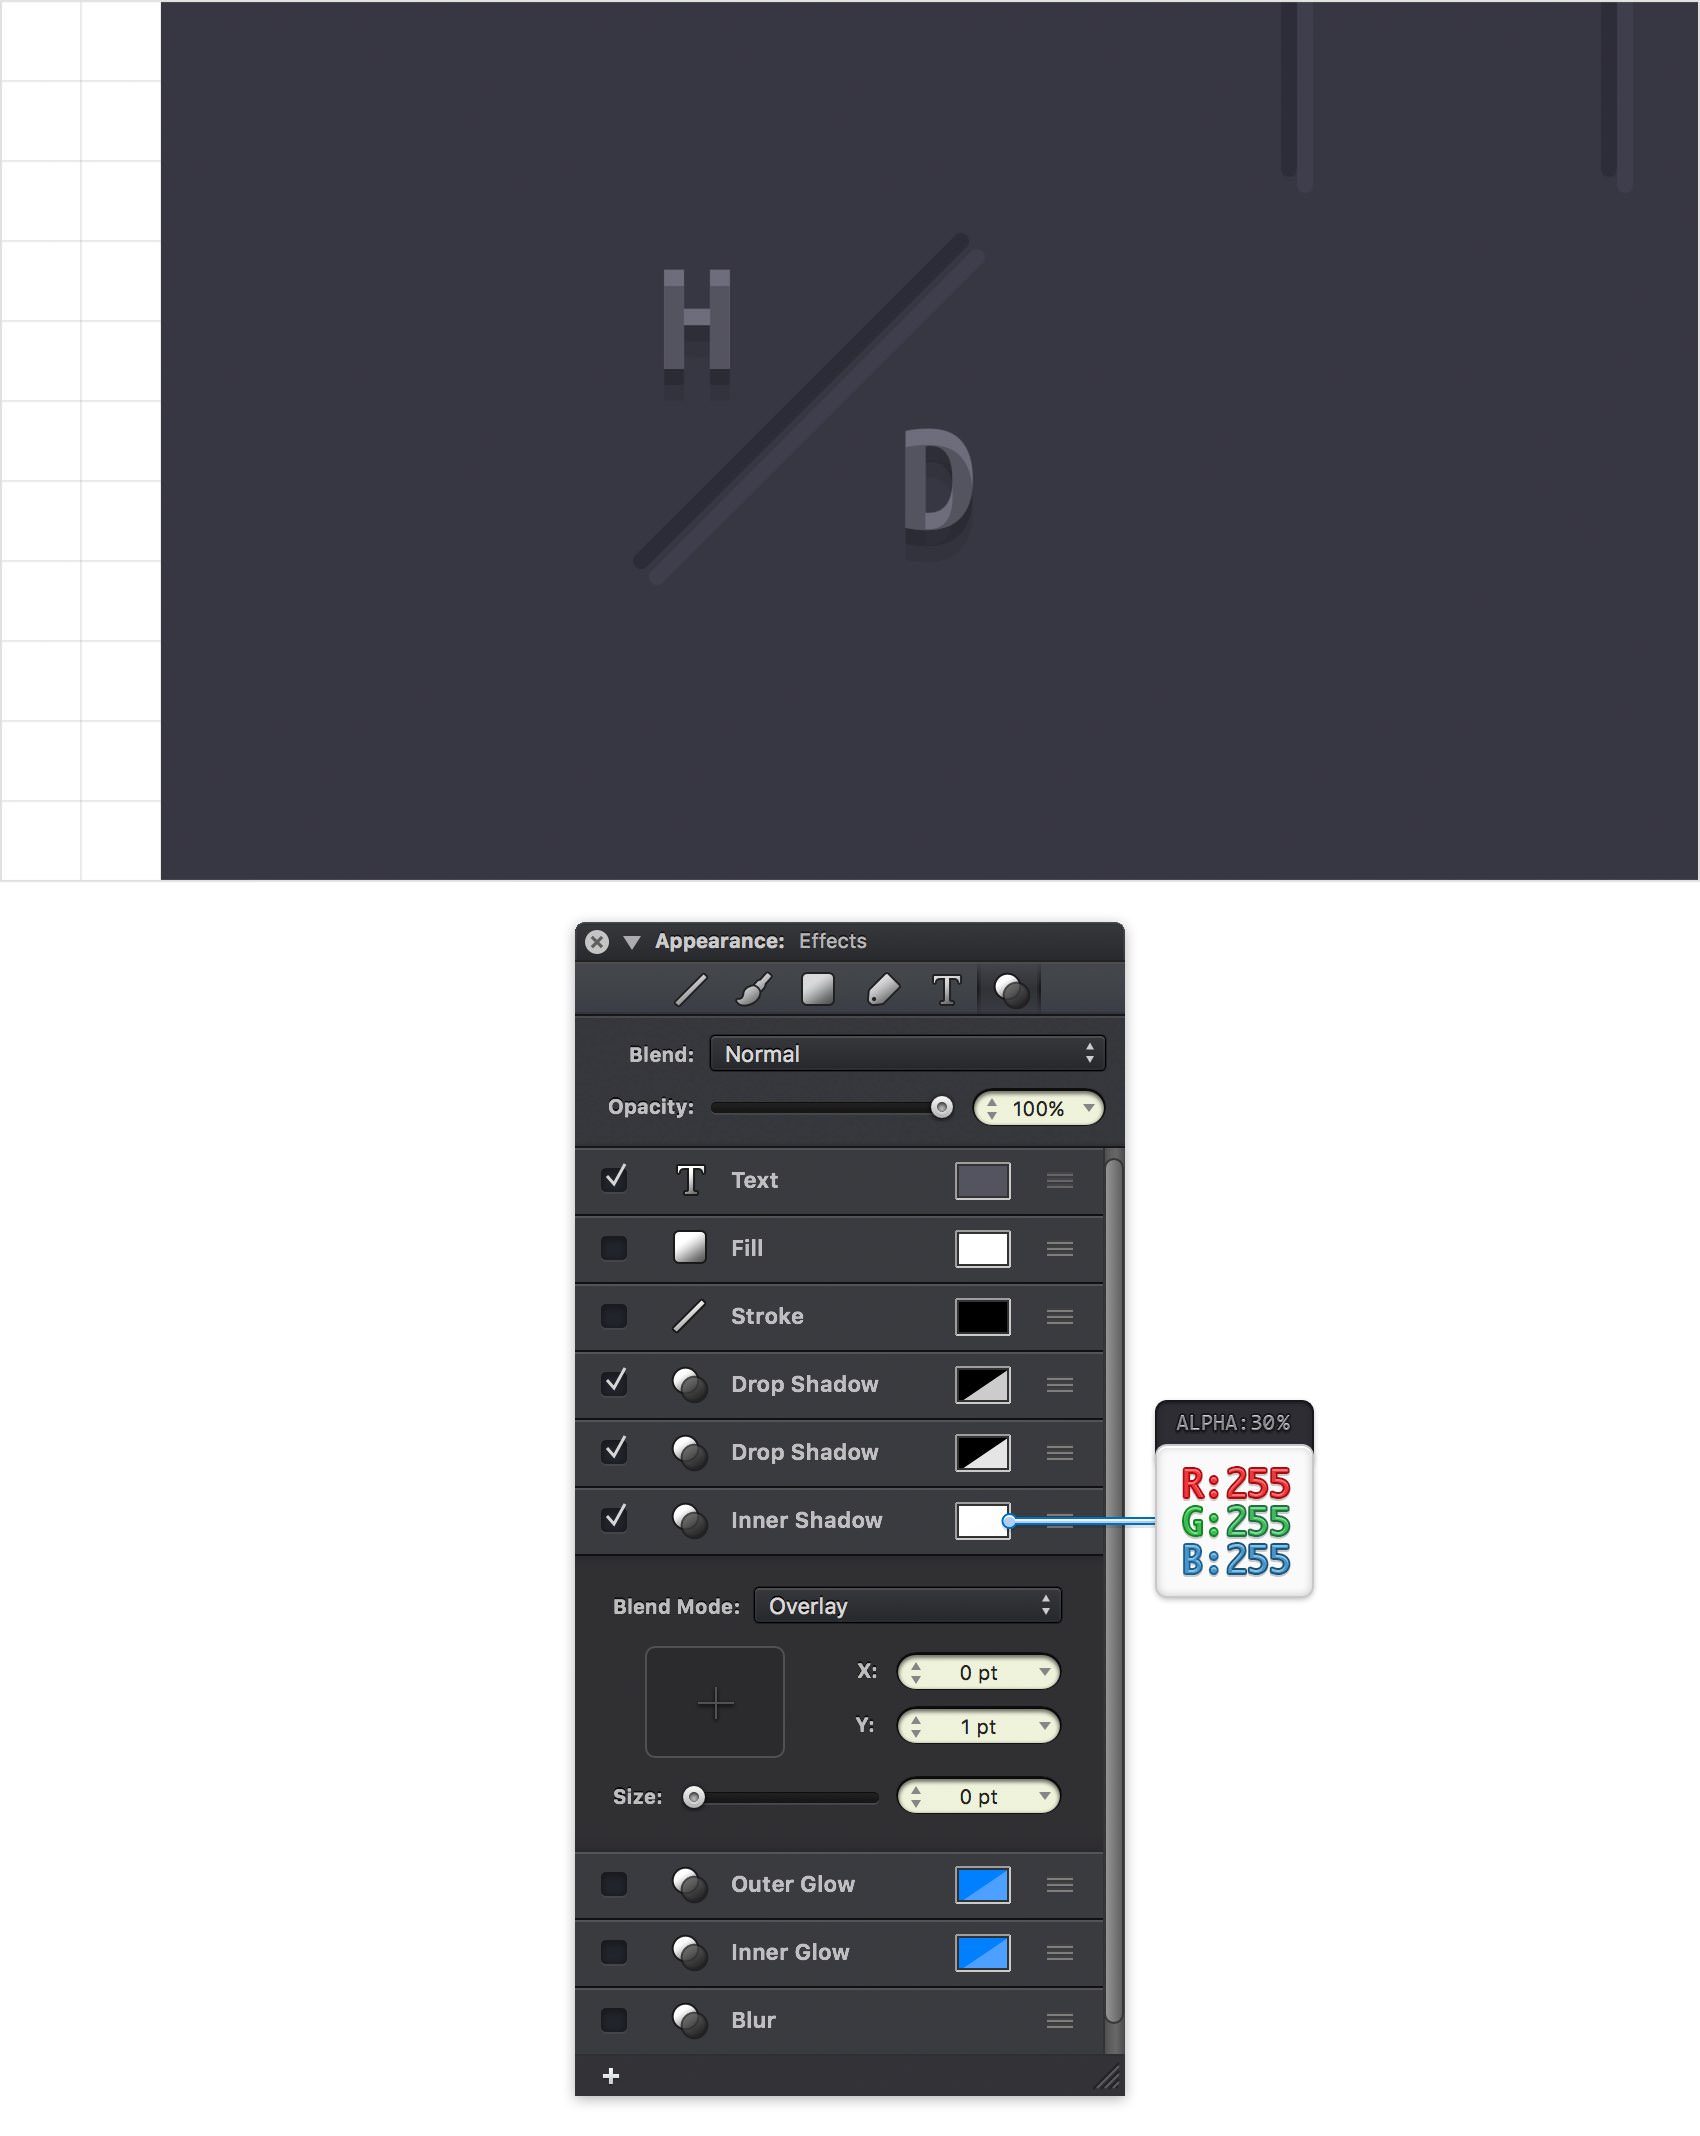
Pick the Text Tool (T) and add the two letters shown in the first image. This time use the Ubuntu Mono font with the size set to 10 pt and don't forget to make it Bold. Make sure that both letters are selected and focus on the Effects pane. Activate the existing Drop Shadow and enter the attributes shown in the following image.
Step 24
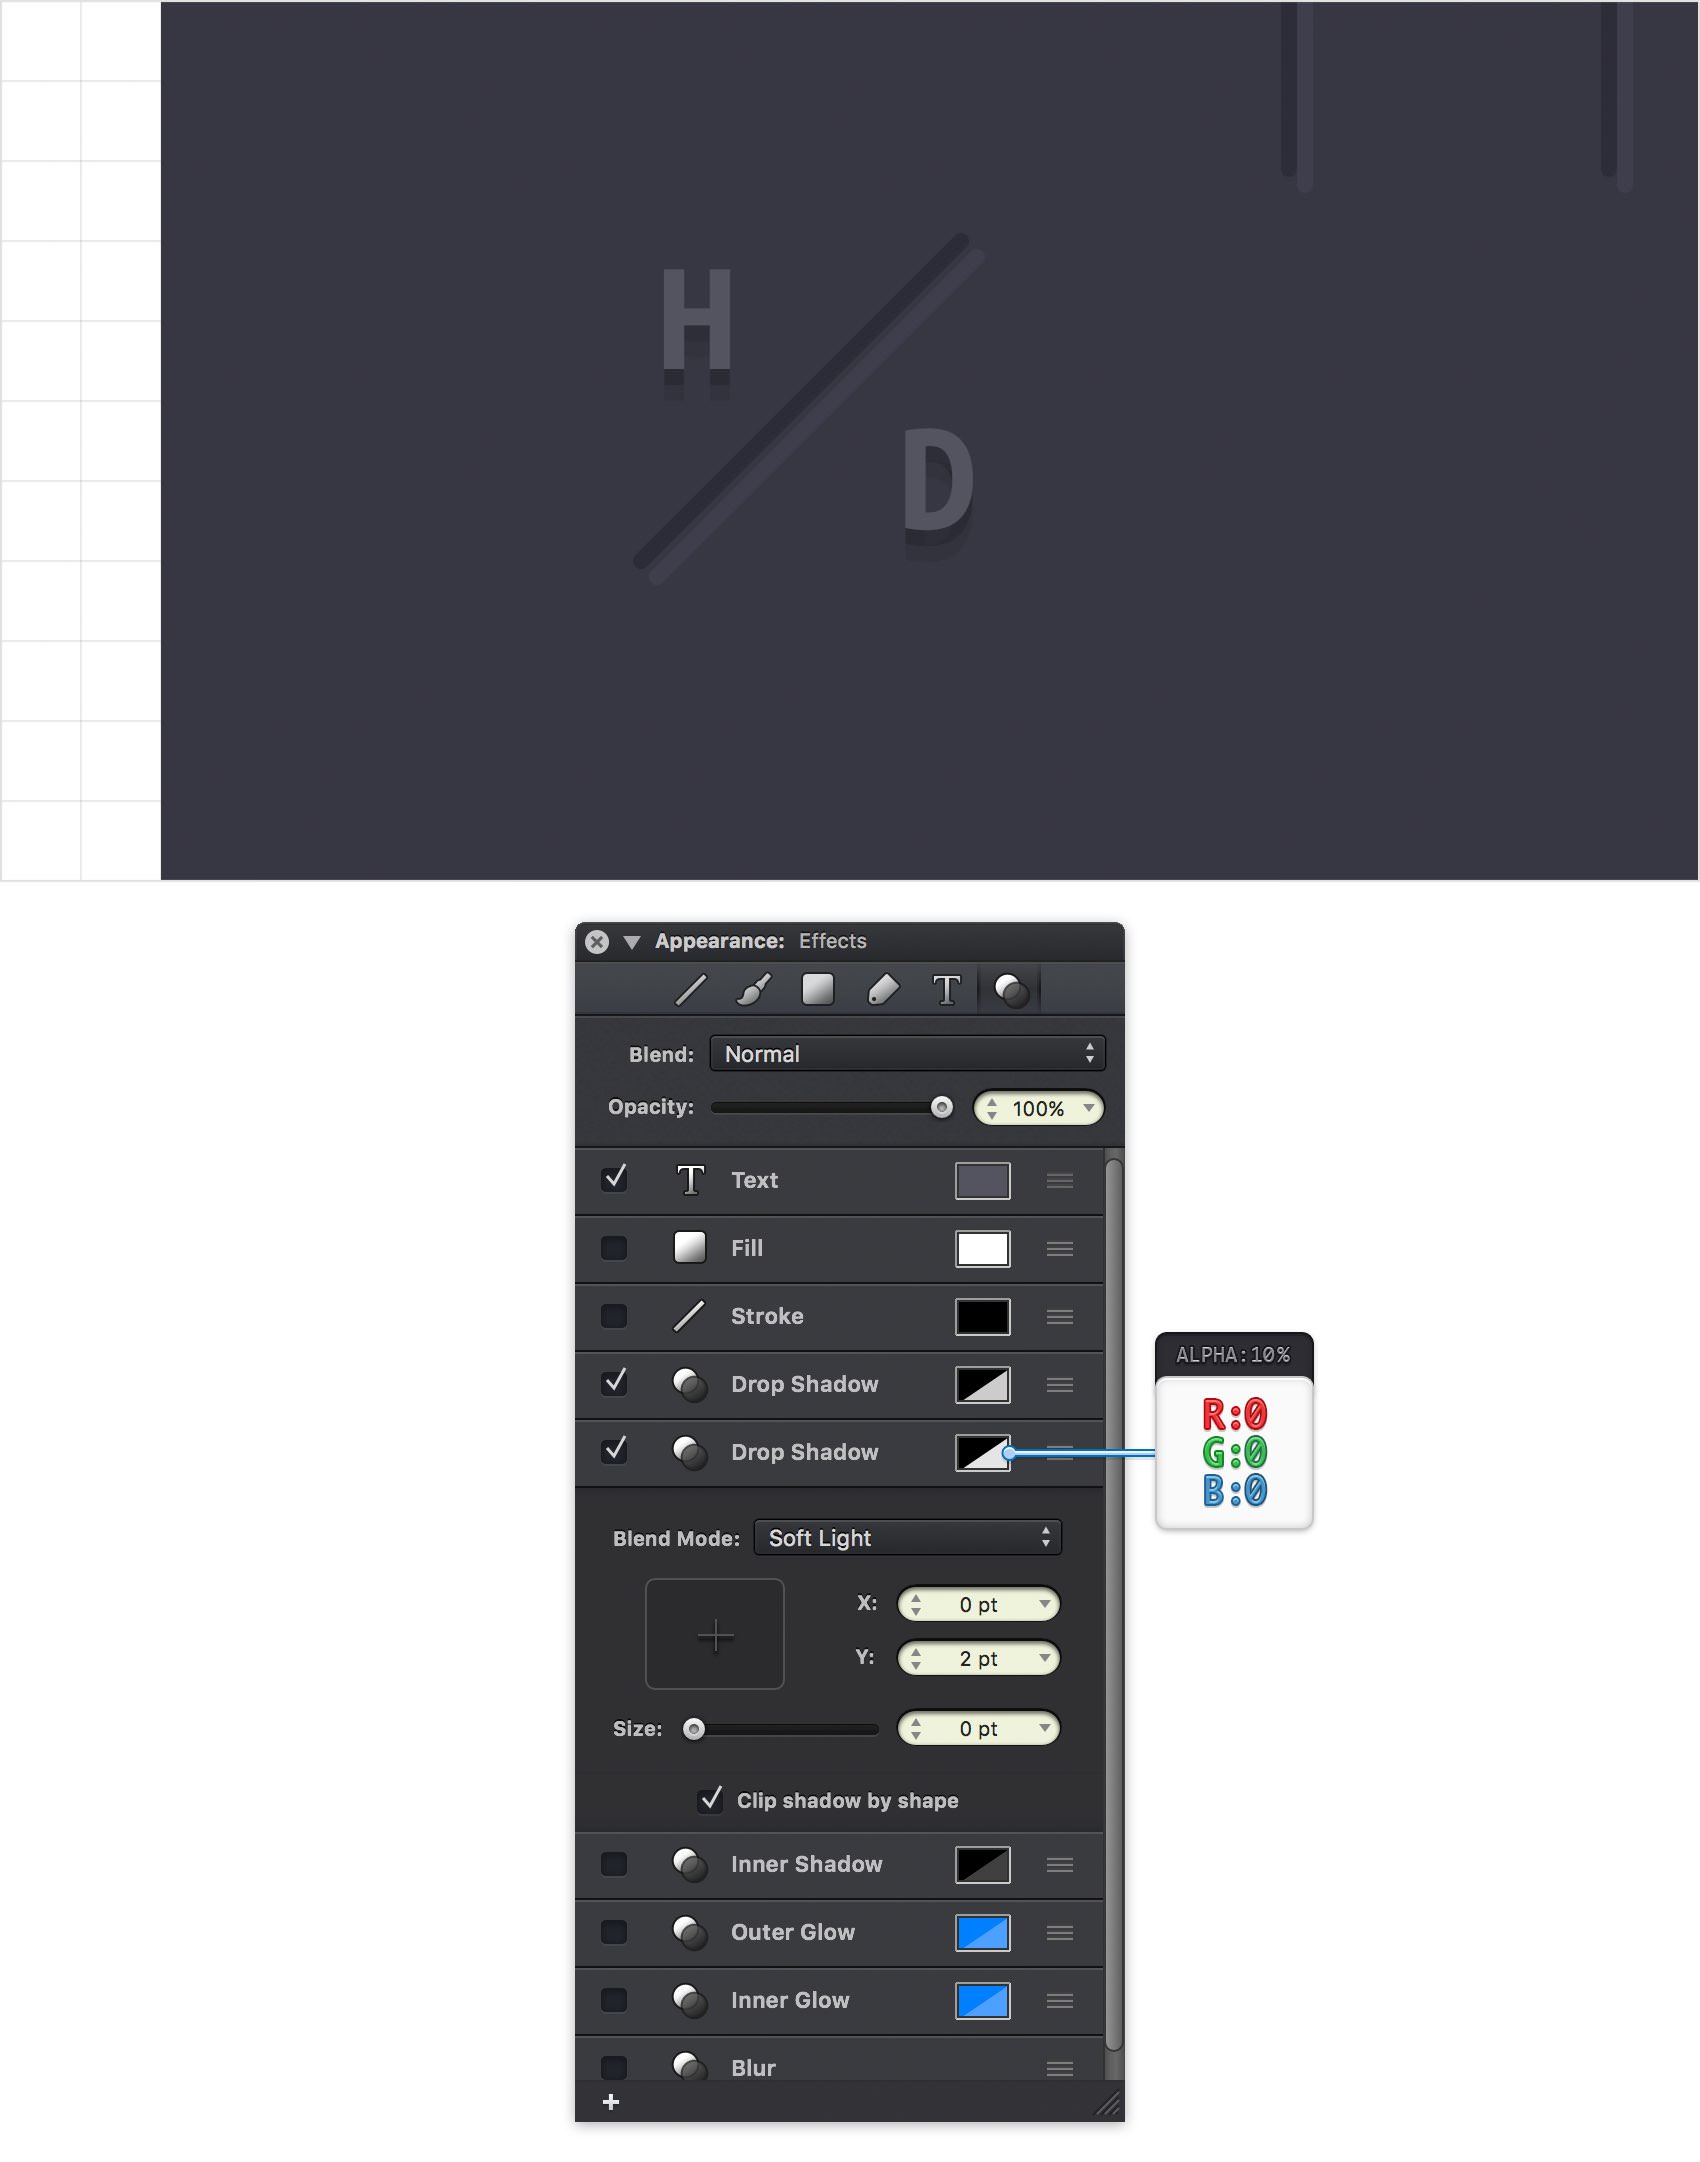
Make sure that your two letters are still selected and keep focusing on the Effects pane. Add a second Drop Shadow, select it and enter the attributes shown in the following image.
Step 25
Make sure that your two letters are still selected and keep focusing on the Effects pane. Activate the existing Inner Shadow, select it and enter the attributes shown in the following image.
Step 26
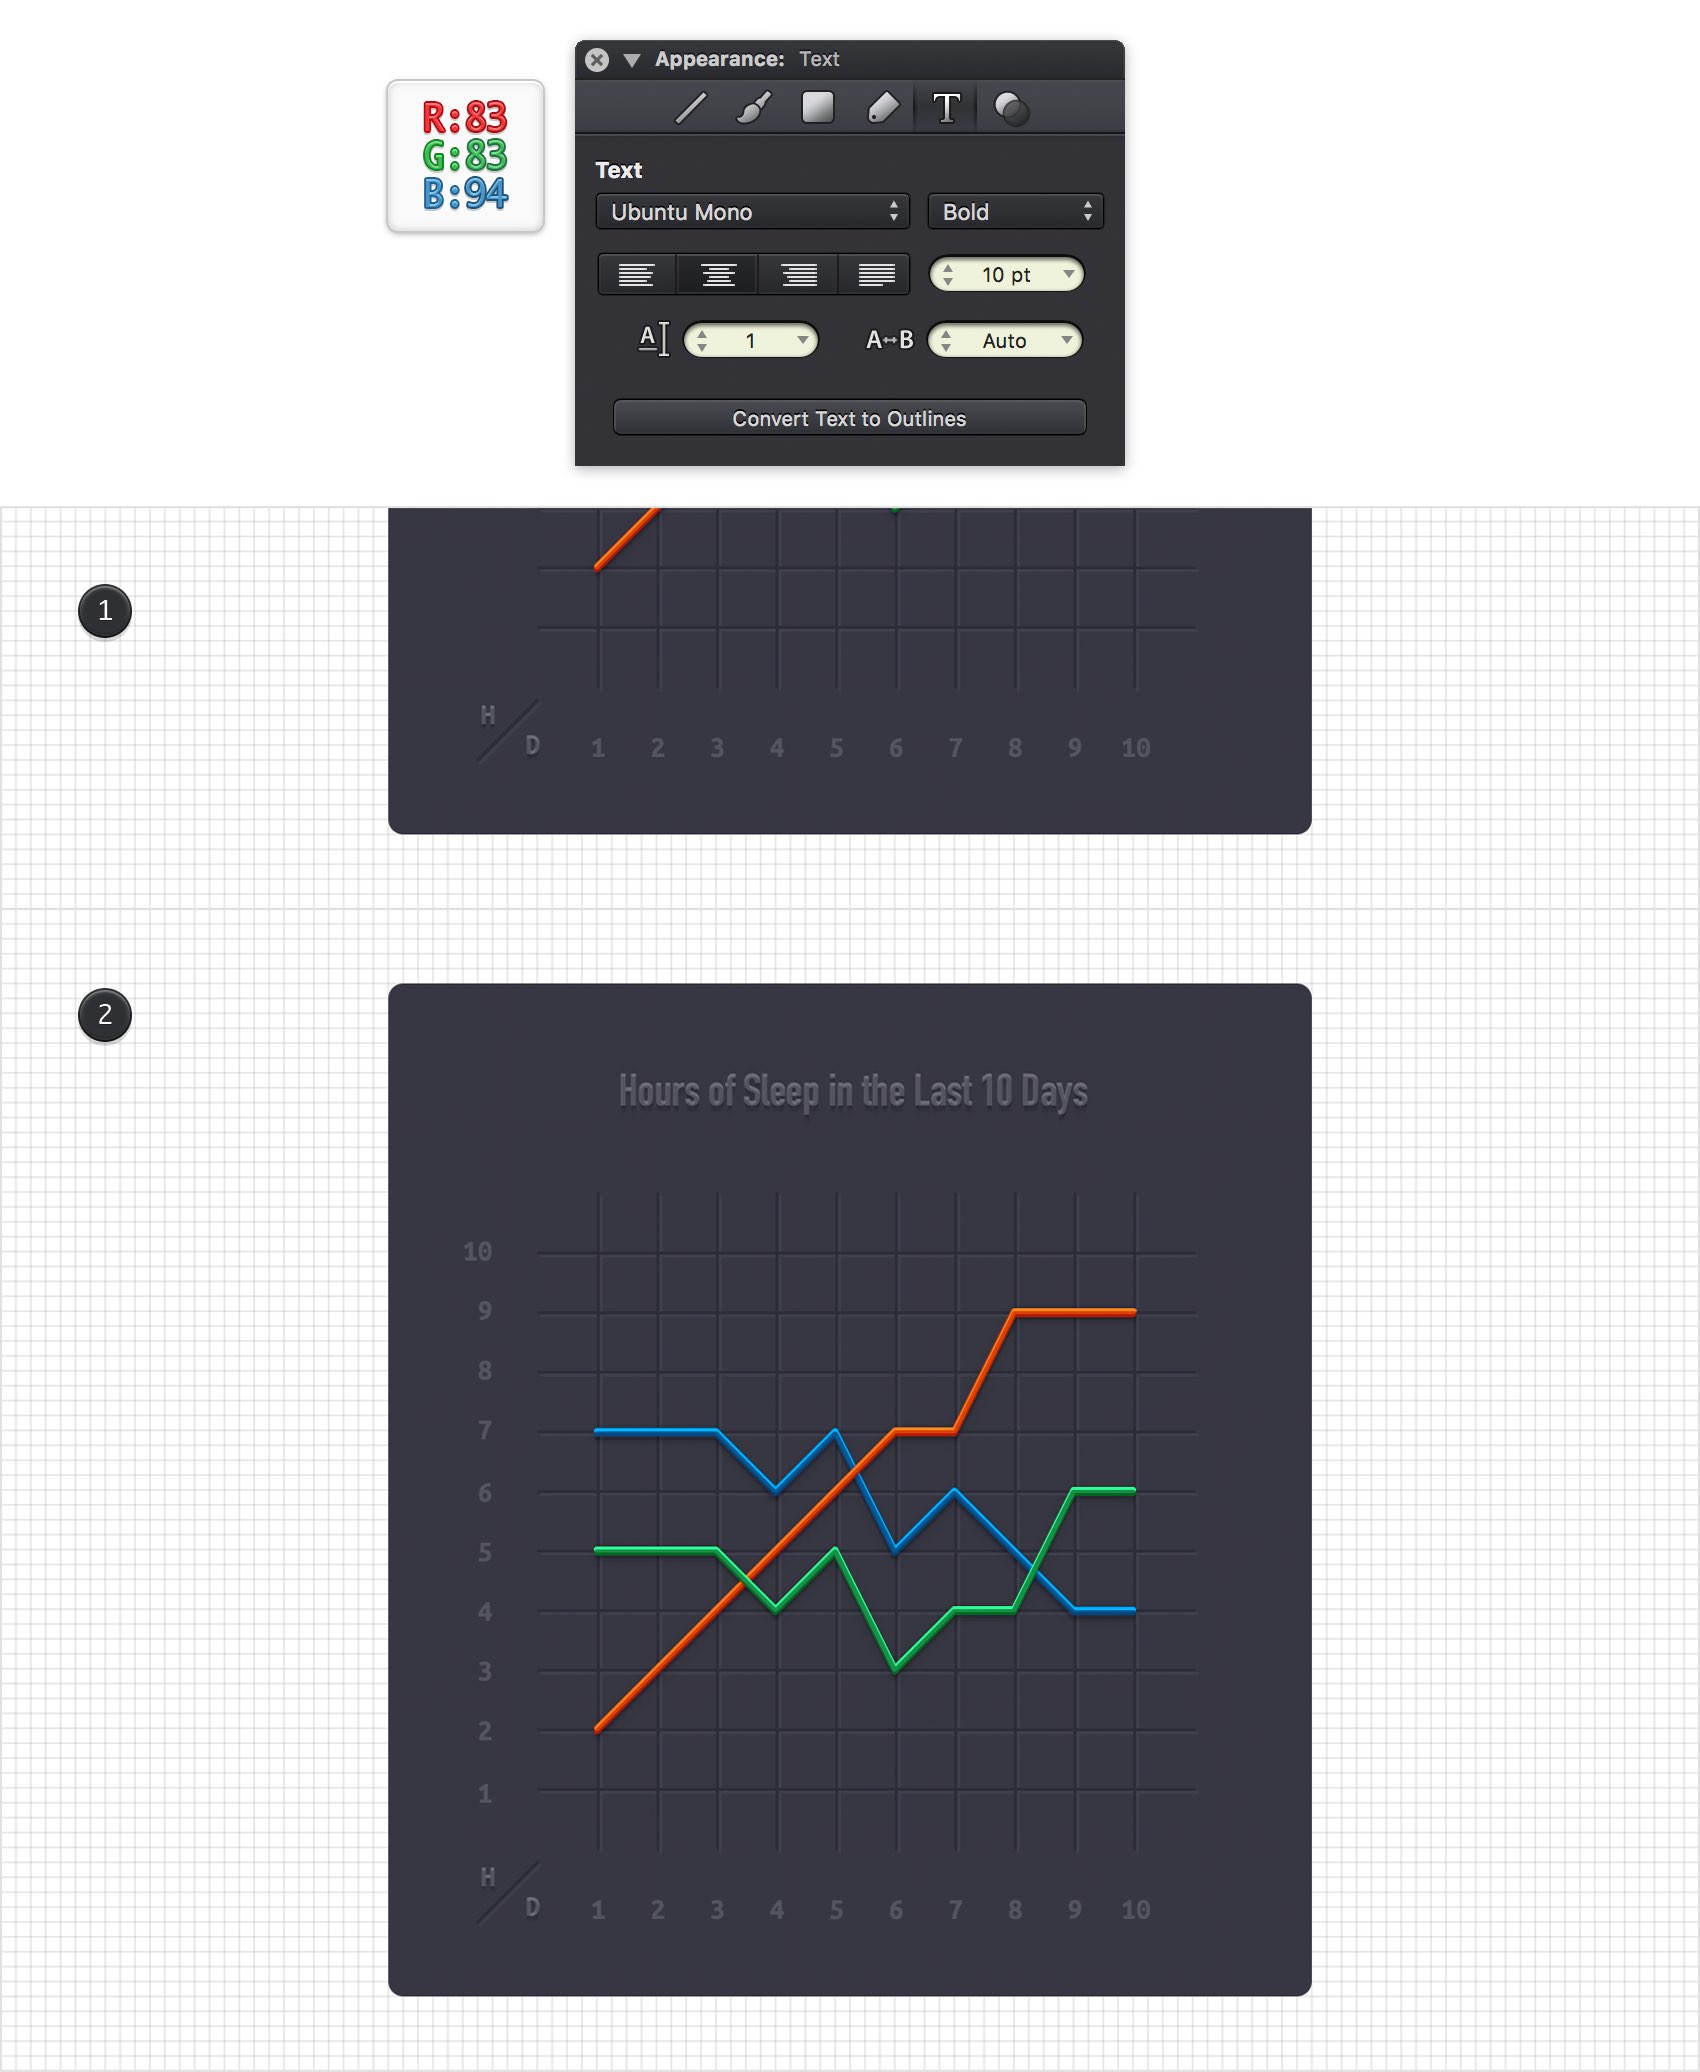
Reselect the Text Tool (T) and use it to add the row and the column of numbers shown in the following image. Use the same font and color attributes used for the tiny letters.
Step 27
Reselect one of those two letters, right click and go to Copy Style and then select all the numbers added in the previous step, right click again and this time go to Paste Style.
Step 28
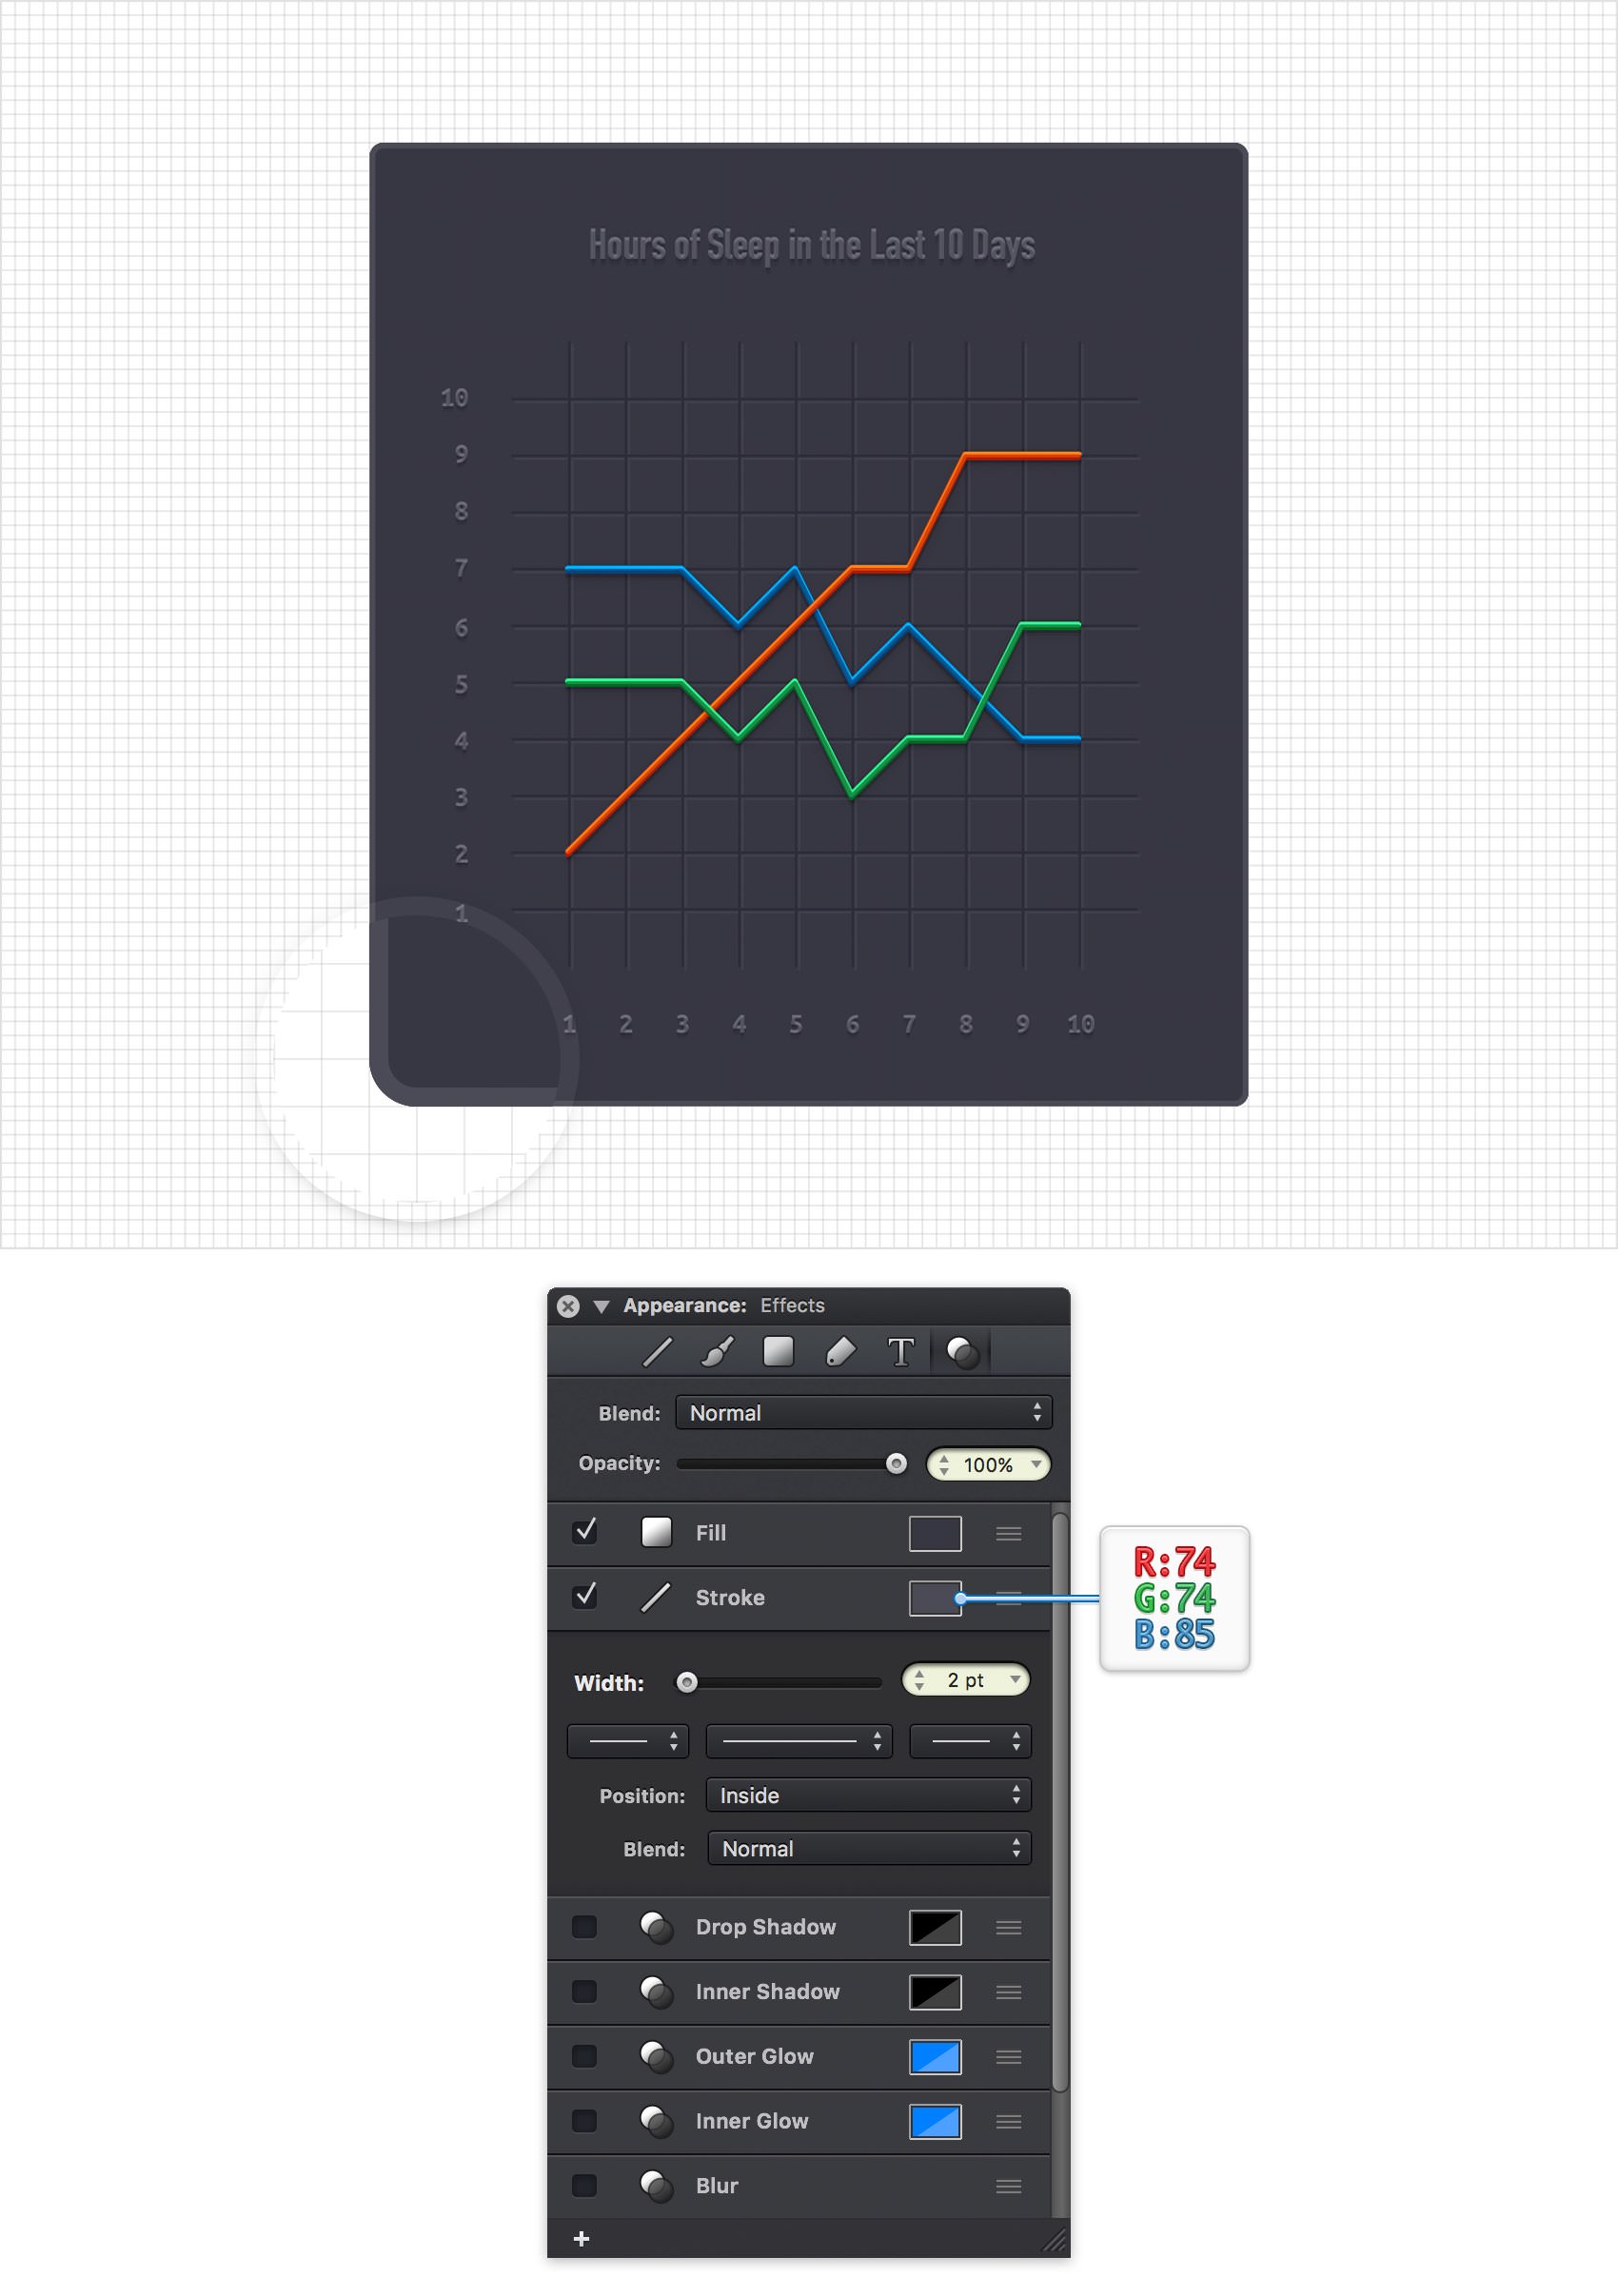
Select your rounded rectangle, focus on the Effects ** pane and make sure that the existing Stroke is active. First, click the color well, drag the Alpha slider to 100% and set the color to R=74 G=74 B=85. Next, drag the Width slider to 2 pt, select Inside from that Position drop-down menu and make sure that the Blend Mode is set to Normal**.
Step 29
Make sure that your rounded rectangle stays selected and keep focusing on the Effects pane. Add a second Stroke, select it and enter the attributes shown in the following image.
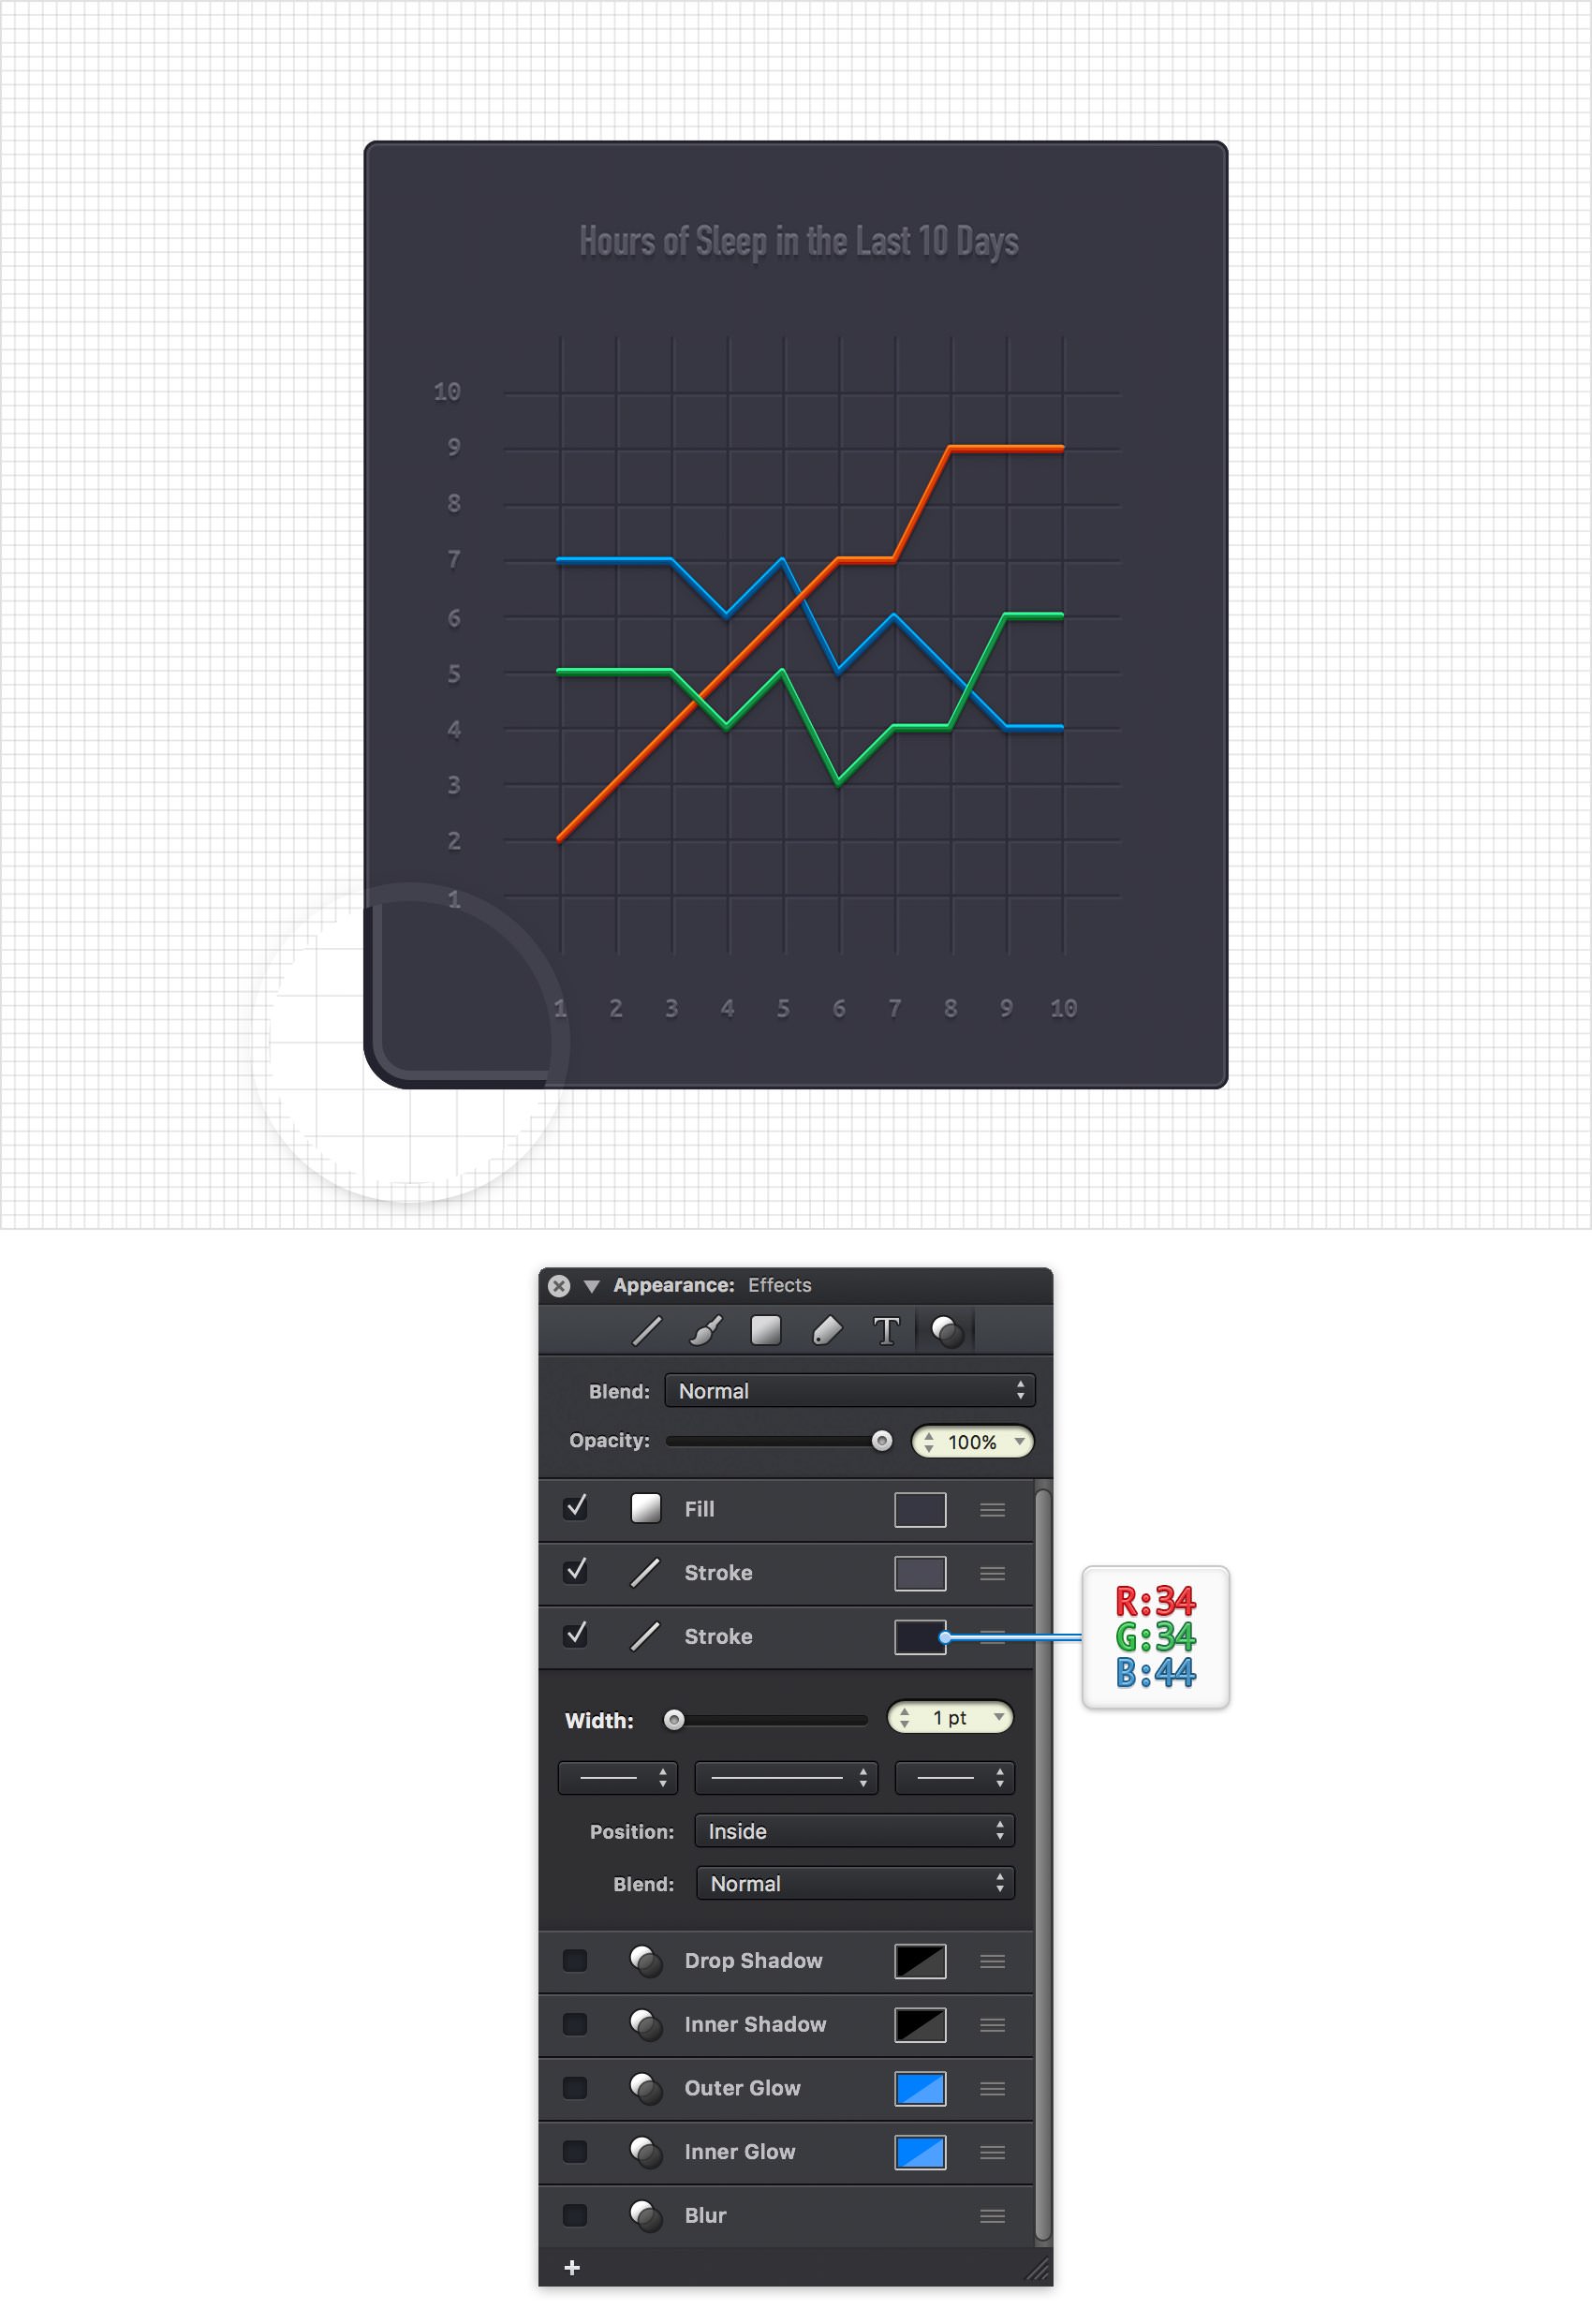
Step 30
Make sure that your rounded rectangle is still selected and keep focusing on the Effects pane. Add a third Stroke, select it and enter the attributes shown in the following image.
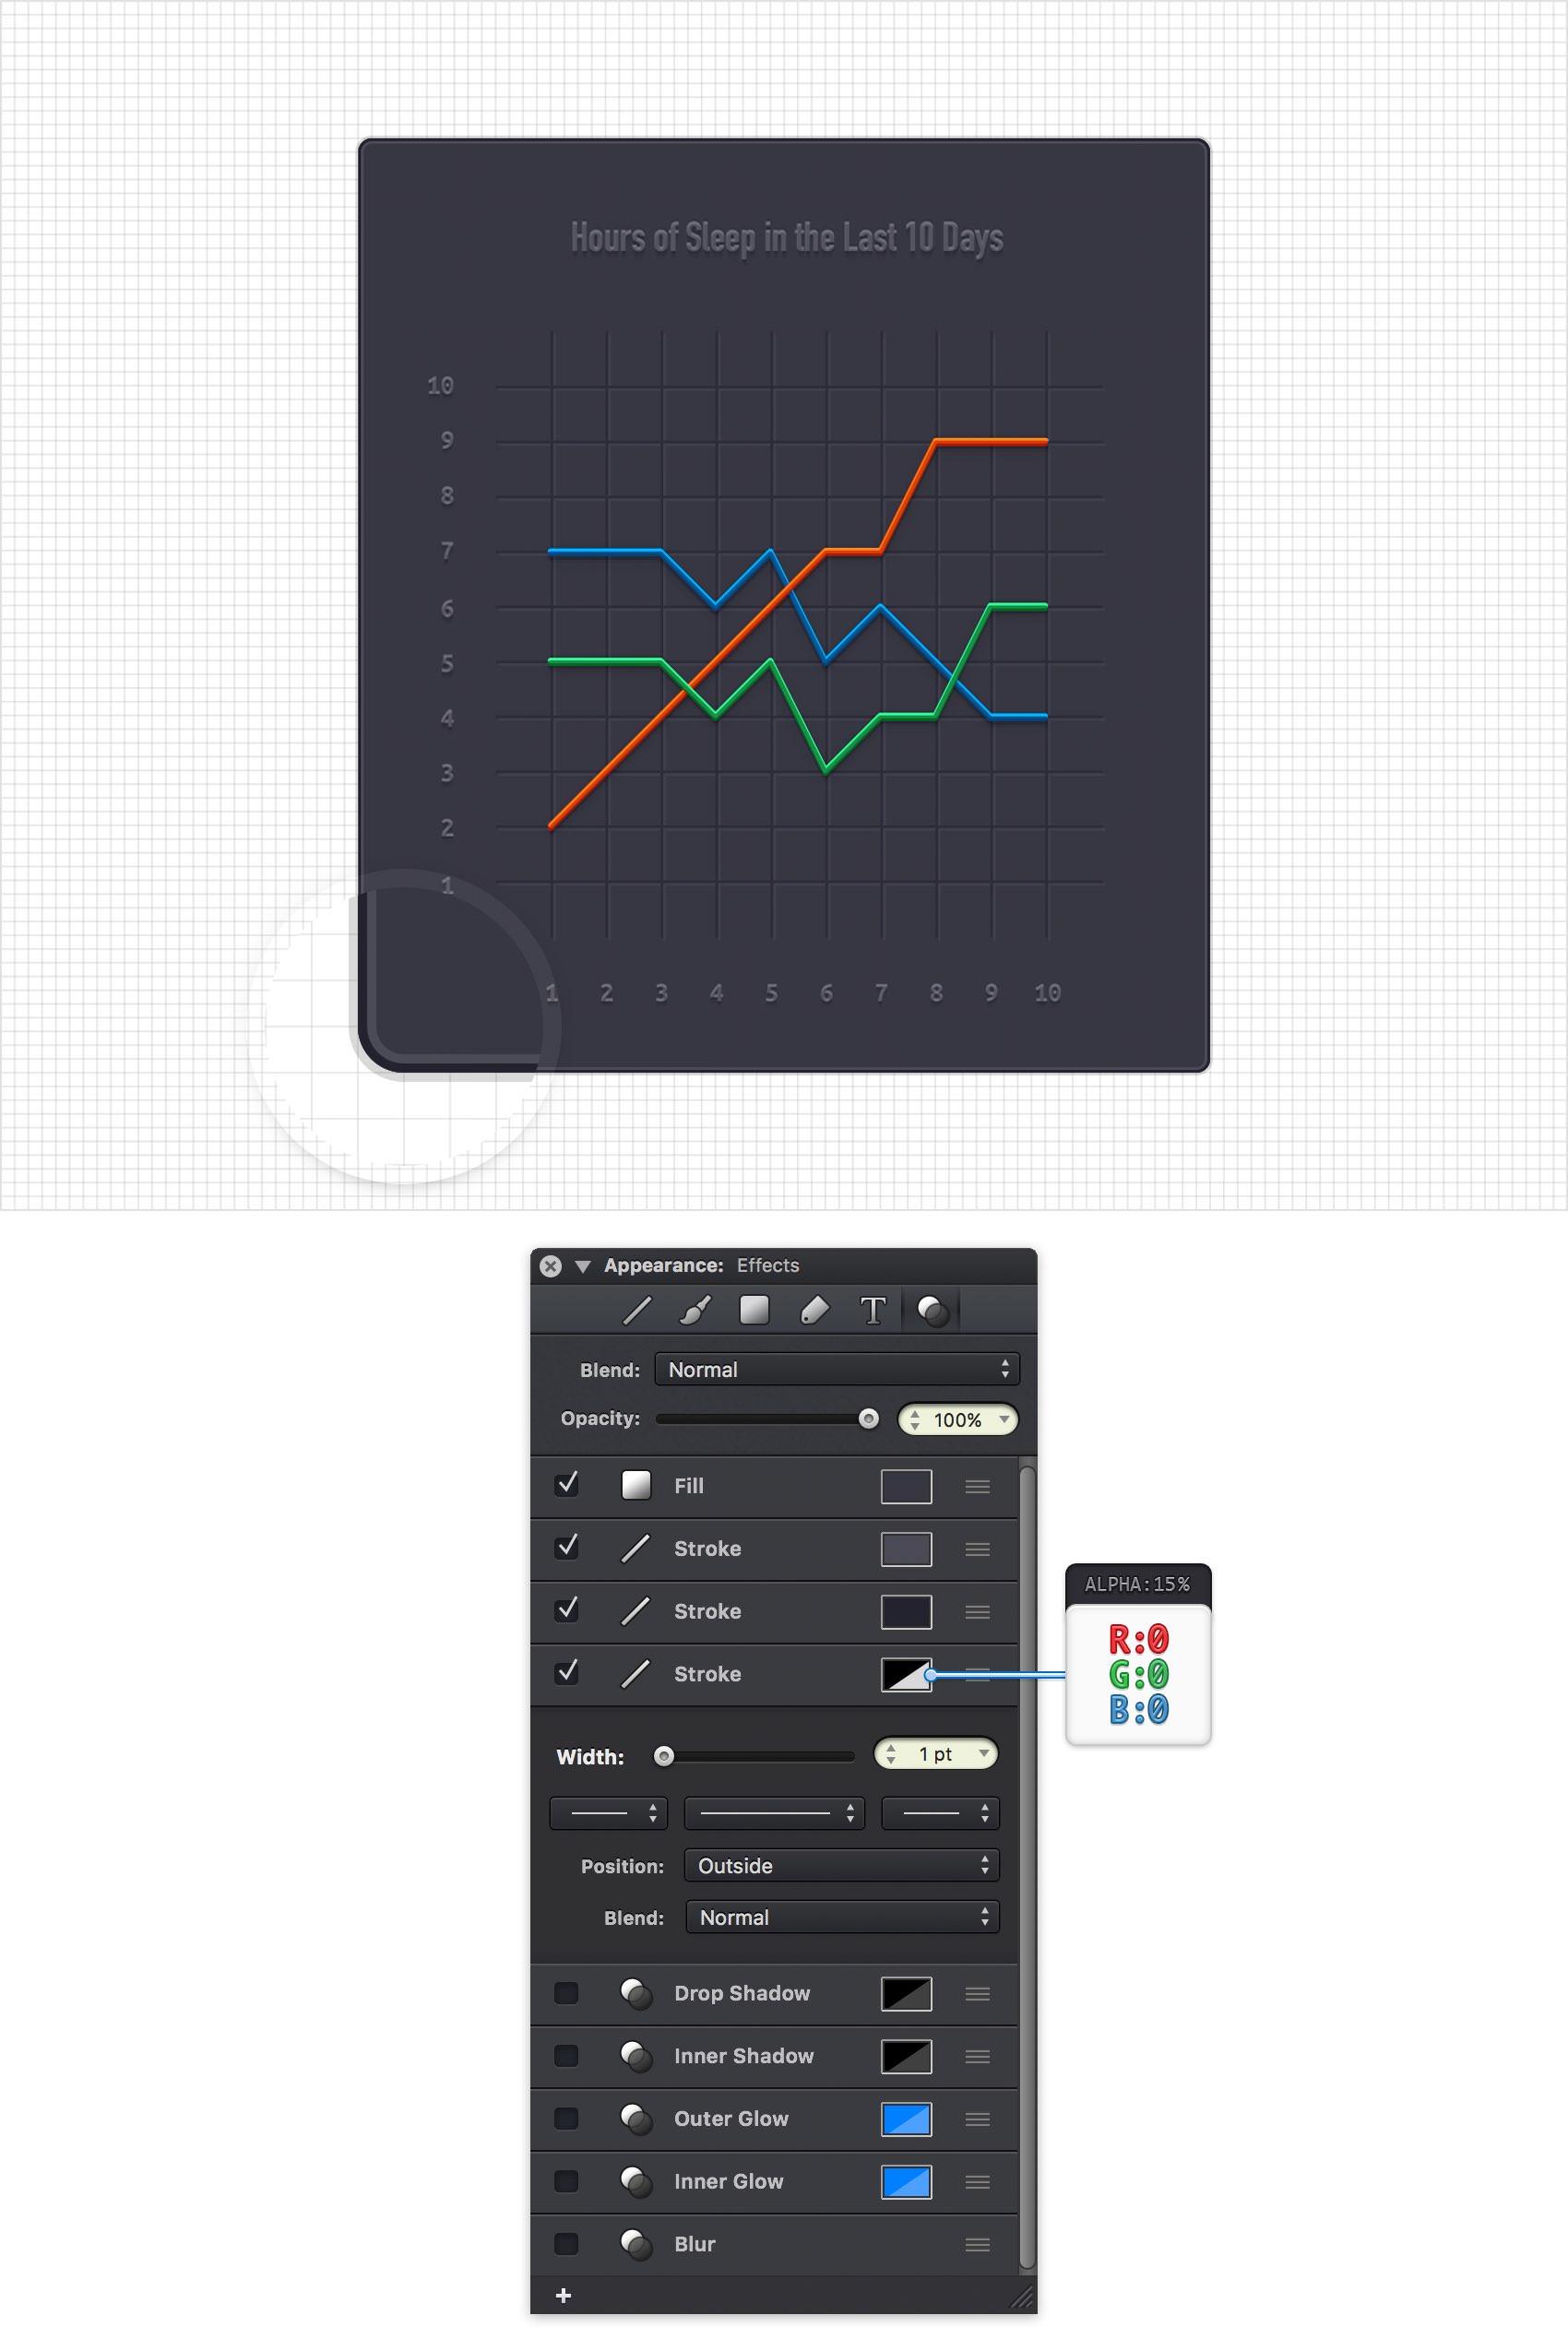
Step 31
Make sure that your rounded rectangle is still selected and keep focusing on the Effects pane. Activate the existing Drop Shadow, enter the attributes shown in the following image and drag this effect right above the bottom Stroke.
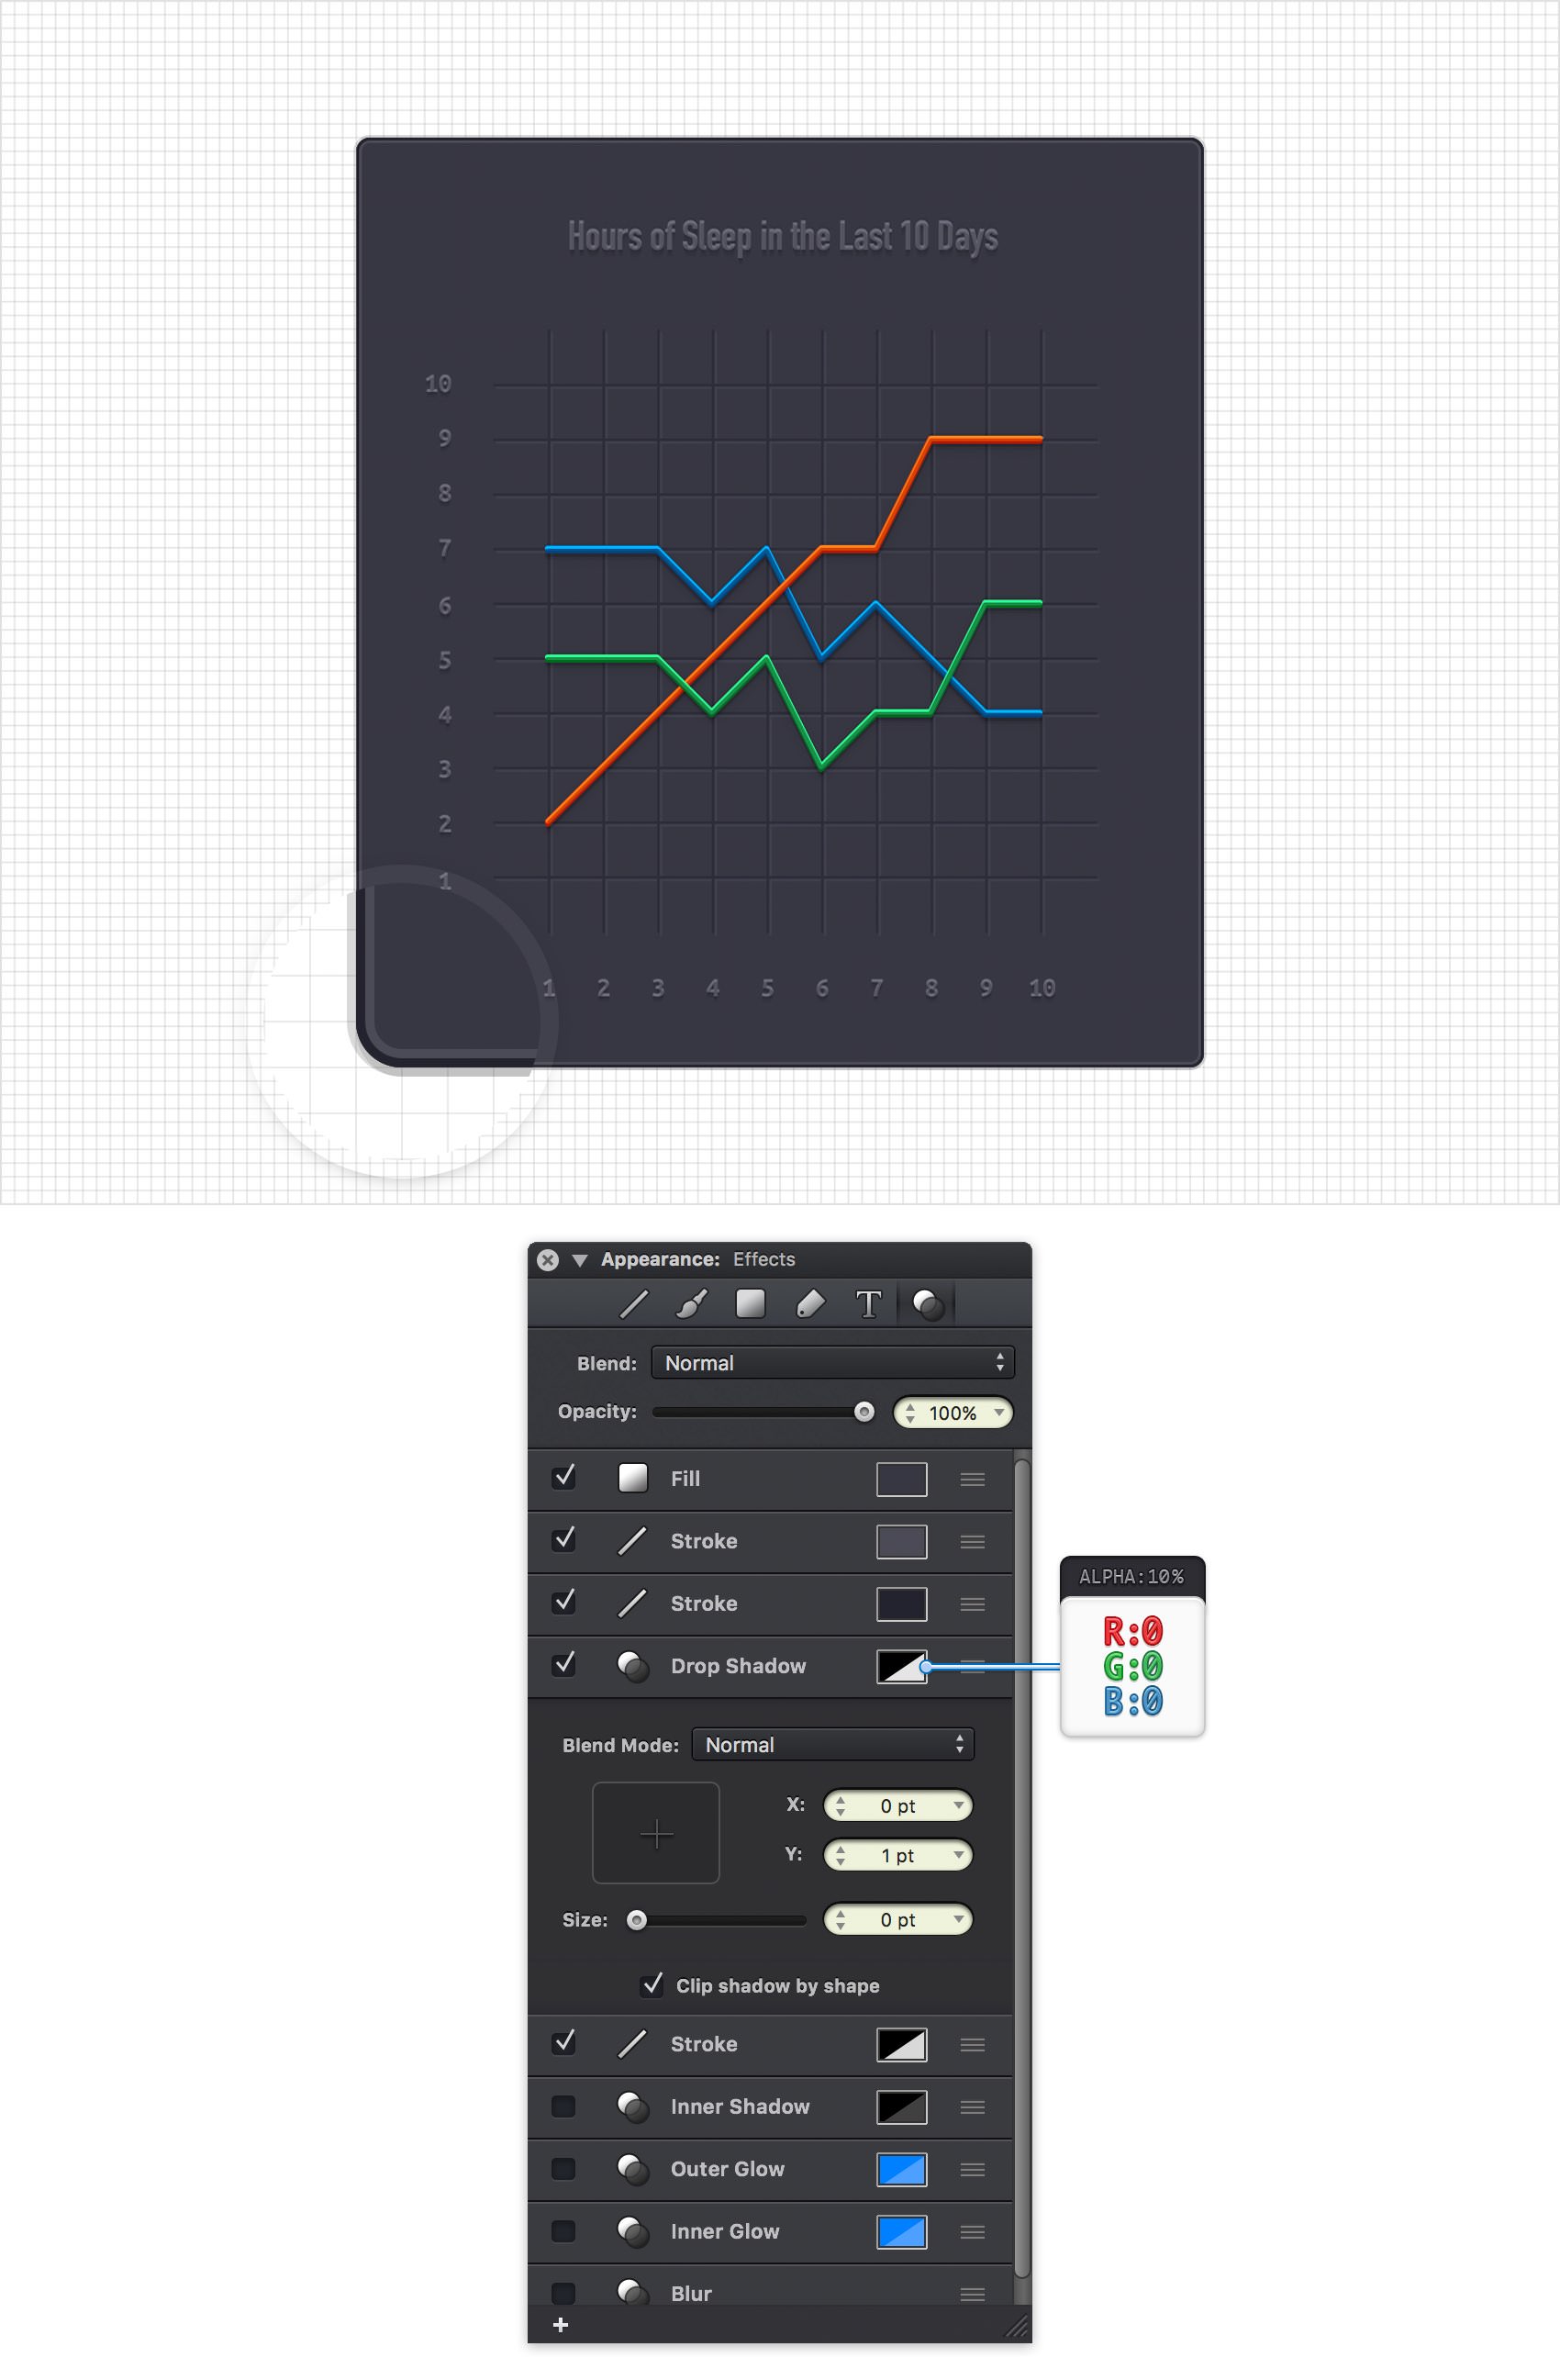
Step 32
Make sure that your rounded rectangle is still selected and keep focusing on the Effects pane. Add a second Drop Shadow, enter the attributes shown in the following image and don't forget to drag this effect right above the bottom Stroke.
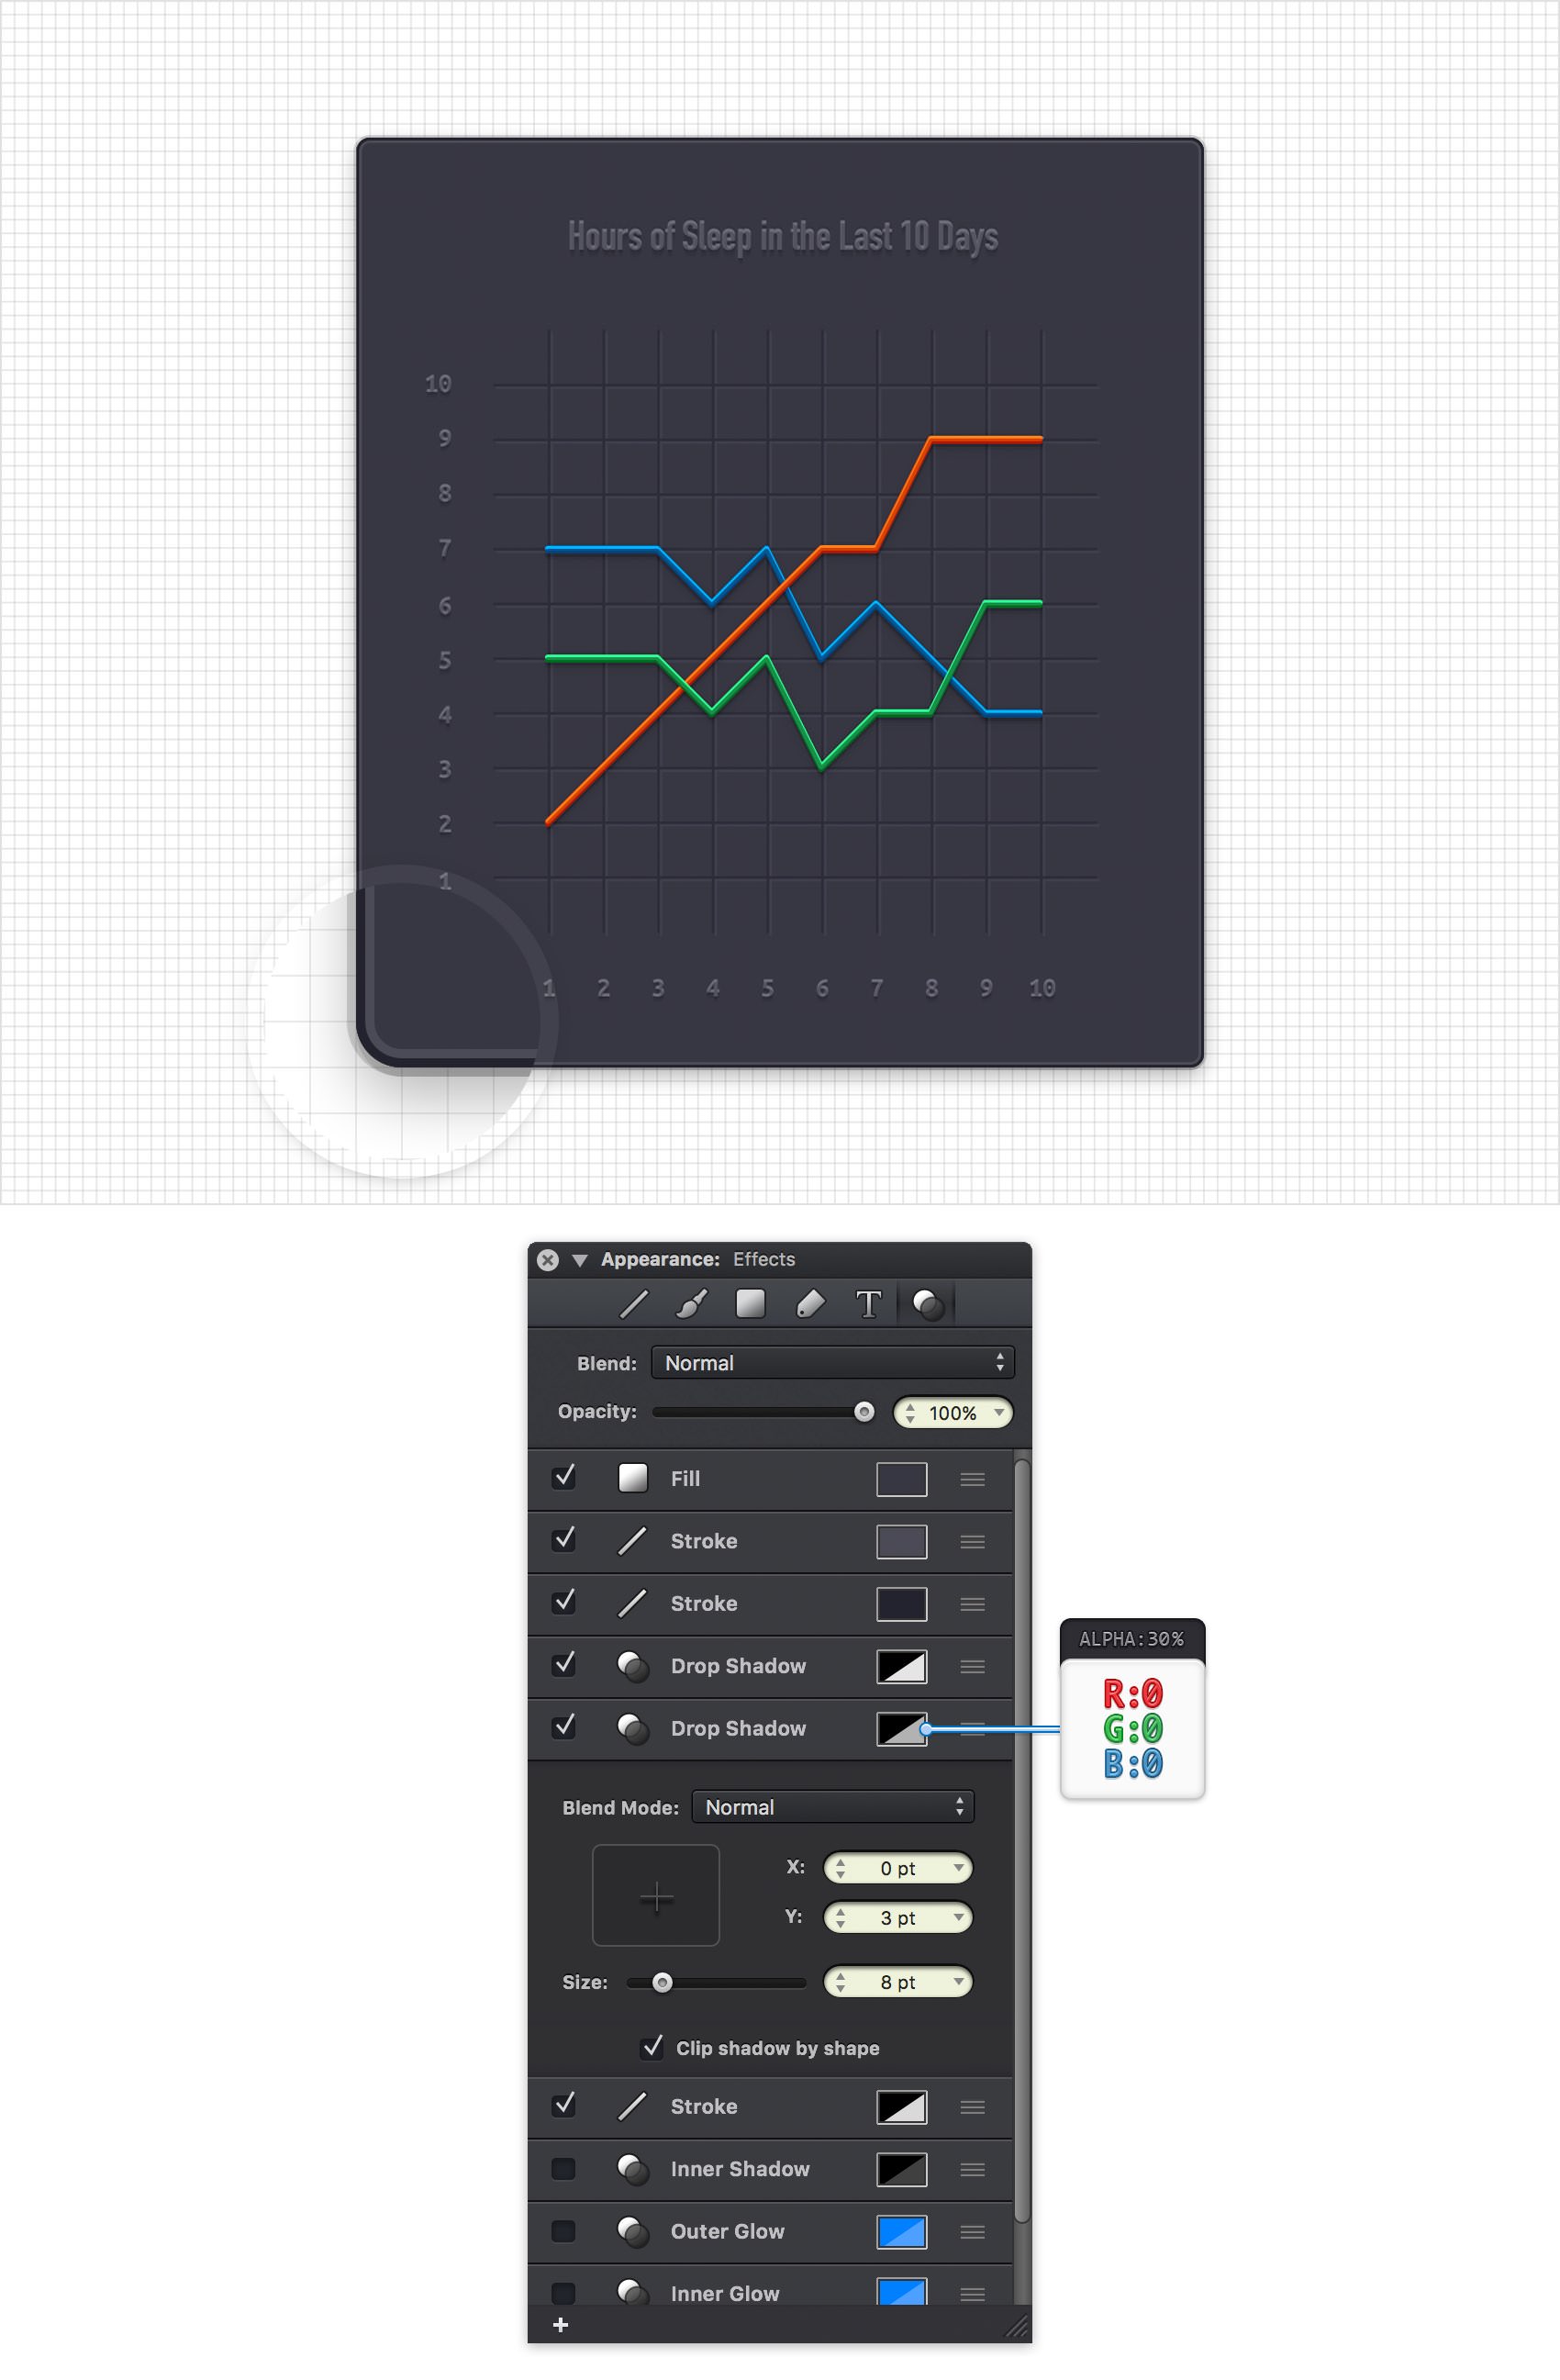
Step 33
Make sure that your rounded rectangle is still selected and keep focusing on the Effects pane. Activate the existing Inner Shadow, enter the attributes shown in the following image and drag this effect right below the top Stroke.
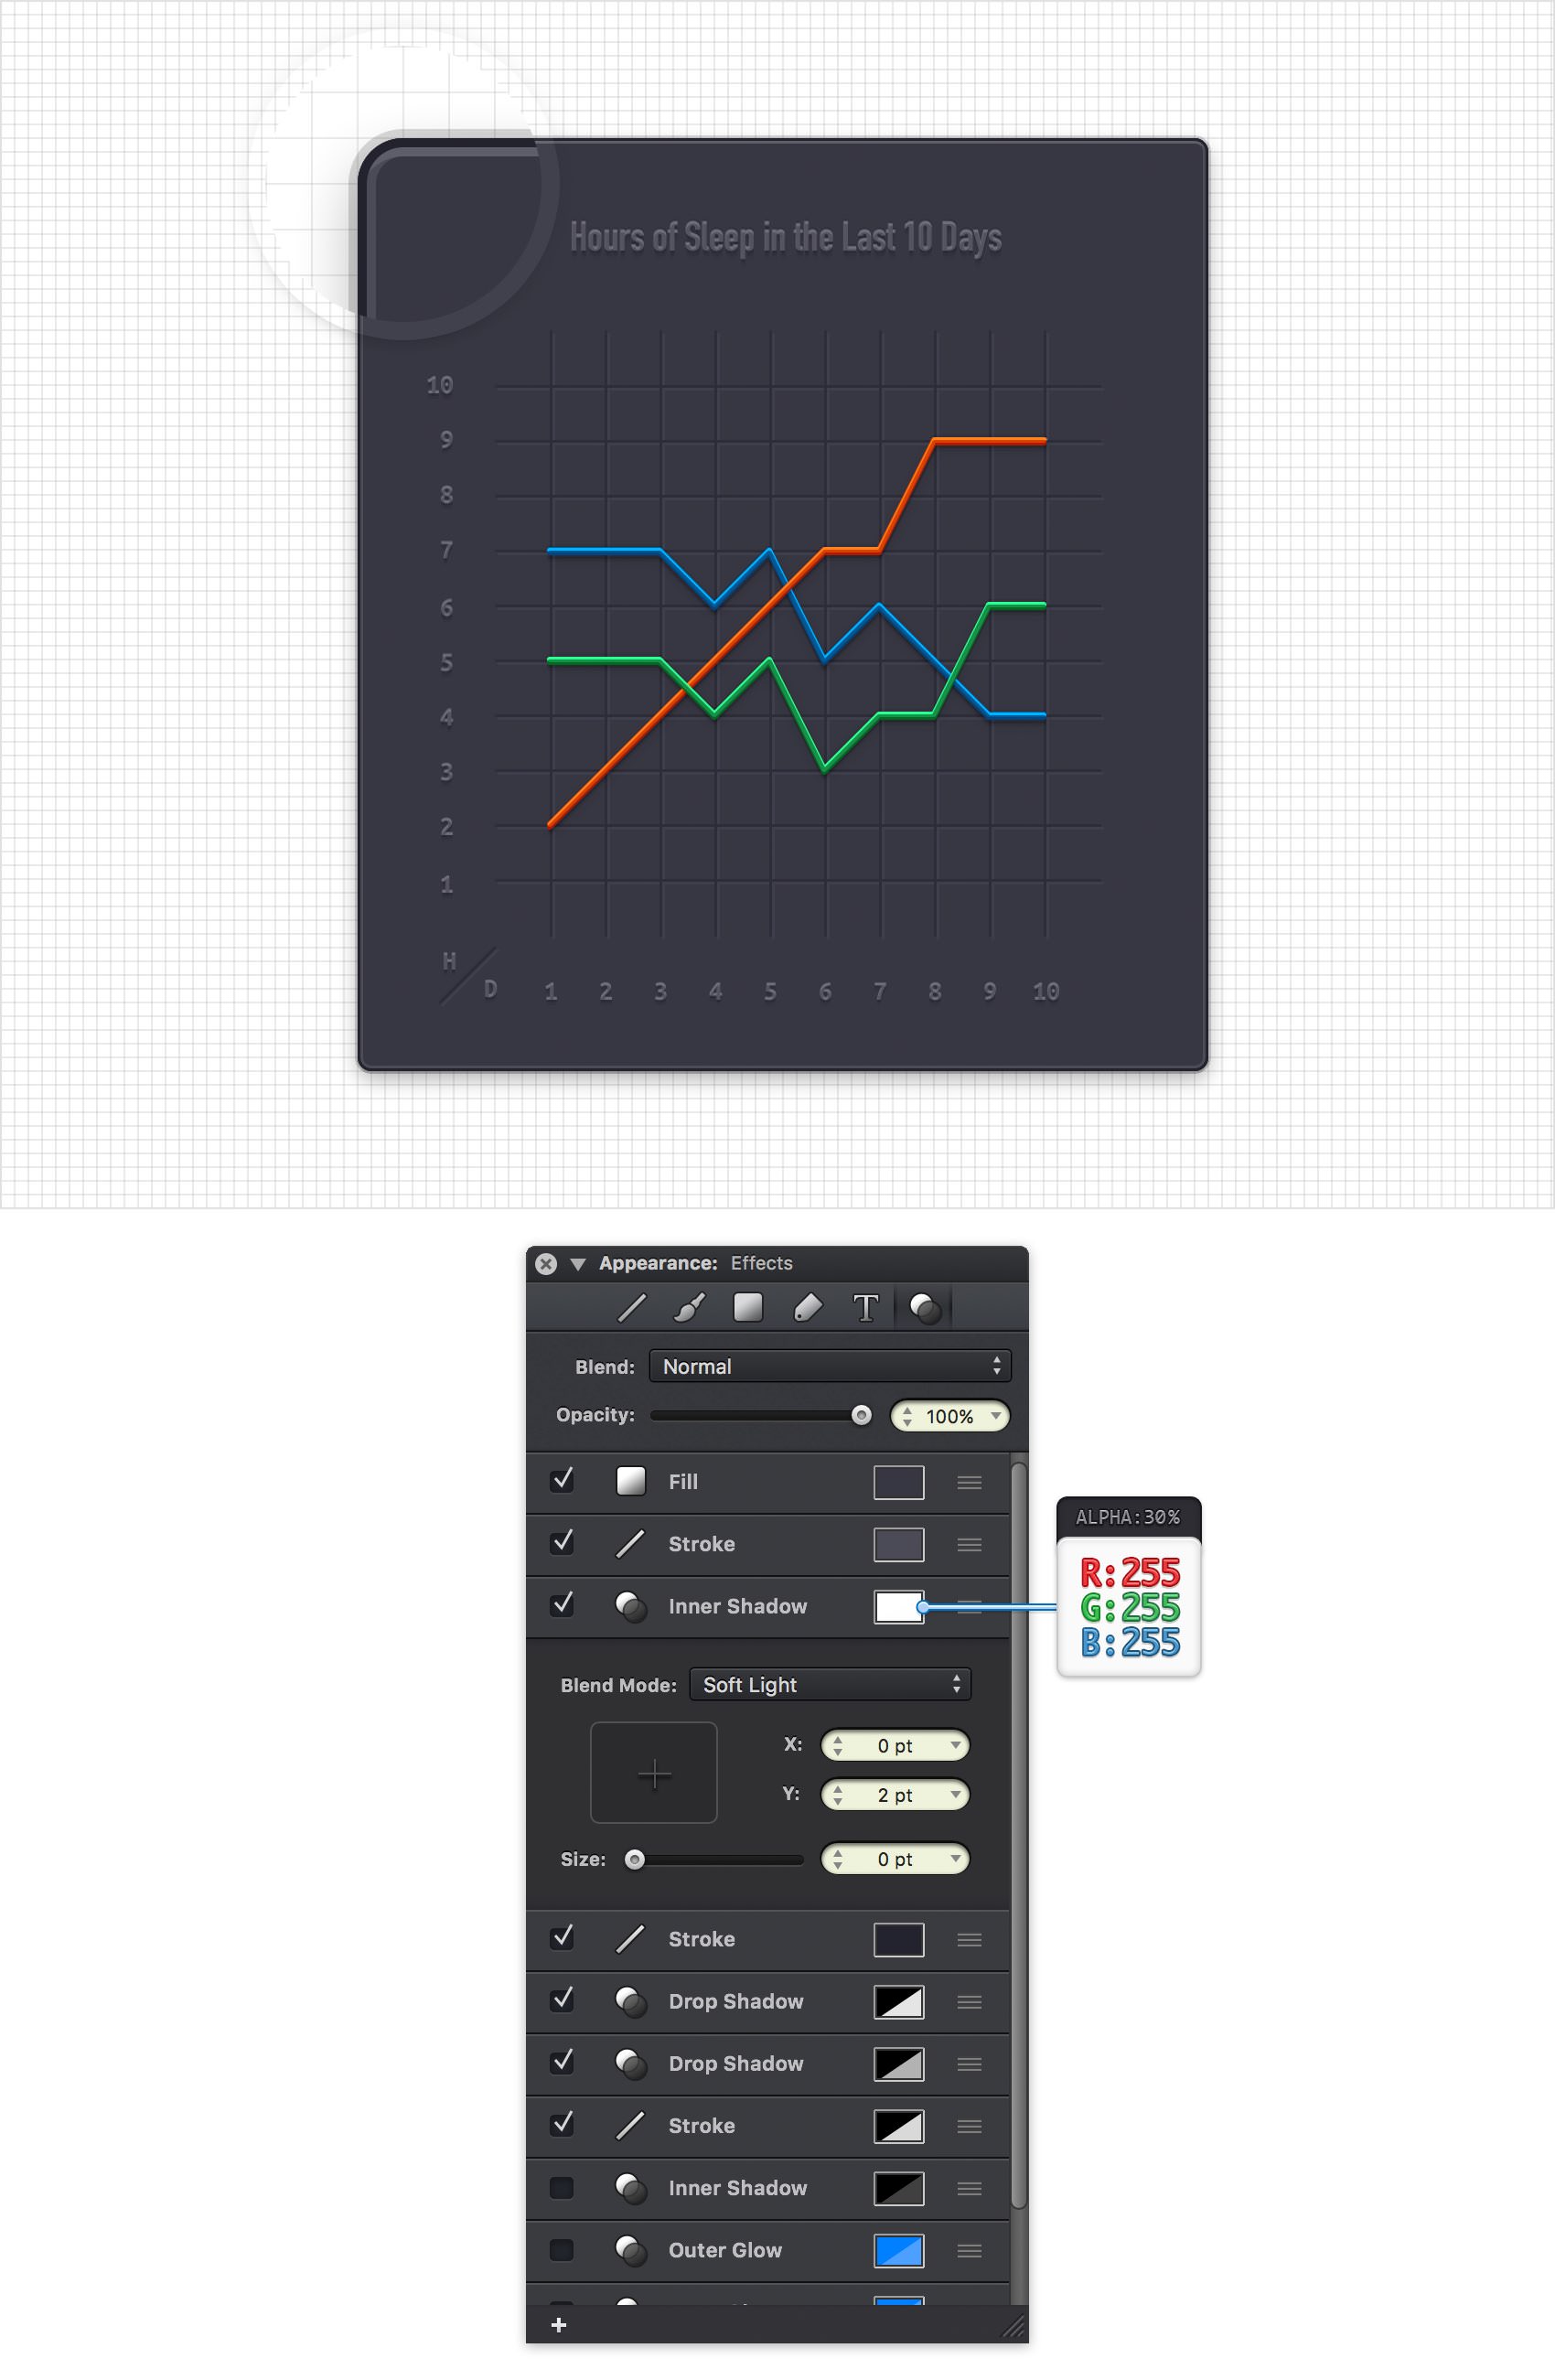
Step 34
Make sure that your rounded rectangle is still selected and keep focusing on the Effects ** pane. Activate the existing Inner Glow, enter the attributes shown in the following image and drag this effect right below the Fill**.
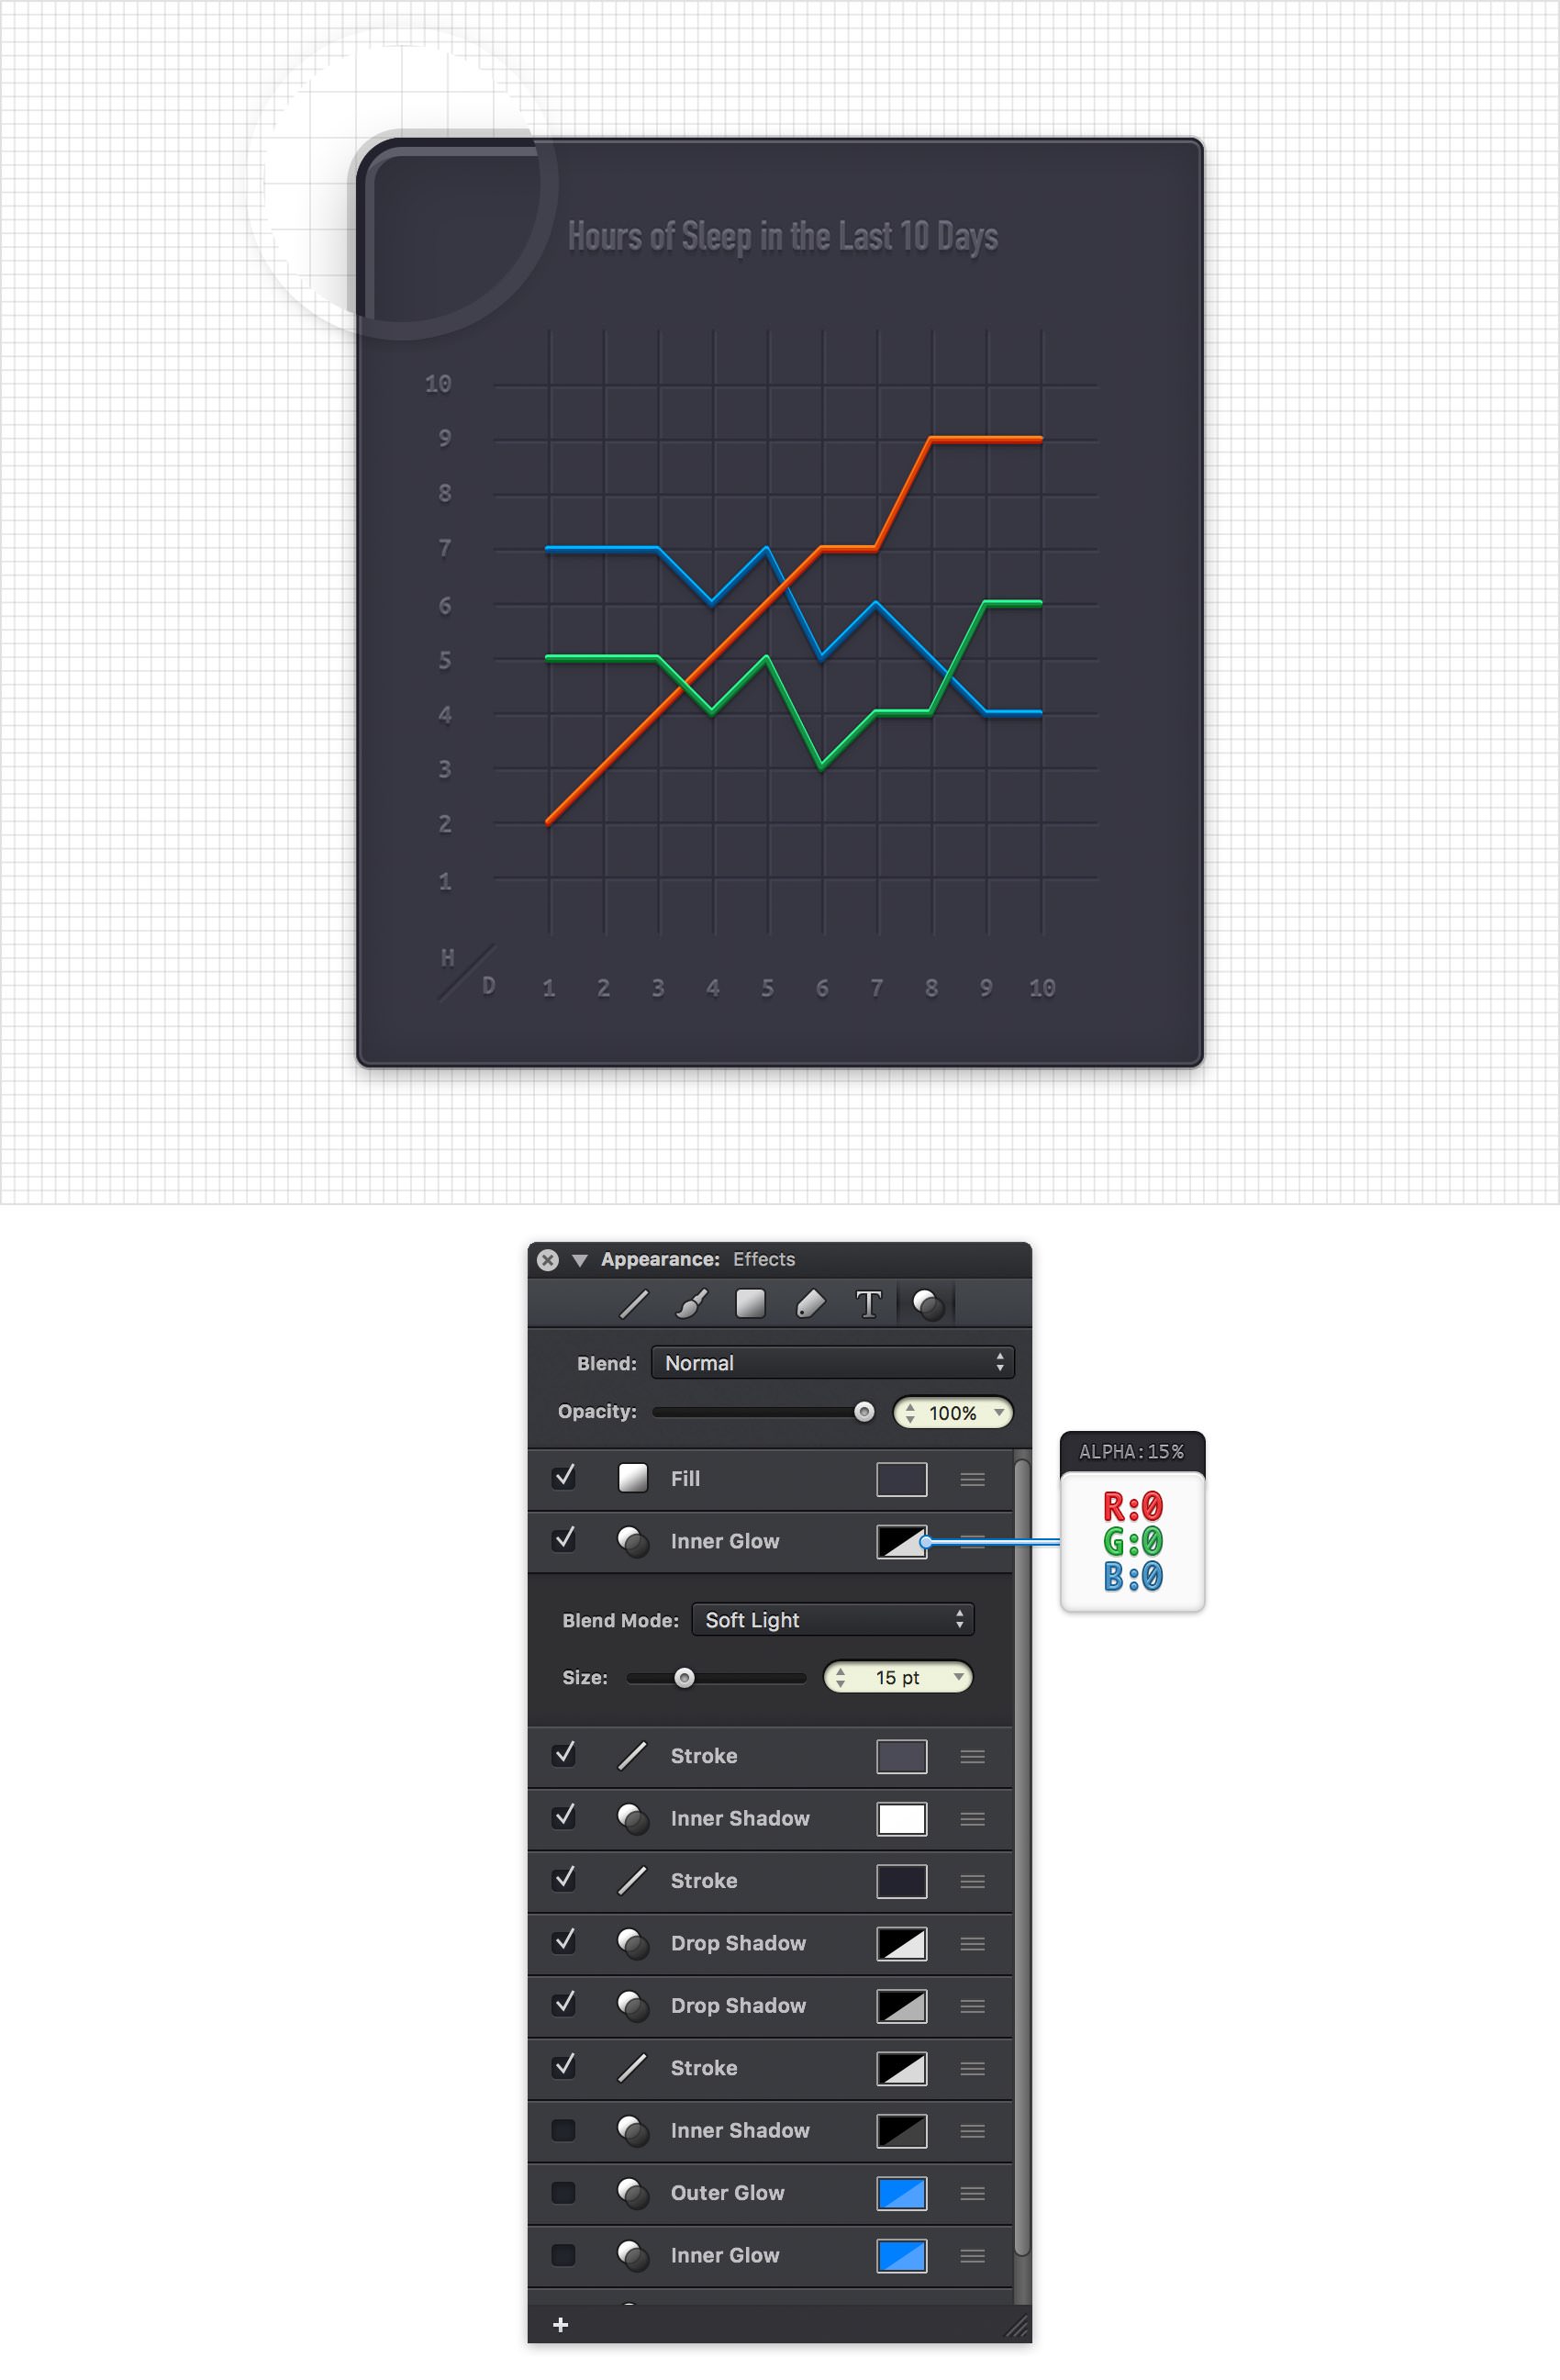
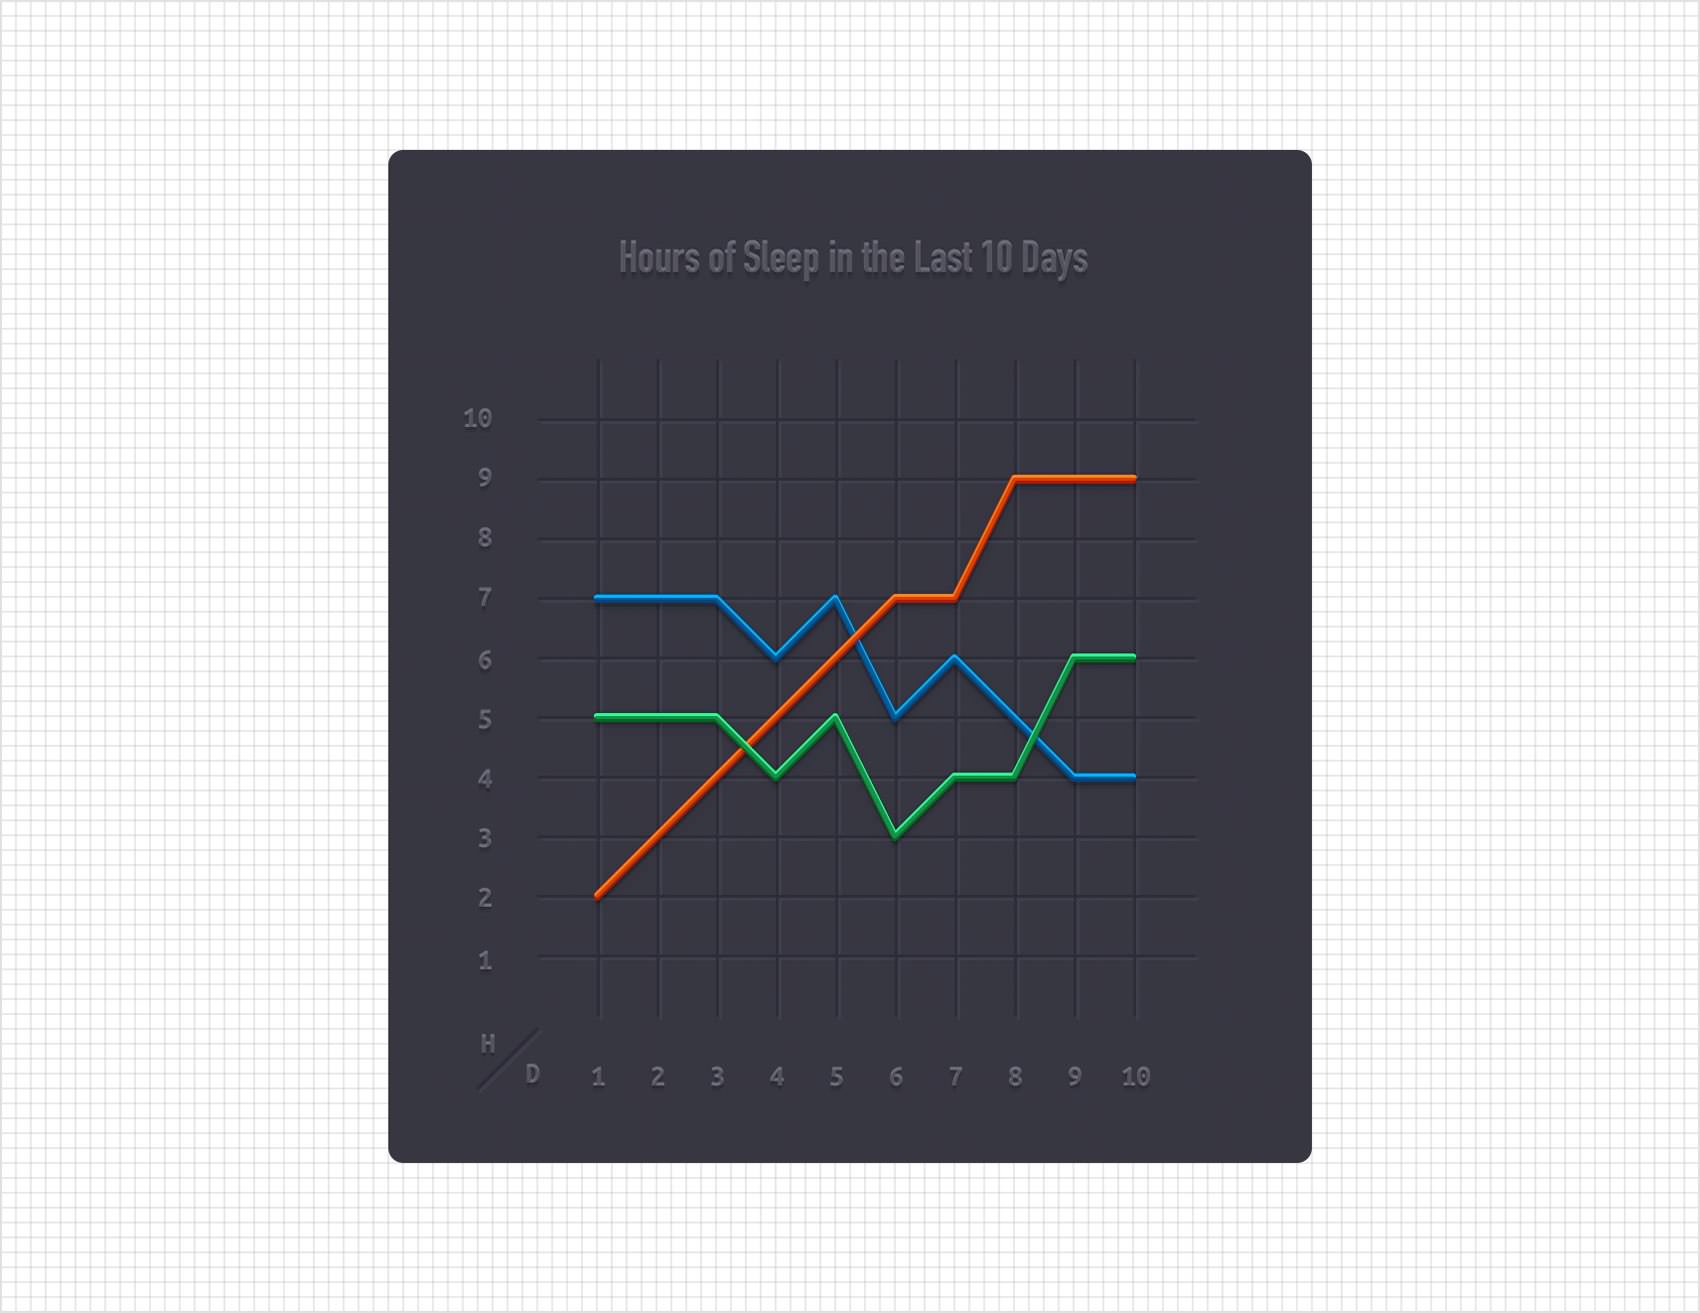
Finished Design
Congratulations, you've finished the tutorial!
Hope you've enjoyed learning some of the techniques and processes presented in these steps. As always, feel free to adjust the final design and make it your own.

Download Graphic File:
linechart.idraw 


