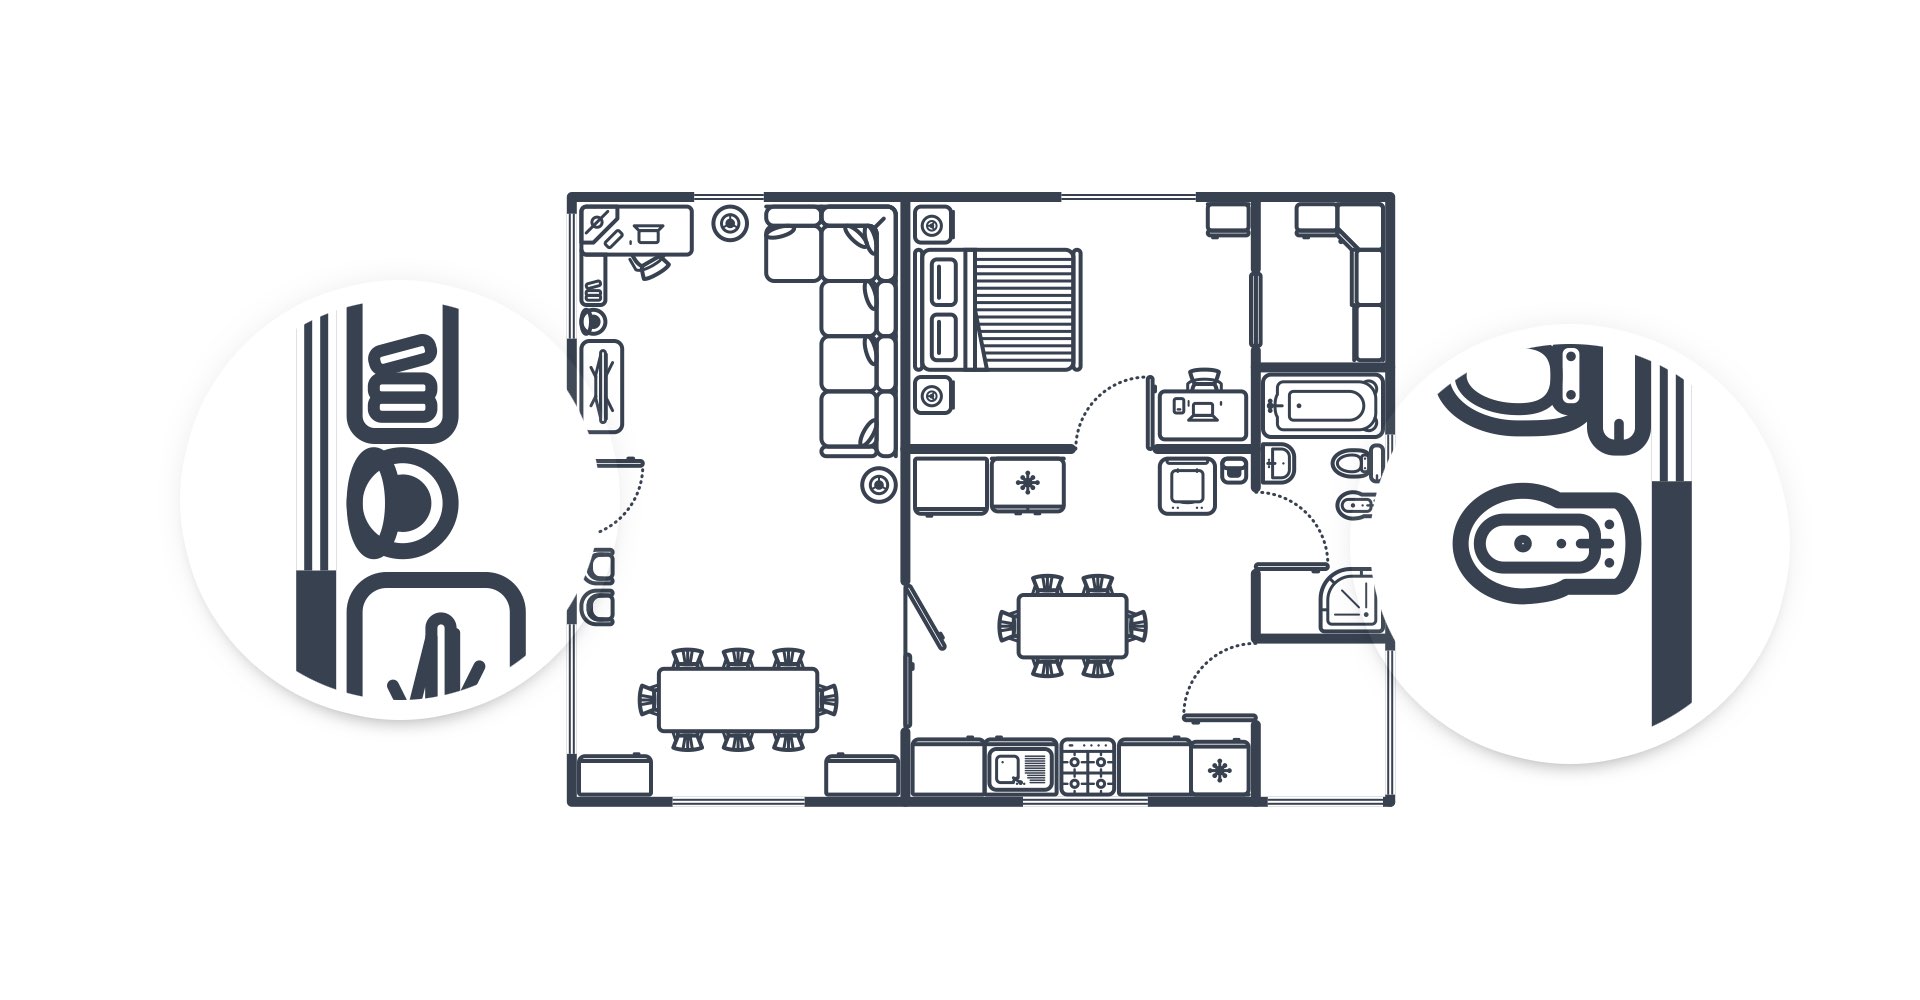
Create a Set of Indoor Floor Plan Shapes
In the following tutorial you will learn how to create a set of indoor floor plan shapes and how to save them inside your shape library.
For starters you will learn how to set up a simple grid and how to use the canvas scale settings. Moving on you will learn how to take full advantage of the Snap to Grid feature and how to work with basic tools.
To ease the work and to speed up your work process. you will learn how to easily save colors and styles and how to use them throughout the tutorial. You will learn how to create dotted or perfect paths and how to align, adjust or cut objects.
Finally, you will learn how to create a new shape library, how to save your symbols and how to import or export existing shape libraries.
Step 1
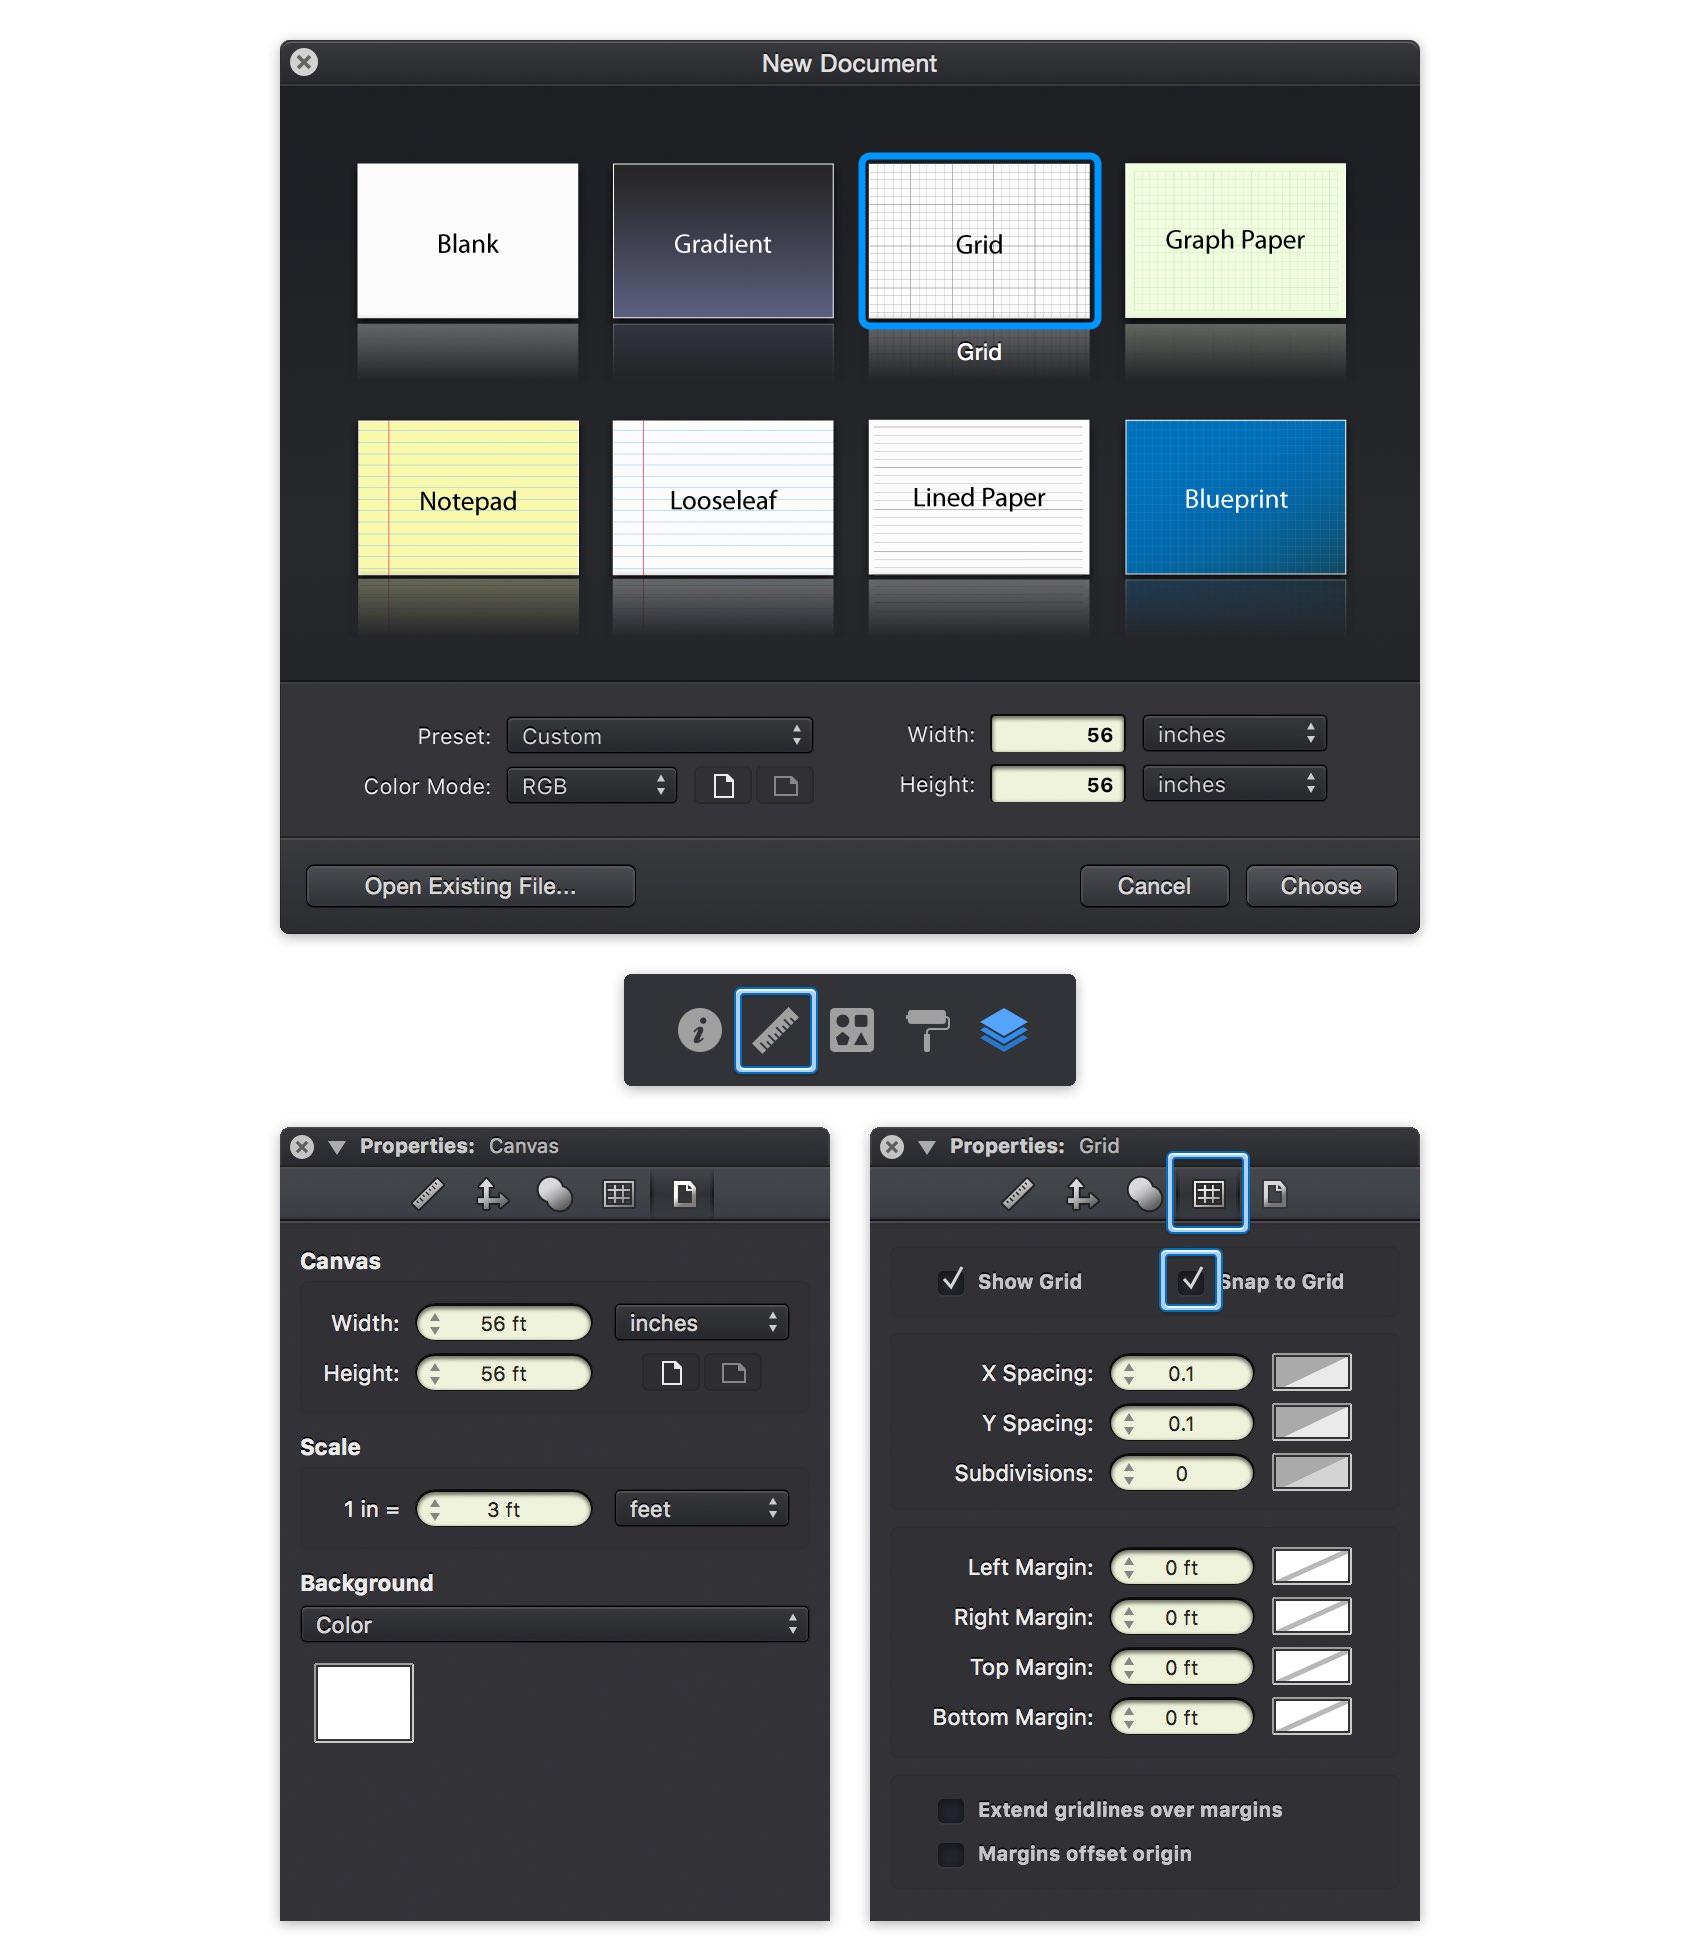
For this tutorial we'll create a new 56 x 56 inches document. Go to File > New or hit the Command + N keyboard shortcut to bring up the New Document window. Select the Grid document style and select inches for the document unit. Set the document dimensions to 63 inches wide by 63 inches high, and then click Choose to create your document.
We're about to create a ‘to-scale’ technical design using the canvas scale settings. First, you need to open the Canvas pane from the Properties panel – click that ruler icon to open or close the Properties panel whenever you want. Change the scale unit from inches to feet and set one inch to stands for three feet. The actual paper size of the document will not change, only the displayed values and units are adjusted by this setting.
Next, you need to adjust the document's grid. Switch to the Grid pane in the Properties panel. Change the grid X Spacing and Y Spacing to 0.1, set the Subdivisions to 0 and then enable the Snap to Grid feature.
Keep in mind that you can quickly enable or disable the grid and the Snap to Grid feature using the Command + ' and the Command + Shift + ' keyboard shortcuts.
Step 2
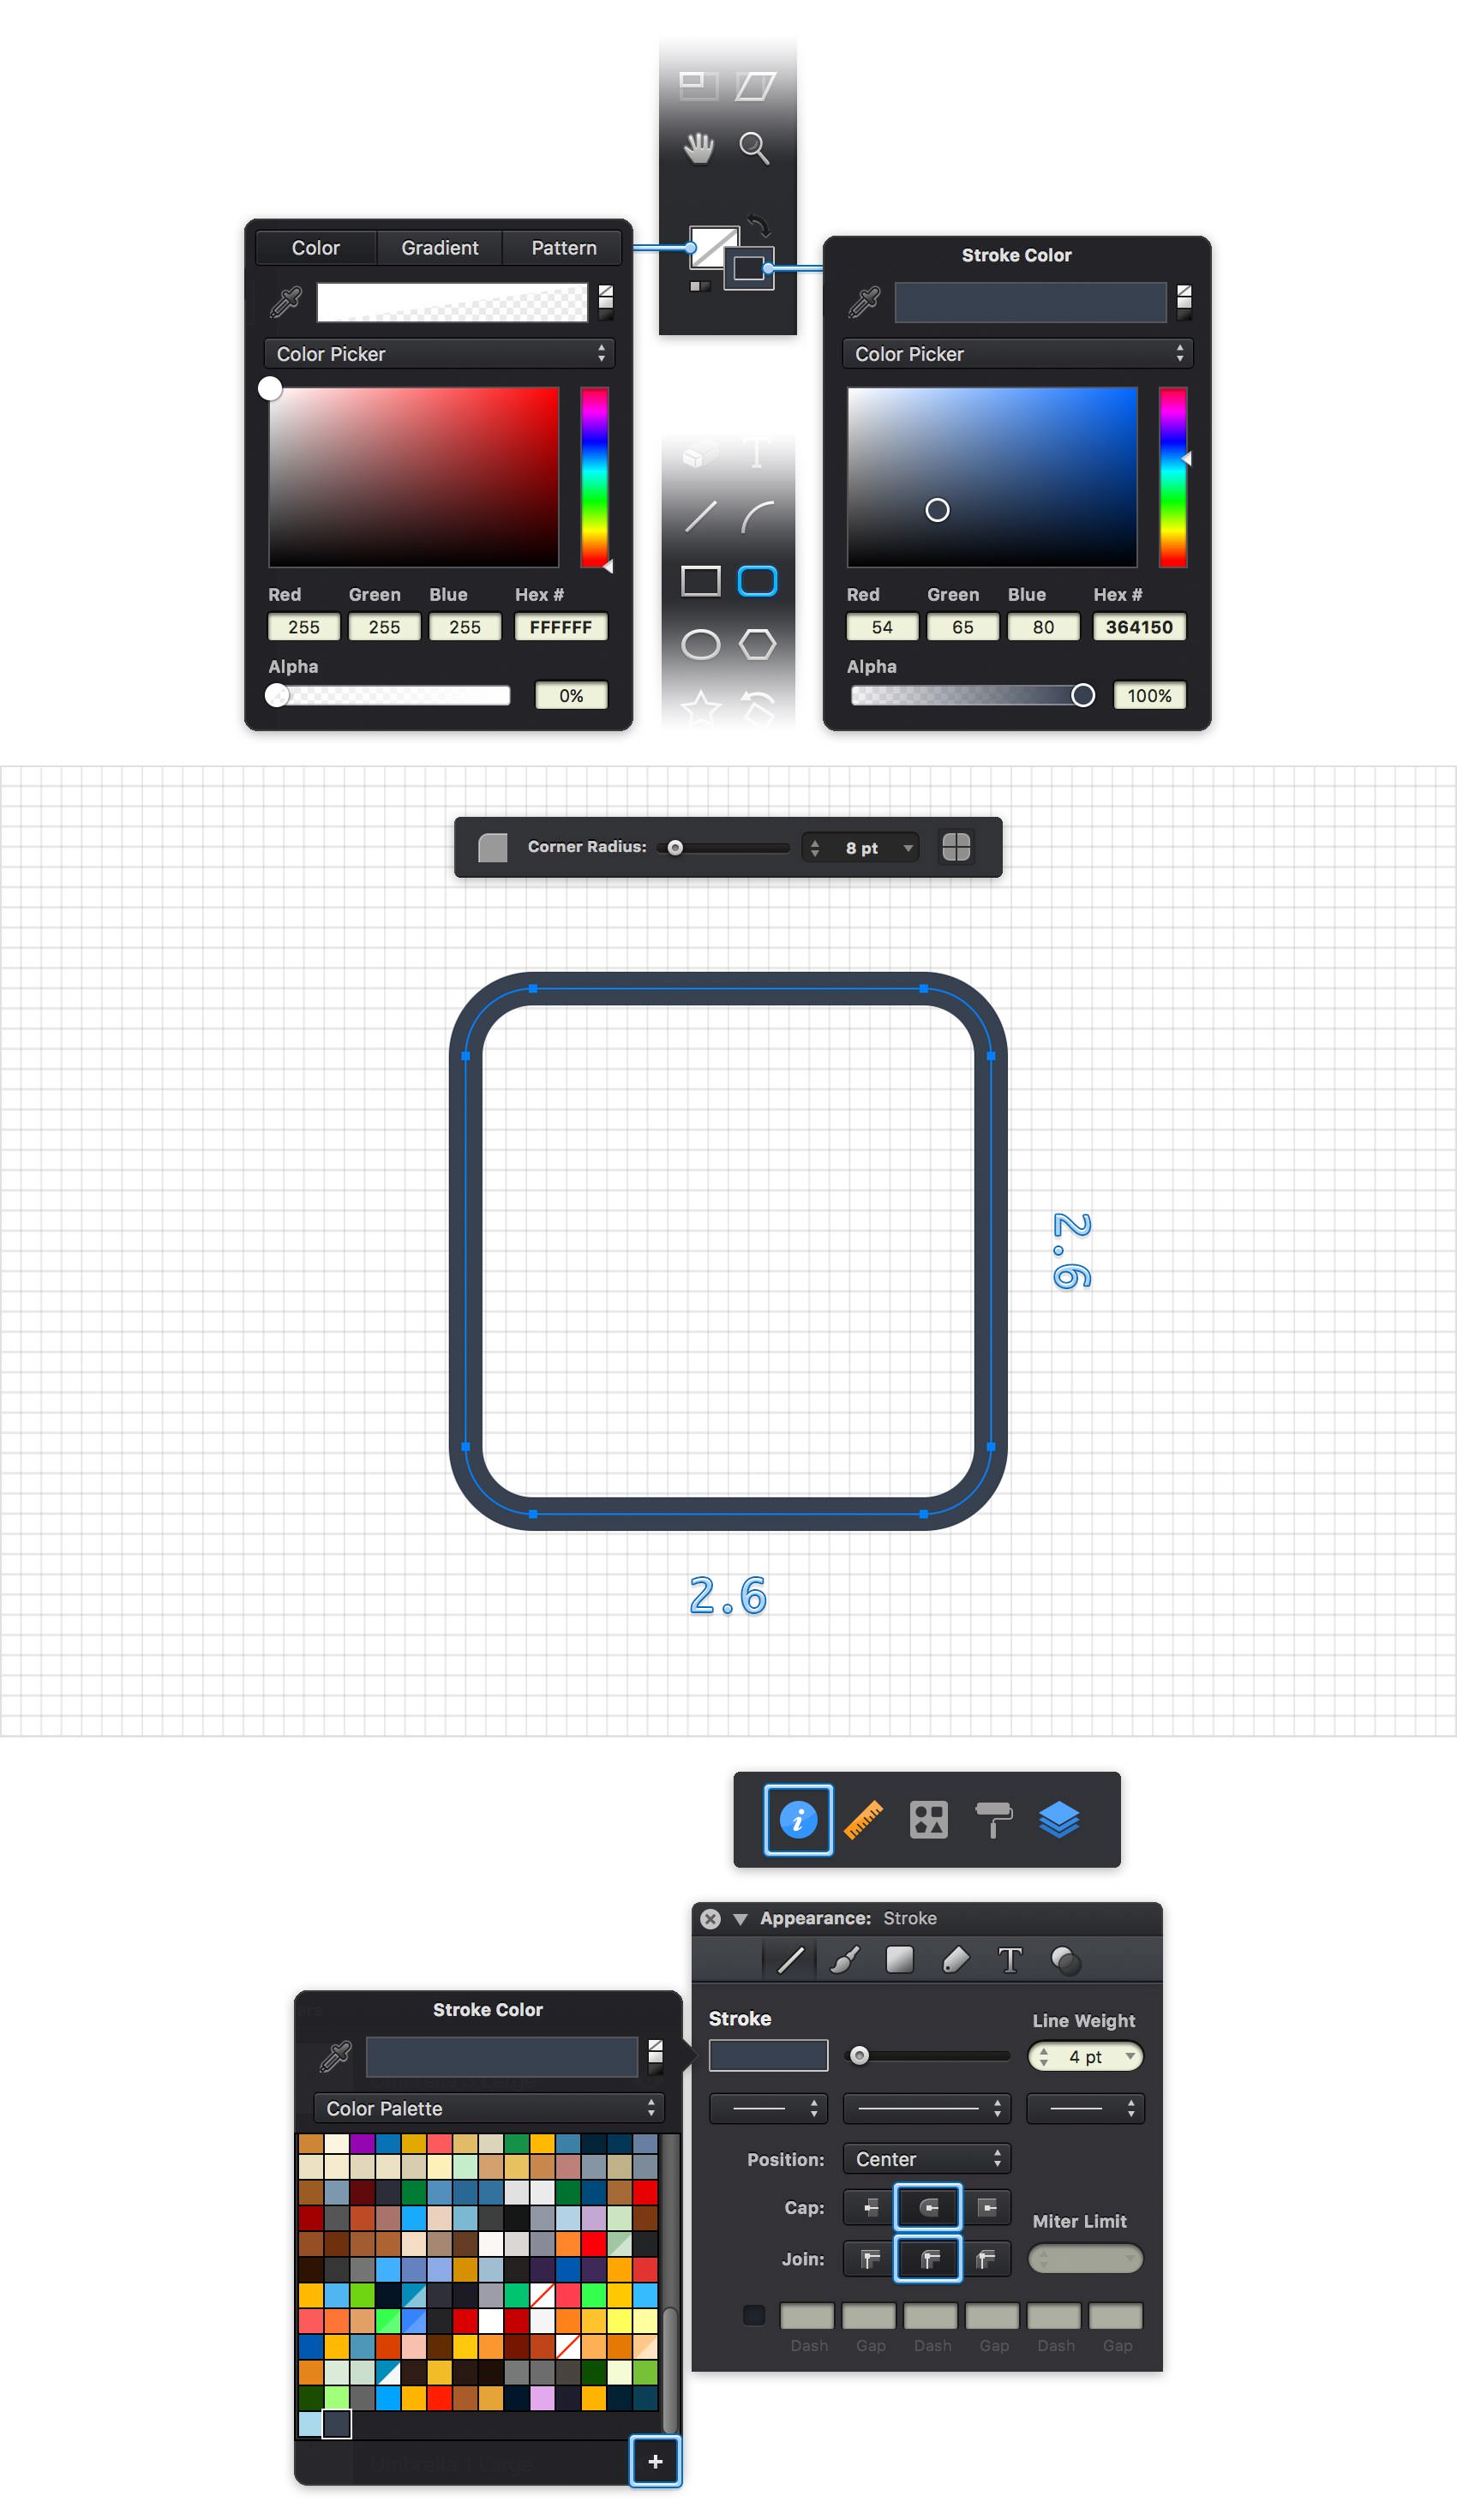
Focus on the Toolbar and notice that by default the Fill color is set to white while the Stroke color is set to black. Click the Stroke color well and replace the existing color with R=54 G=65 B=80 and then click the Fill color. drag that Alpha slider to 0% to make your Fill invisible.
Pick the Rounded Rectangle Tool (Shift + M), focus on the Tool Options bar and drag the Corner Radius slider to 8 pt. Move to your canvas and create a 2.6 x 2.6 ft shape – the grid and the Snap to Grid feature will ease your work. Holding the Shift key while dragging will make it easier for you to create this rounded square.
Make sure that this shape stays selected and go to the Stroke pane from the Appearance pane l– click the leftmost inspector panel icon to open or close the Appearance panel whenever you want. Drag the Line Weight slider to 4 pt, make sure that the Position is set to Center and don't forget to check the Round Cap and Round Join buttons. These two buttons won't change the look of your shape, but will help you later.
You should also save the stroke color used for this shape as you are about to use it throughout the entire tutorial. Click the color well from the Stroke pane (or the Stroke color well from your Toolbar), switch from the Color Picker to the Color Palette, and then click that plus button to add your active color to the existing set of colors.
Step 3
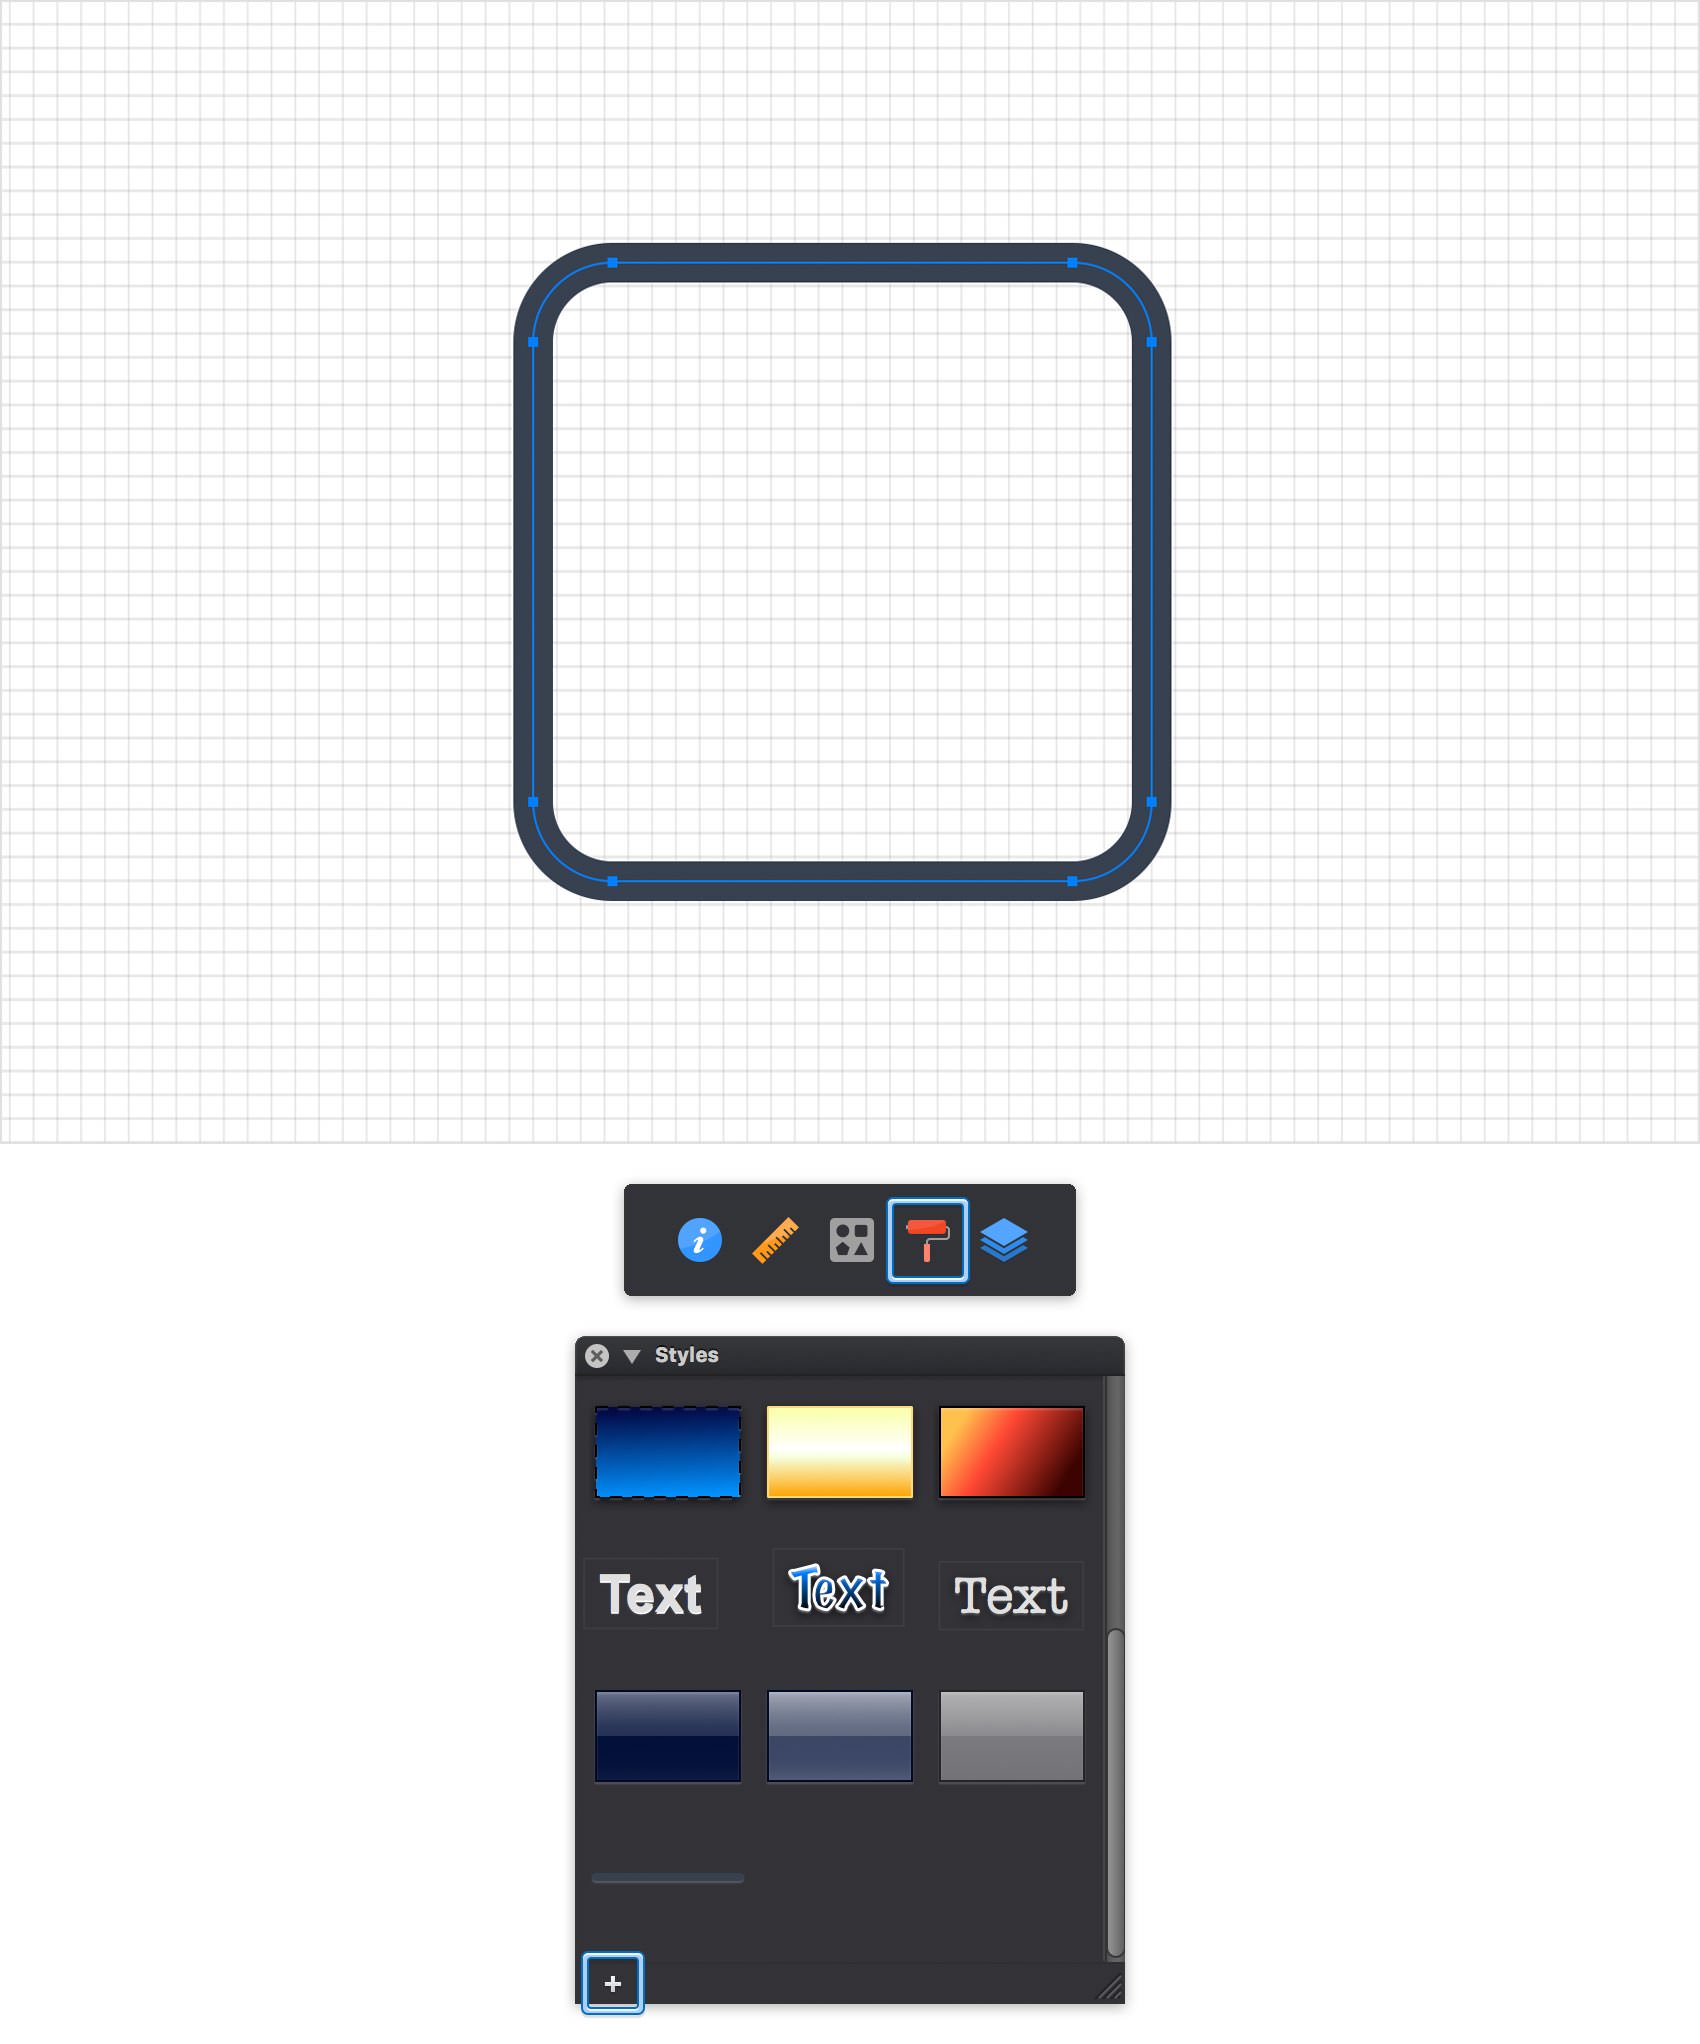
Make sure that your rounded rectangle is still selected and open the Styles panel – click that paint roller icon to open or close the Styles panel whenever you want. click that plus button from the bottom of the panel to save the attributes used for your selected shape. Using this style you will be able to quickly apply the appearance attributes of this rounded rectangle to other shapes.
Step 4
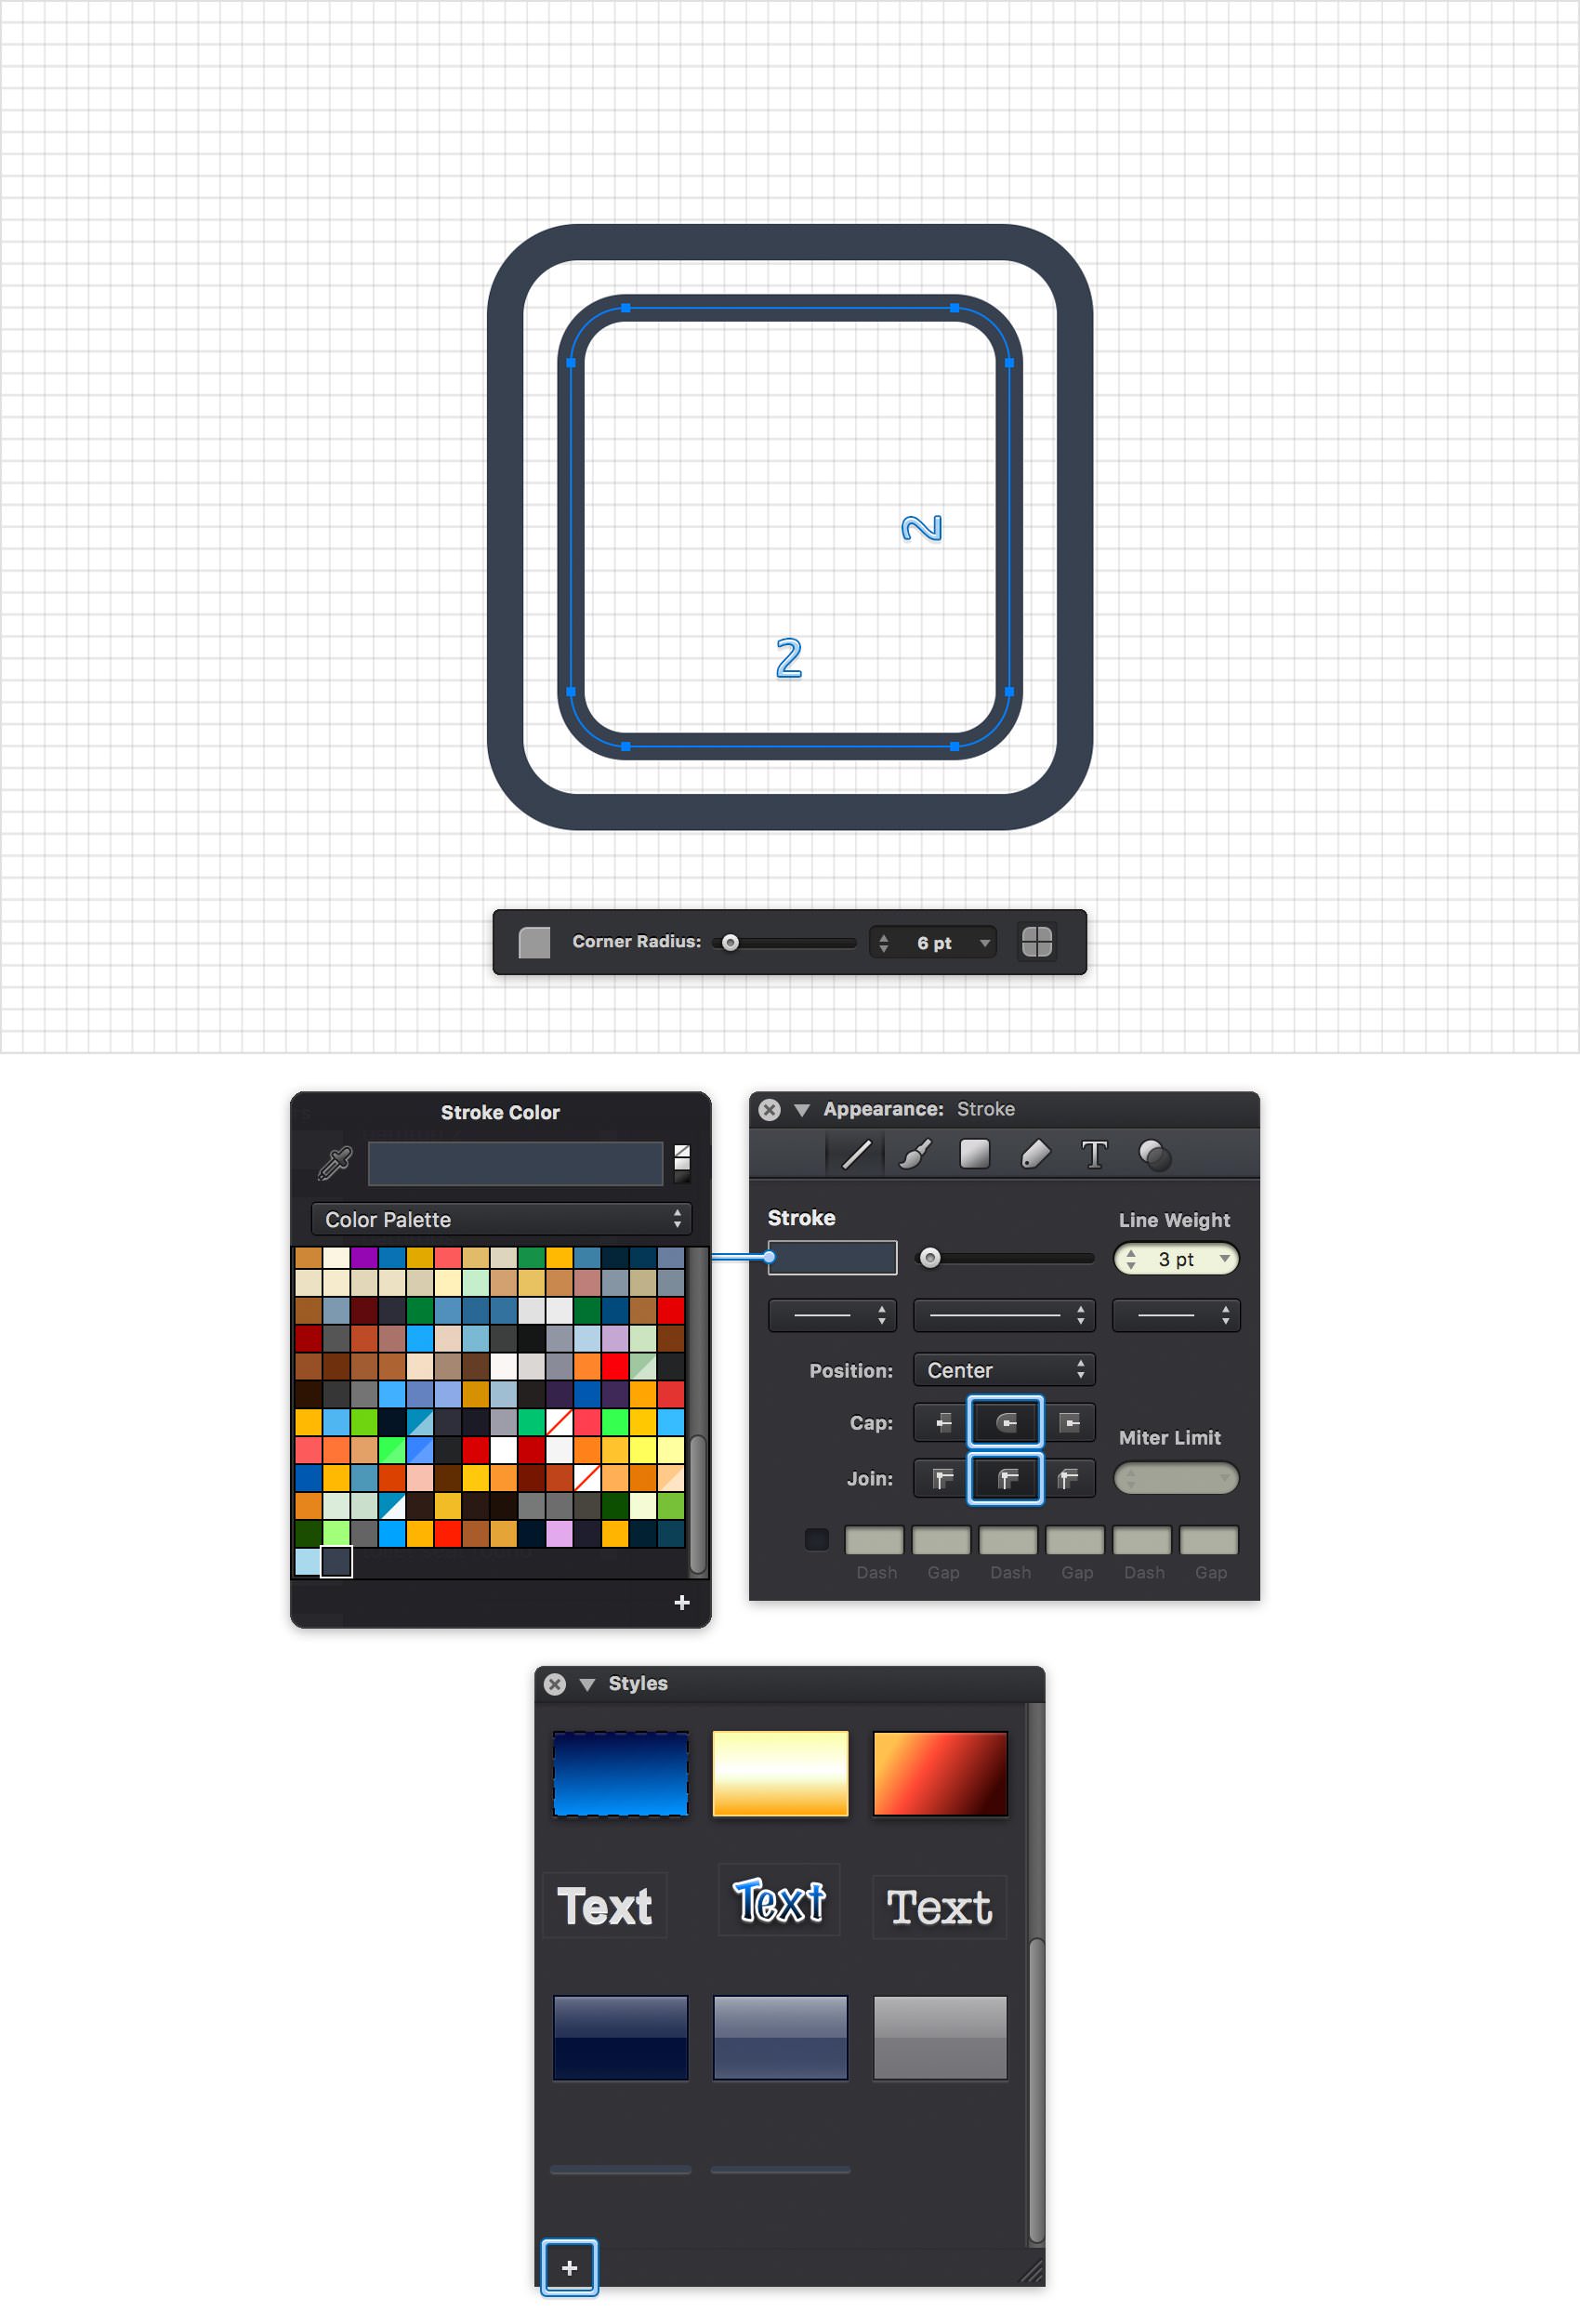
Reselect the Rounded Rectangle Tool (Shift + M), return to the Tool Options bar and drag that Corner Radius slider to 6 pt. Move to your canvas, create a 2 x 2 ft shape and place it exactly as shown in the following image.
Make sure that this new shape stays selected and focus on the Stroke pane. Drag the Line Weight slider to 3 pt and check the Round Cap and Round Join buttons. Also, click that Stroke color well and make sure that you're using the saved color.
With this new, rounded rectangle selected, move to the Styles panel and save a second style.
Step 5
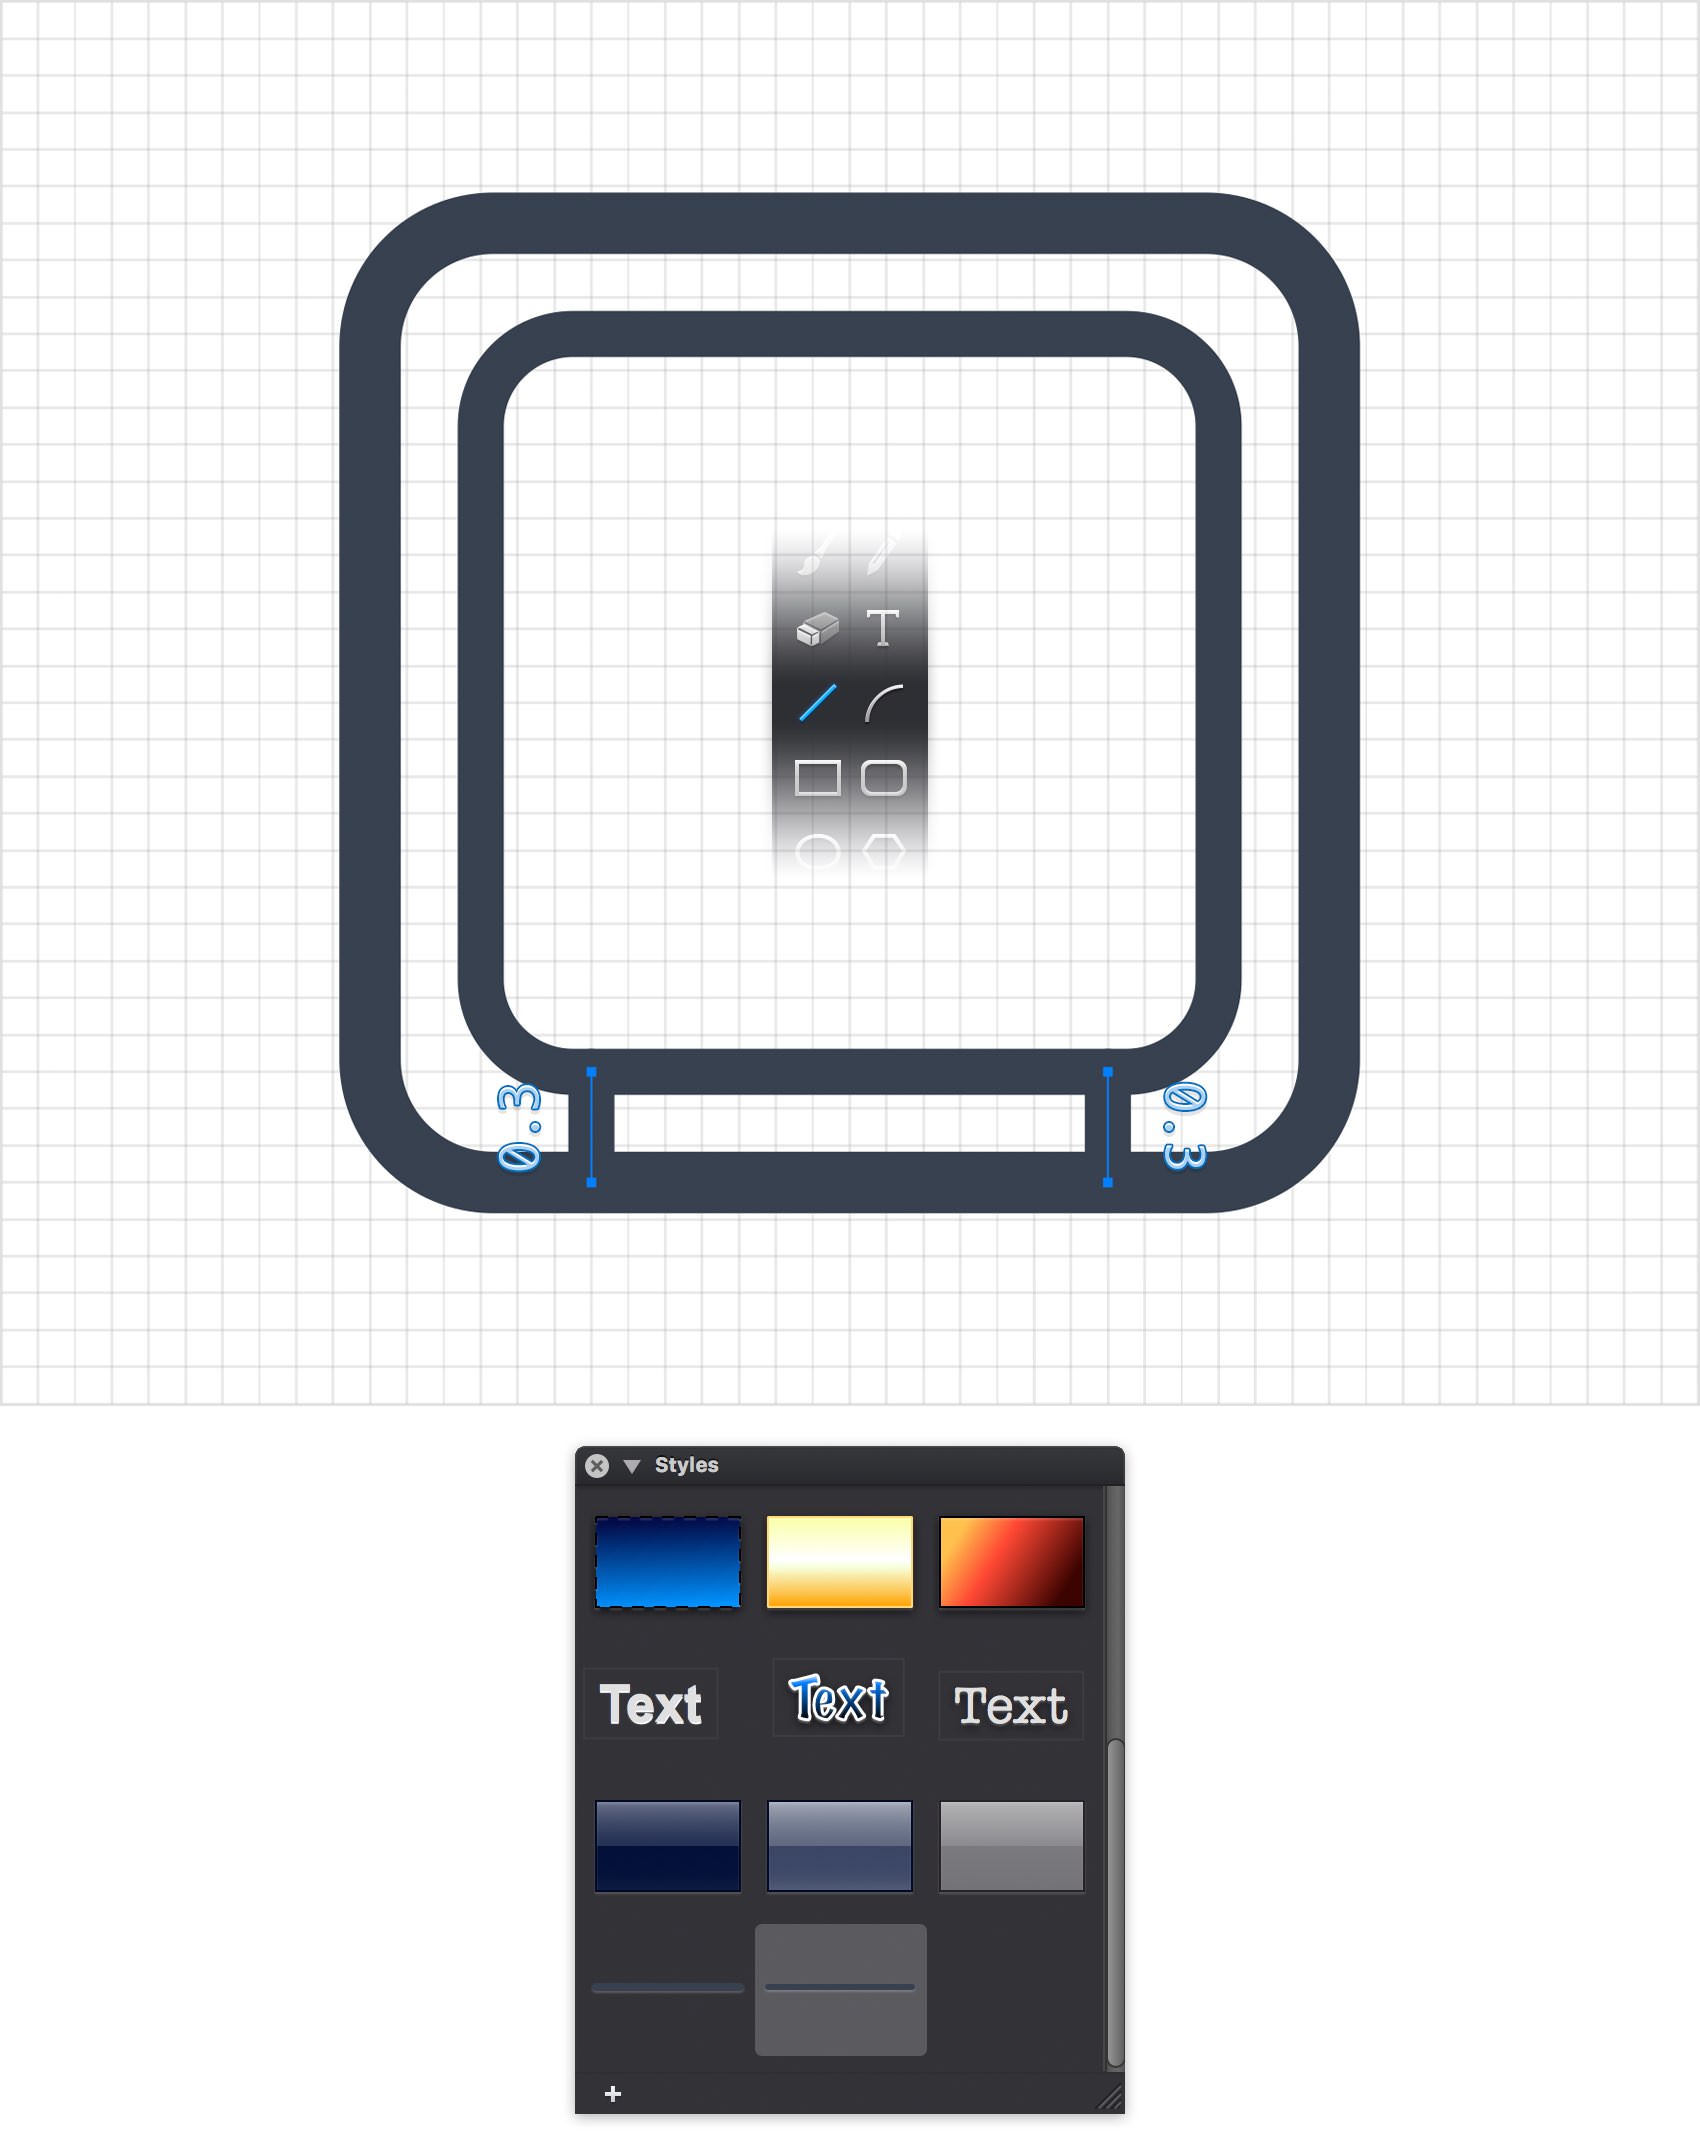
Using the Line Tool (L), create two, 0.3 ft, vertical lines. Hold the Shift key while dragging to easily create a straight line.
Place these new paths exactly as shown in the following image and apply your second style from the Styles panel.
Step 6
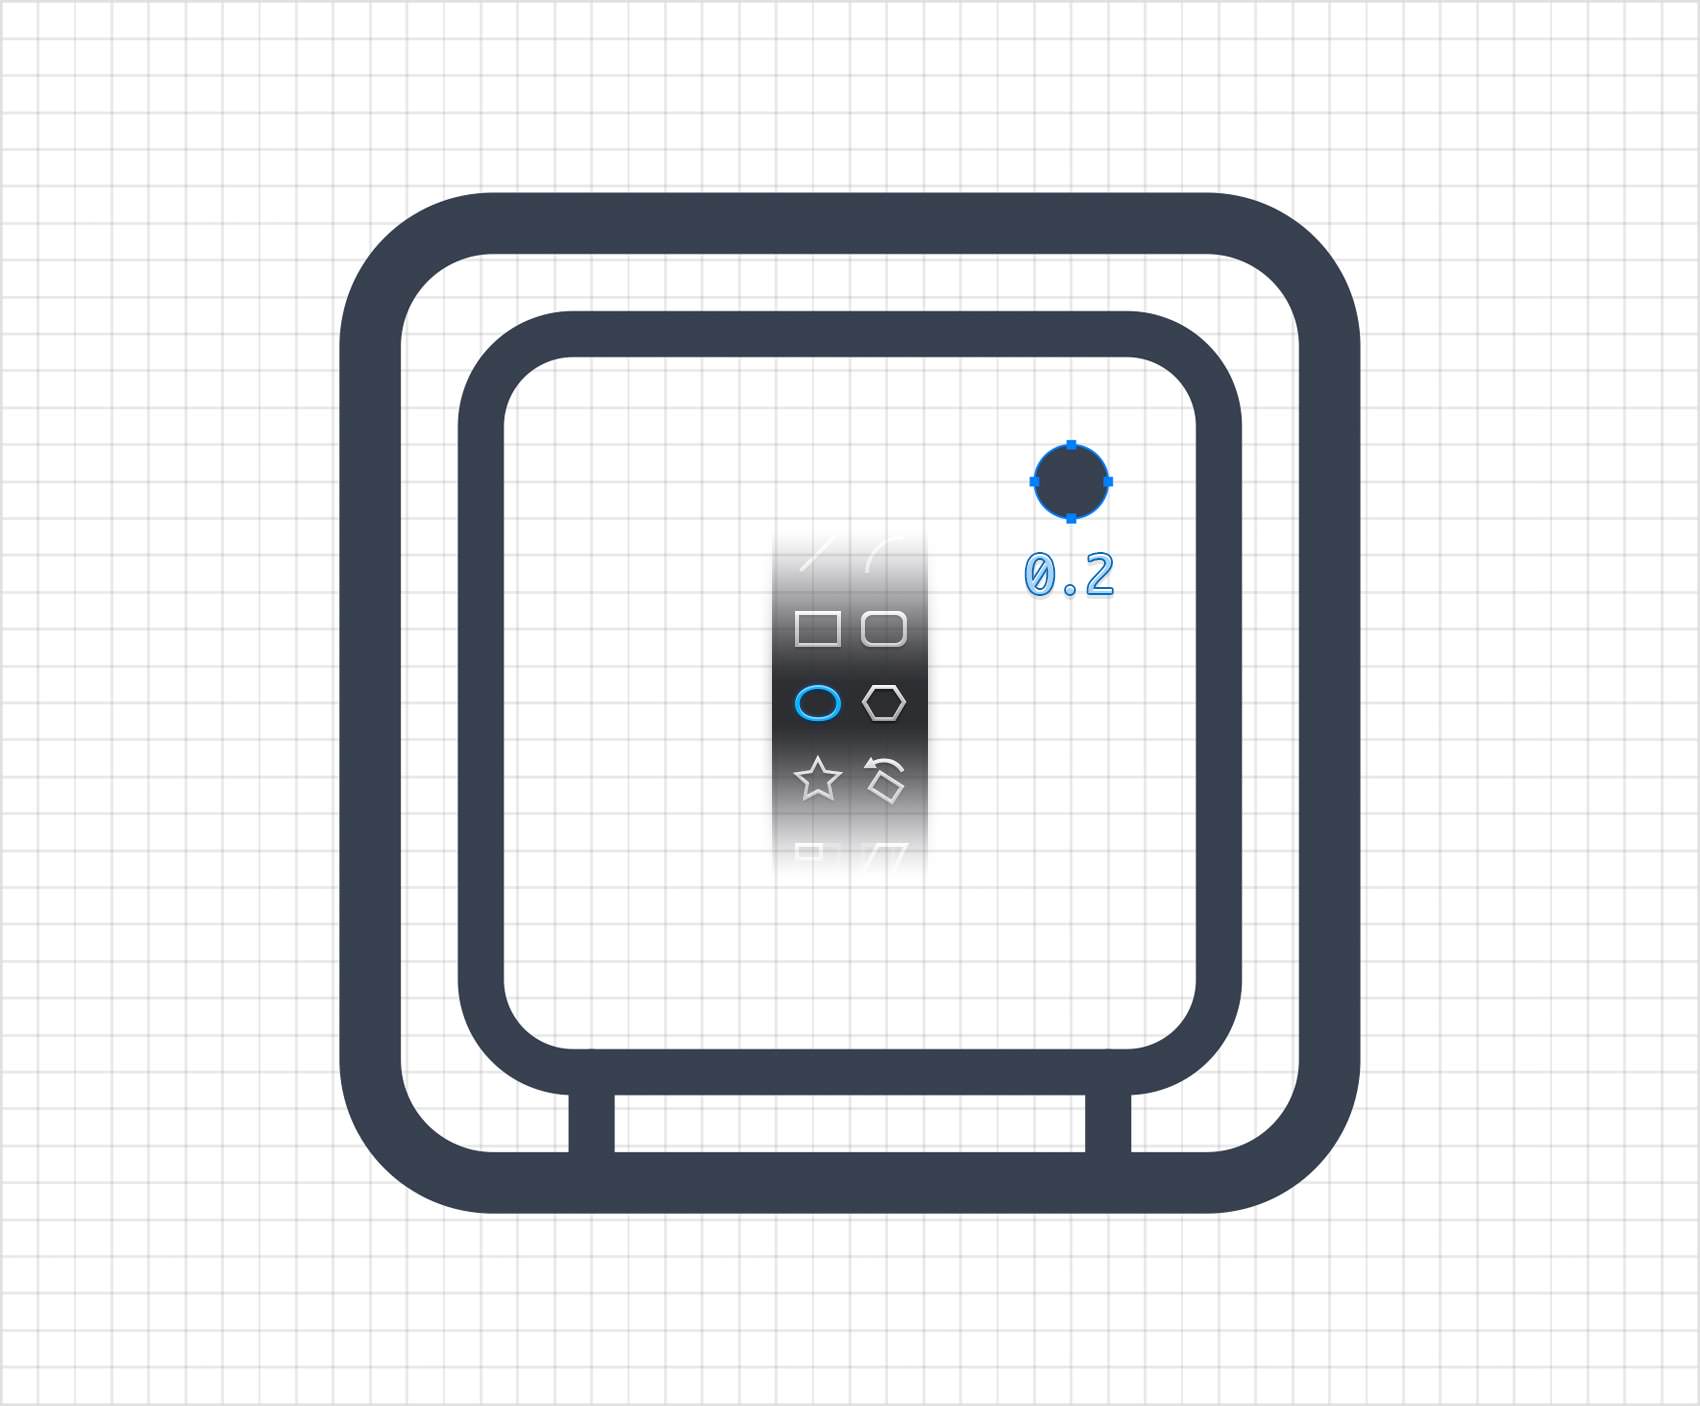
Go to your Toolbar, make the Stroke invisible and then select the Fill and apply your saved color.
Pick the Ellipse Tool (L), create a 0.2 ft circle and place it as shown in the following image. Hold the Shift key while dragging to easily create a perfect circle.
Step 7
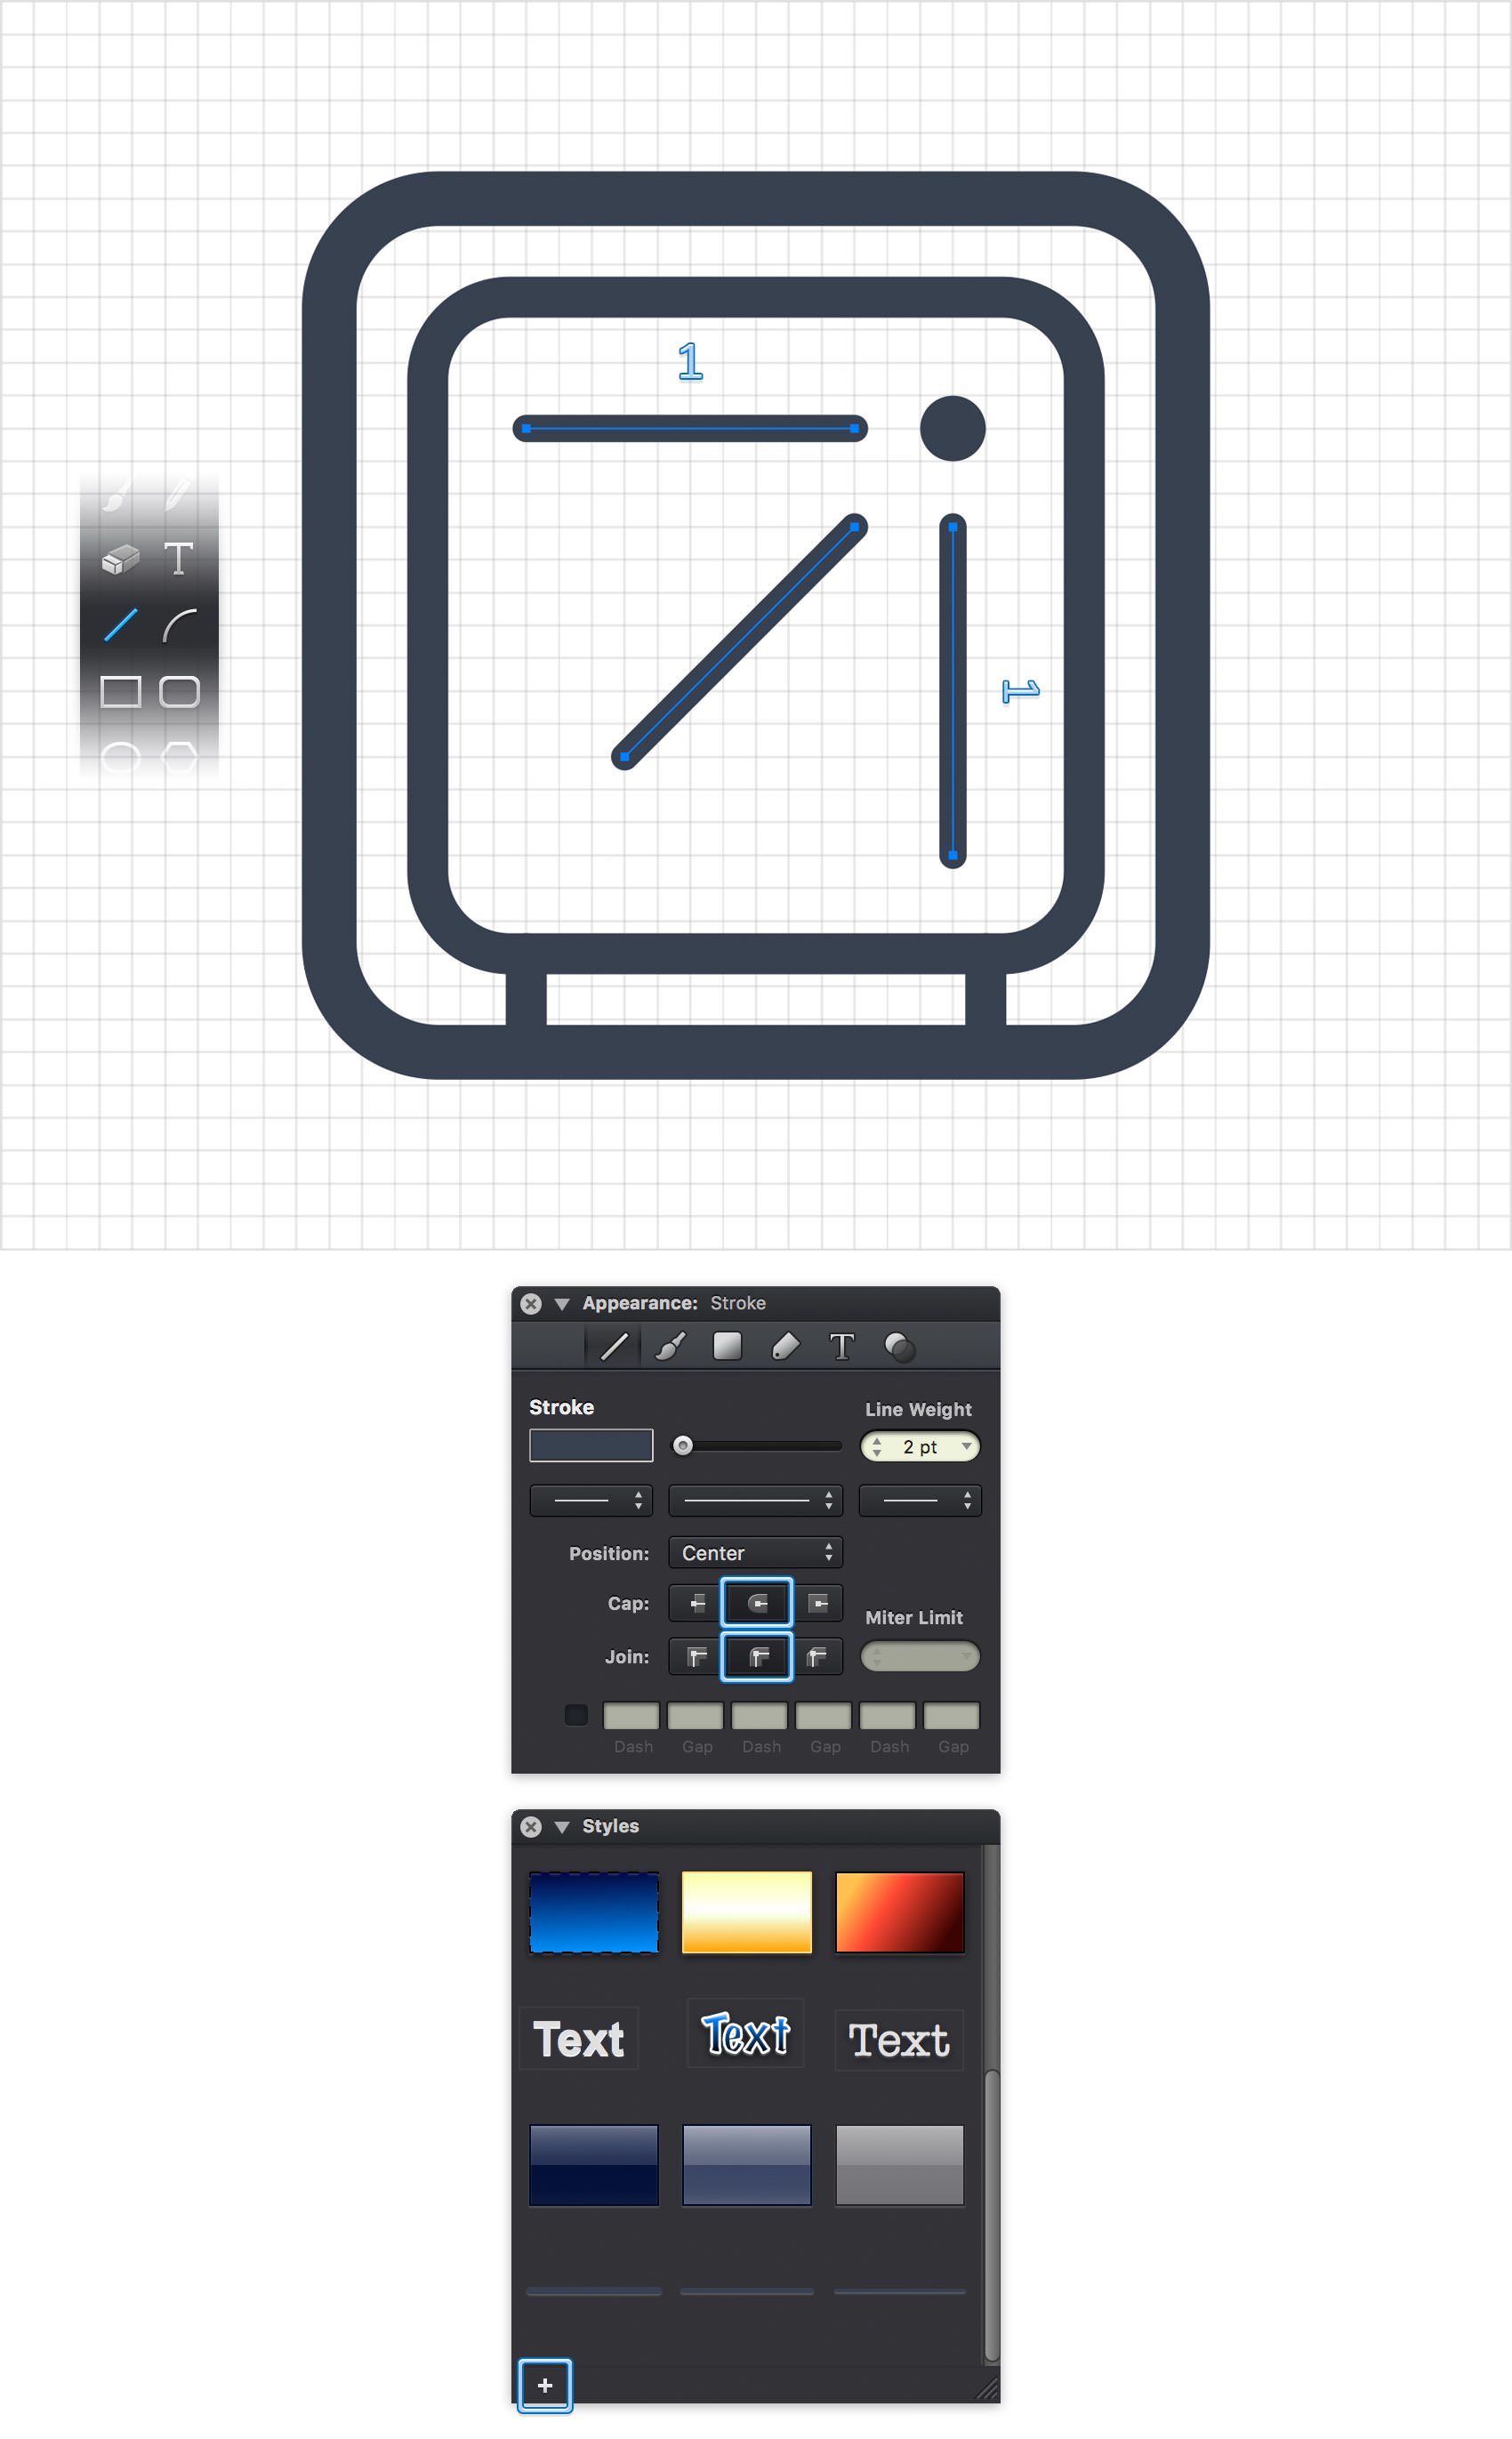
Go to your Toolbar, make the Fill invisible and then select the Stroke and apply your saved color.
Using the Line Tool (L), create the three straight lines shown in the following image. Remember to hold the Shift key while dragging to easily create a perfect, oblique or straight line.
Use the Move Tool (V) and the Shift key to select all three paths, go to the Styles pane and apply your second saved style. Move to the Stroke pane and drag that Line Weight slider to 2 pt. Return to the Styles panel and save your third style using that same plus button.
Step 8
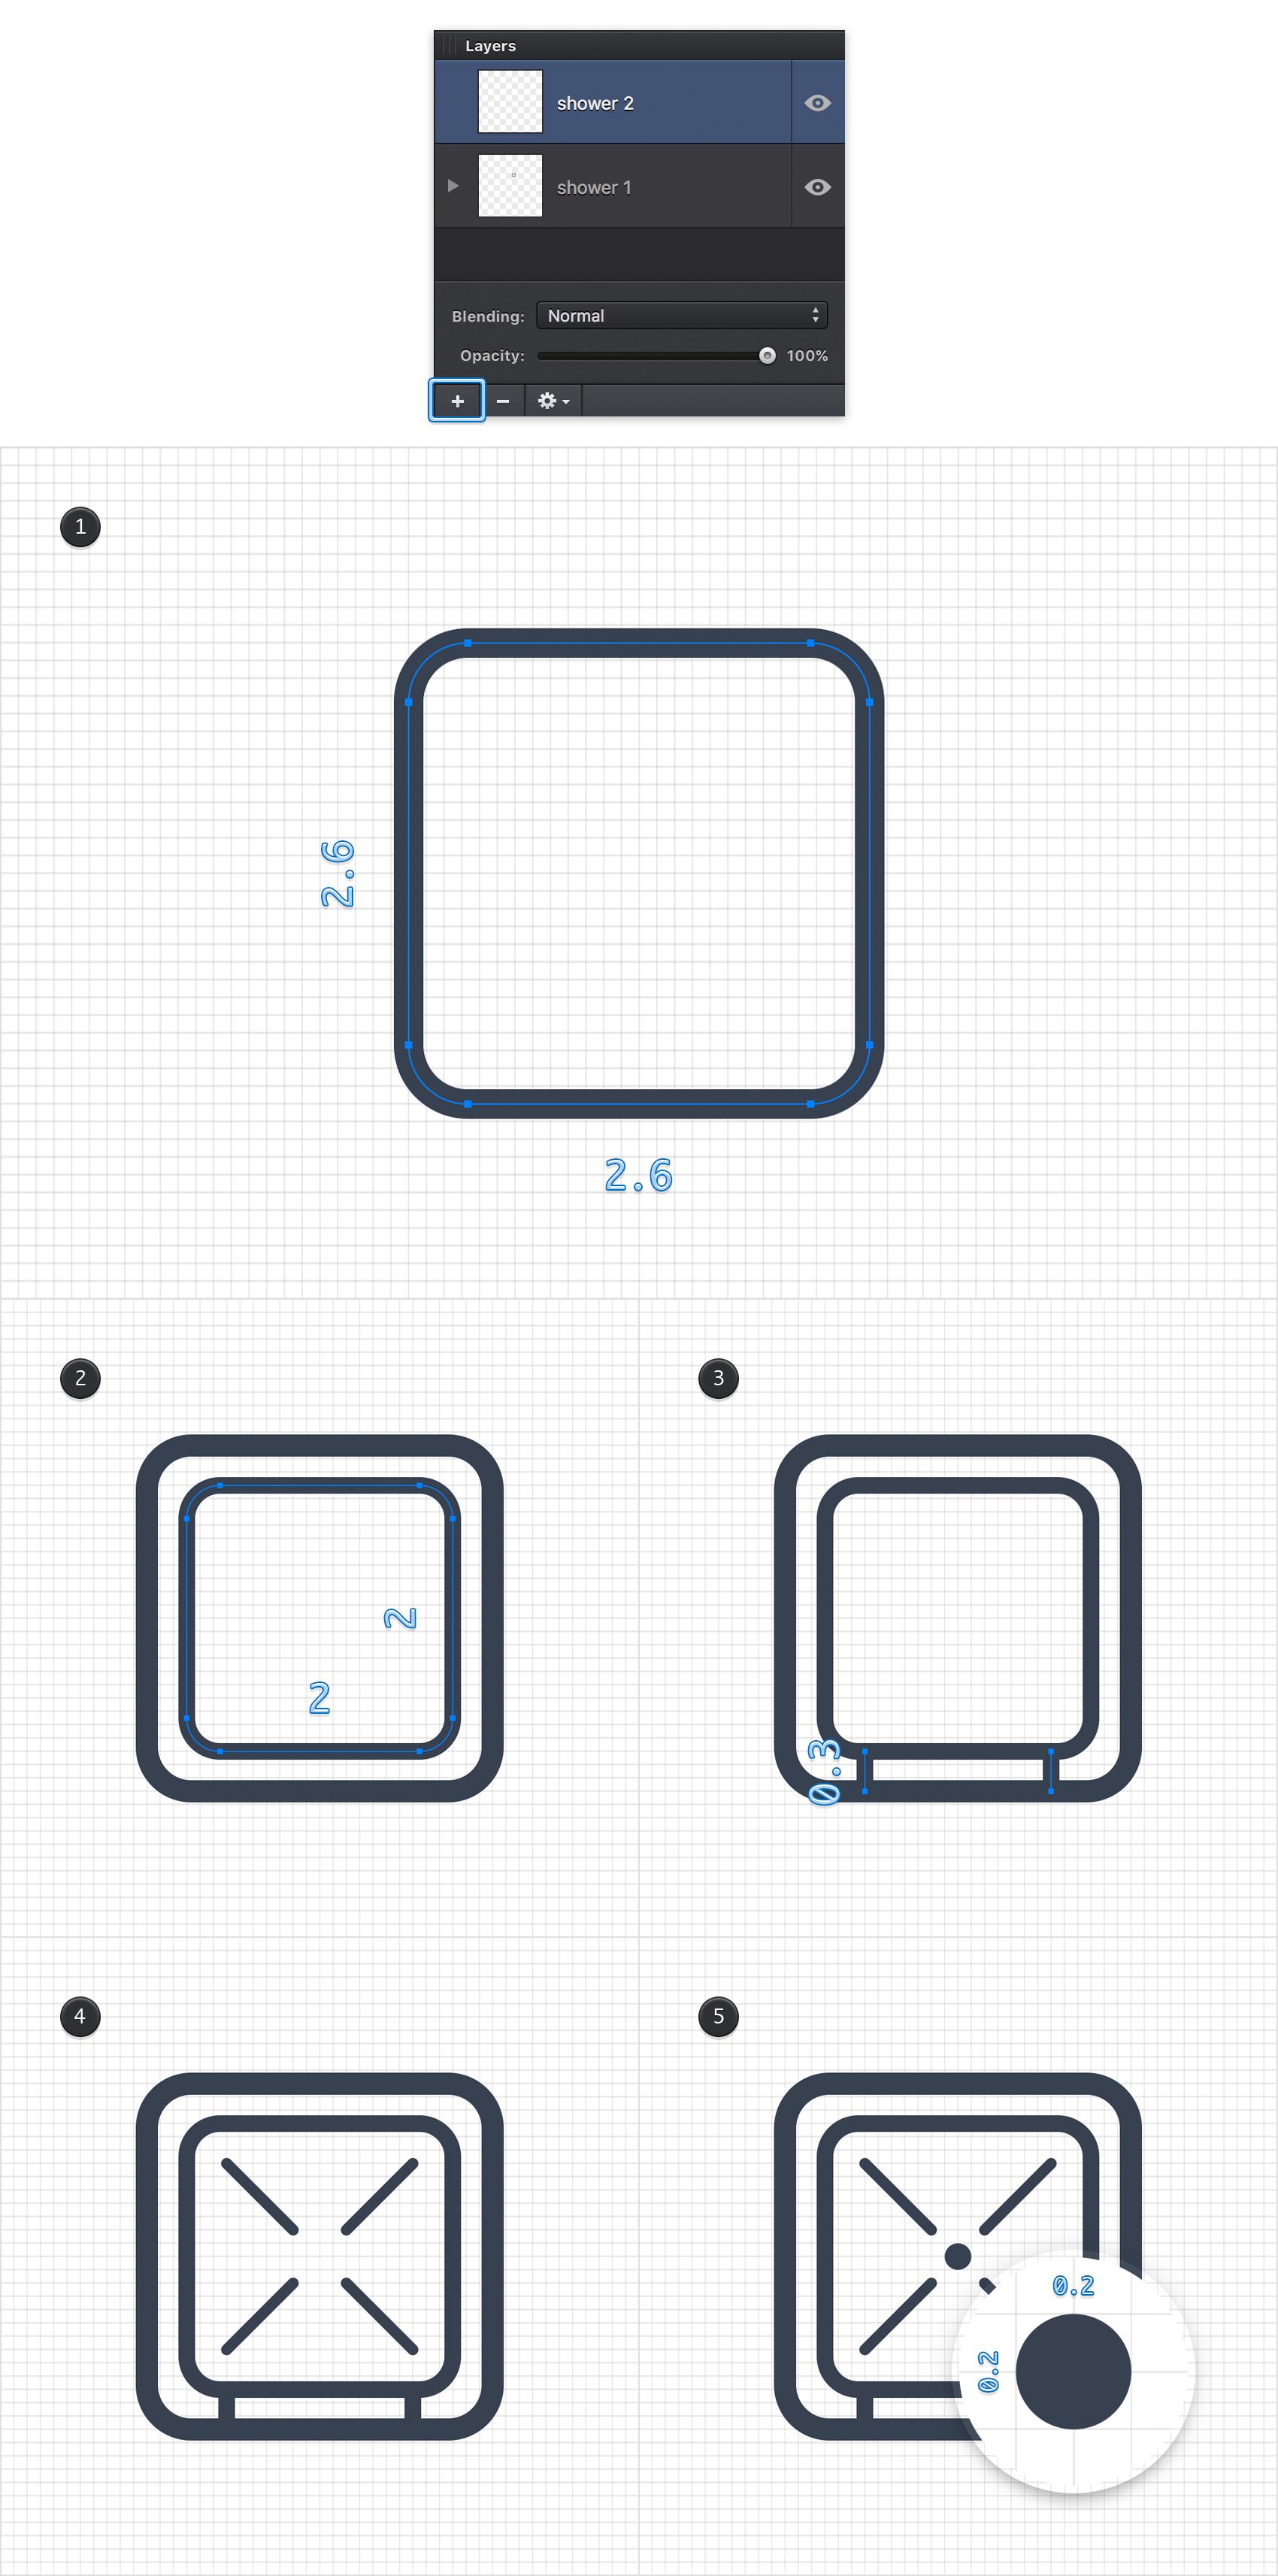
Focus on the Layers panel, double click the name of the existing layer and rename it "shower 1". Move to the bottom of the panel and use that plus button to add a second layer. Rename this new layer "shower 2" and make sure that it stays selected, as the new shapes you are about to create will go here.
Pick the Rounded Rectangle Tool (Shift + M) and set the Corner Radius to 8 pt. Move to your canvas, create a 2.6 x 2.6 ft shape and apply your first style from the Styles panel.
Return to the Tool Options bar and lower the Corner Radius attribute to 6 pt. Create a 2 x 2 ft shape, place it as shown in the second image and apply your second style from the Styles panel.
Switch to the Line Tool (L) and create two, 0.3 ft, vertical paths. Place these new lines as shown in the third image and apply your second style from the Styles panel. Using that same Line Tool (L), create the four oblique paths shown in the fourth image and apply your third style from the Styles panel.
Finally, pick the Ellipse Tool (L) and create a 0.2 ft circle. Place it as shown in the fifth image and fill it with your color from the Color Palette.
Step 9
Move to the Layers panel and add a third layer. Rename it "shower 3" and make sure that it stays selected.
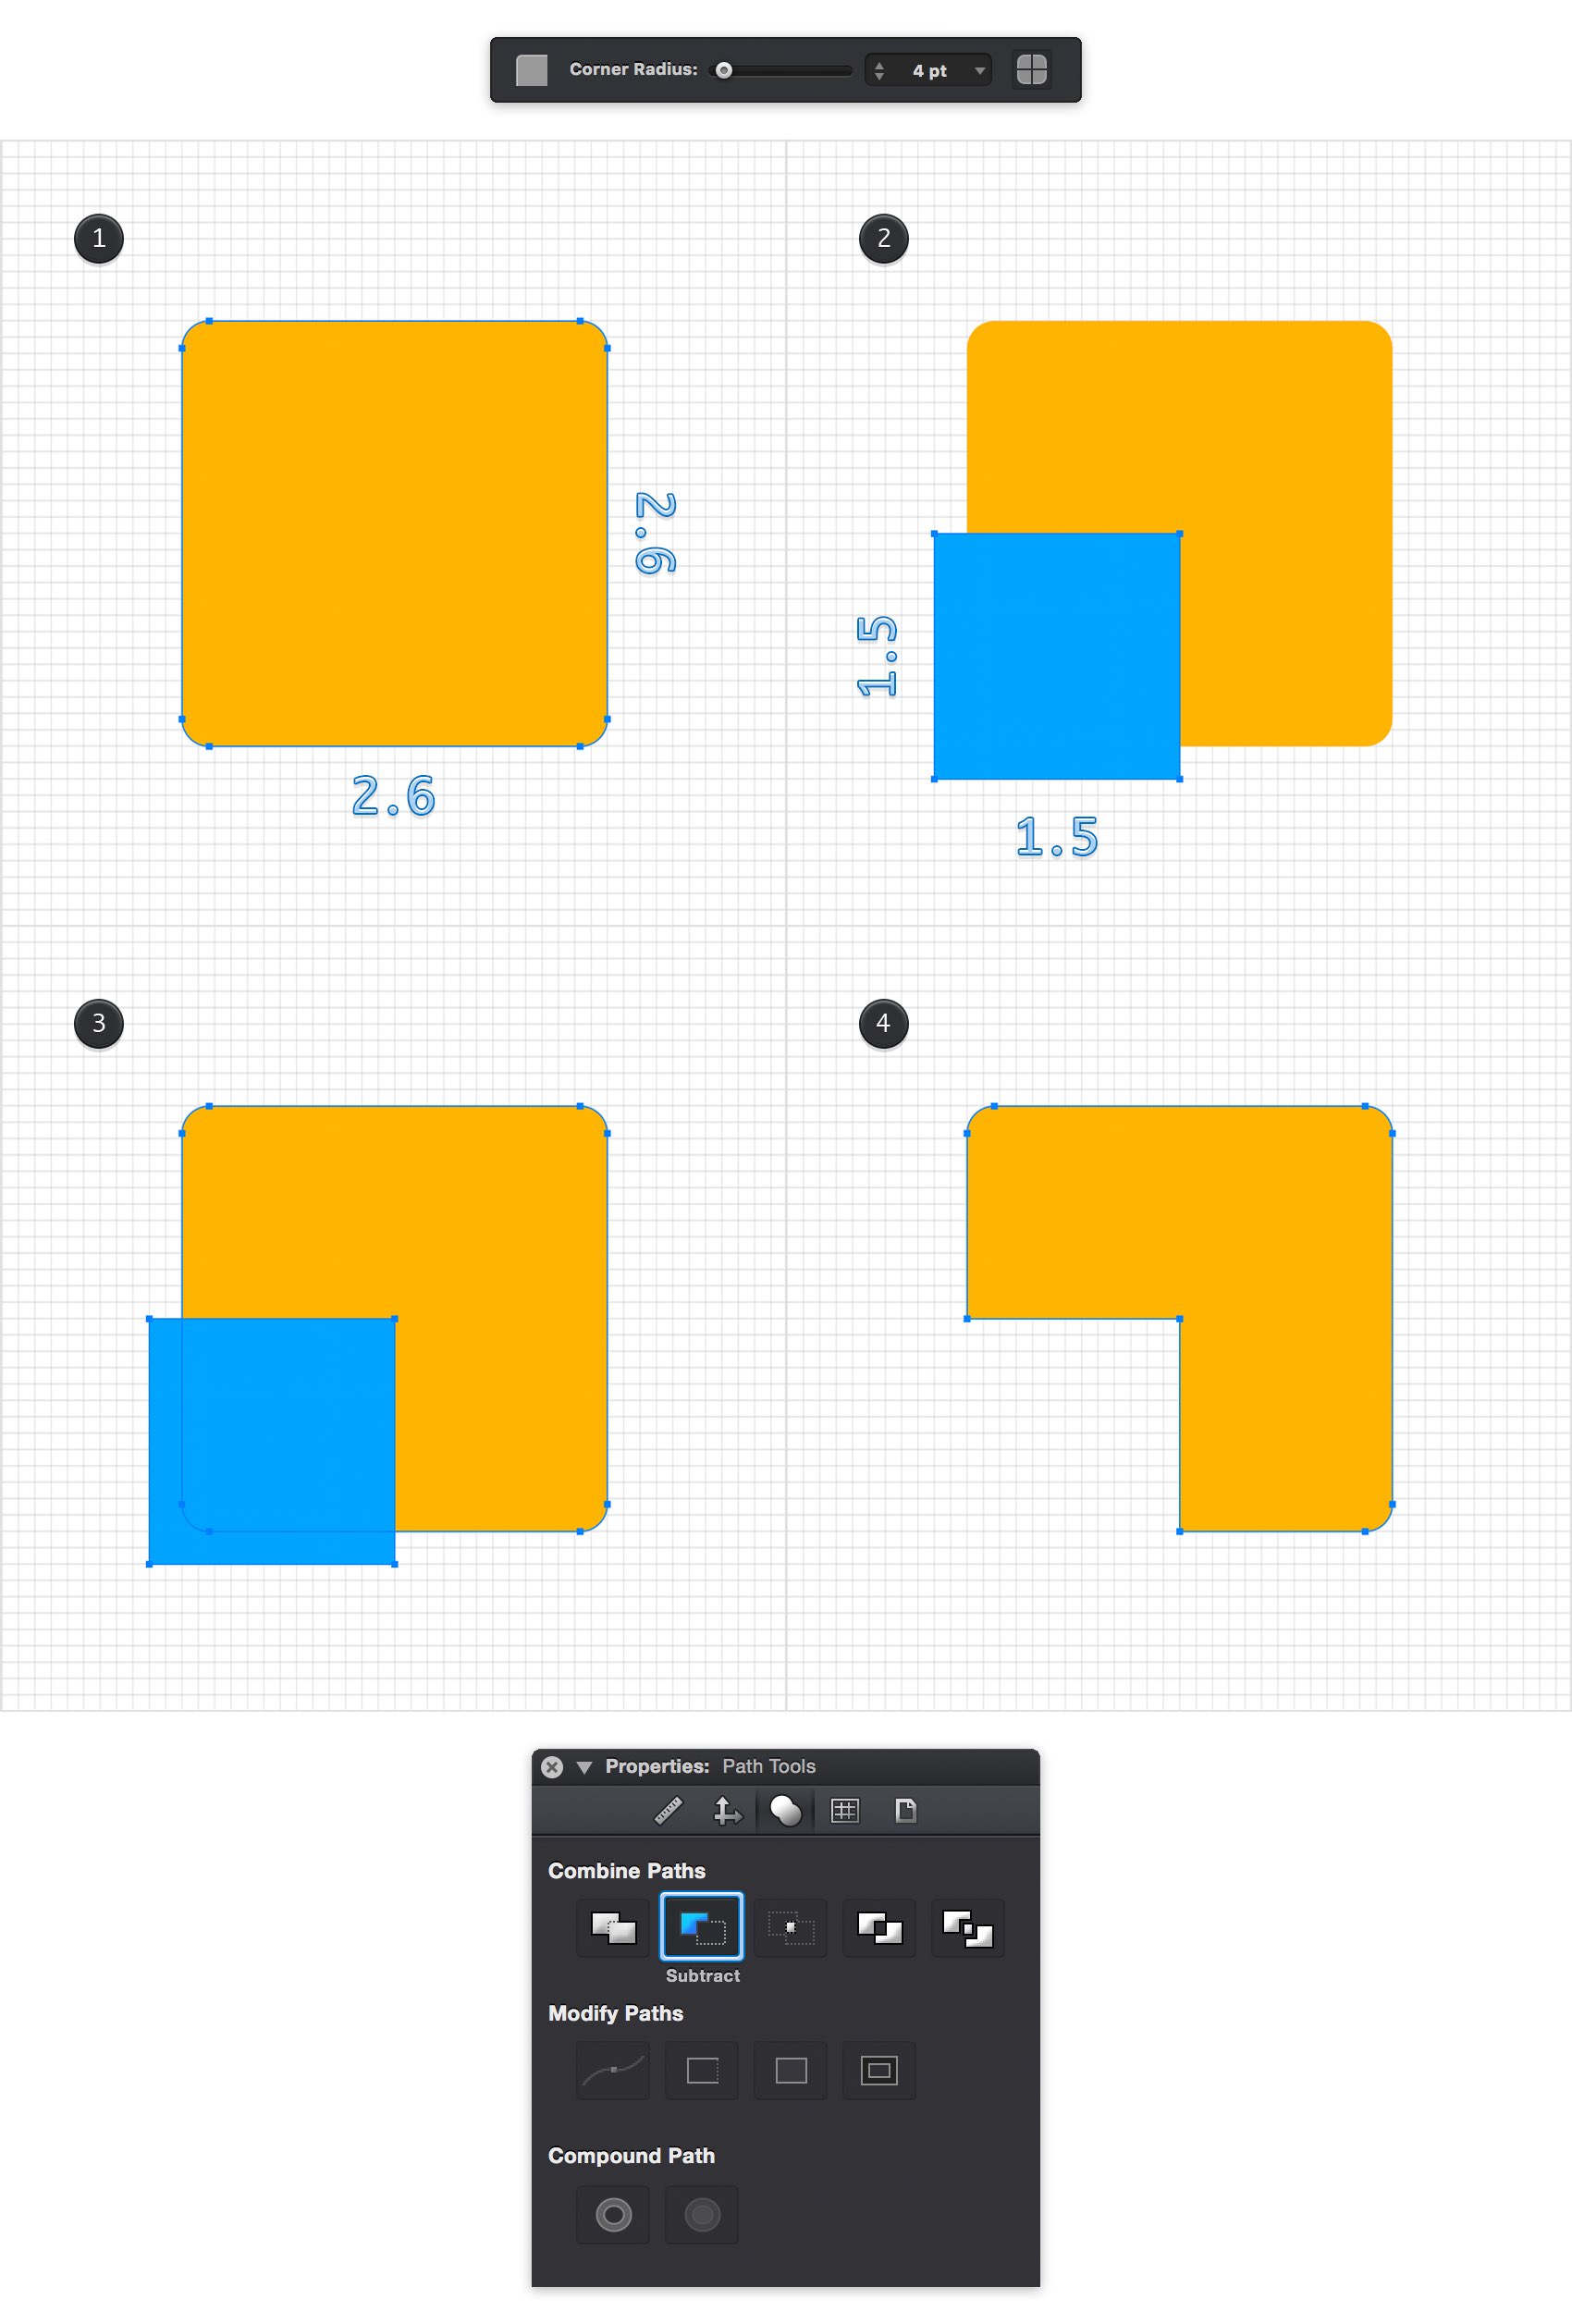
Pick the Rounded Rectangle Tool (Shift + M), focus on the Tool Options bar and drag the Corner Radius slider to 4 pt. Create a 2.6 x 2.6 ft shape and fill it with a random yellow. Switch to the Rectangle Tool (M), create a 1.5 ft square, fill it with a random blue and place it exactly as shown in the second image.
Using the Move Tool (V), select both shapes made in this step, go to the Path Tools pane from the Properties panel and click the Subtract command. In the end your yellow shape should look like in the fourth image.
Step 10
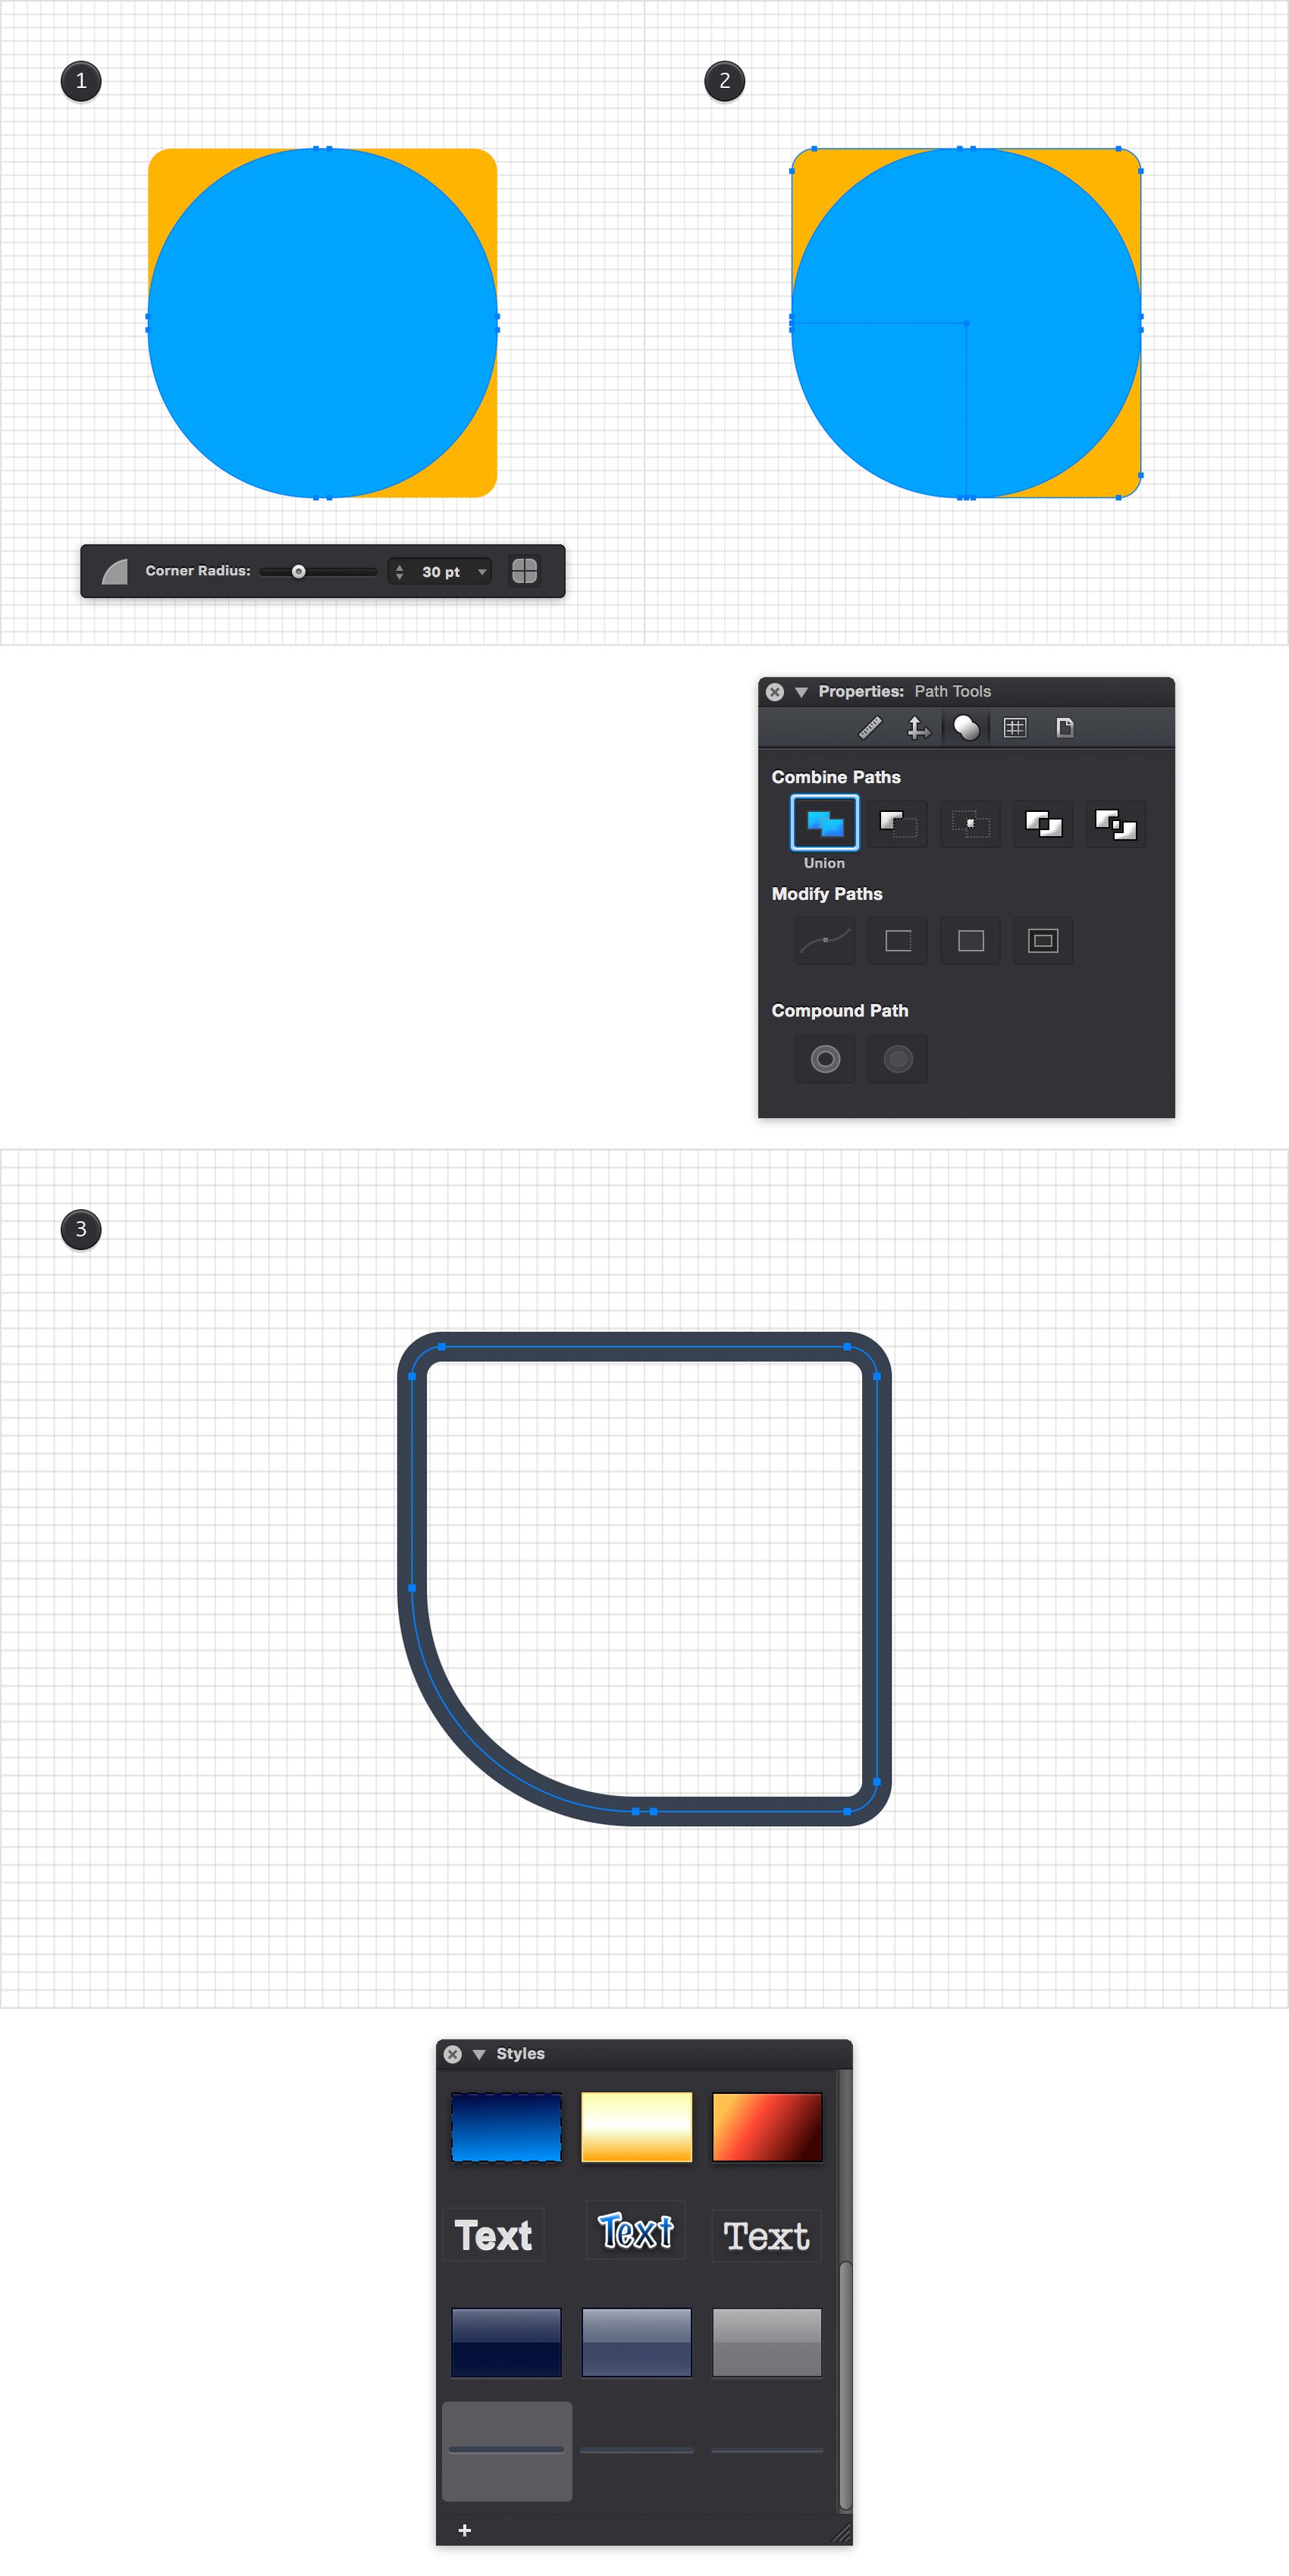
Pick the Rounded Rectangle Tool (Shift + M), focus on the Tool Options bar and drag the Corner Radius slider to 30 pt. Move to your canvas, create a 2.6 x 2.6 ft shape and place it above your yellow shape.
Select this new shape along with the yellow one, return to the Path Tools pane and click the Union command. Make sure that the resulting shape is selected and apply your first style from the Styles panel.
Step 11
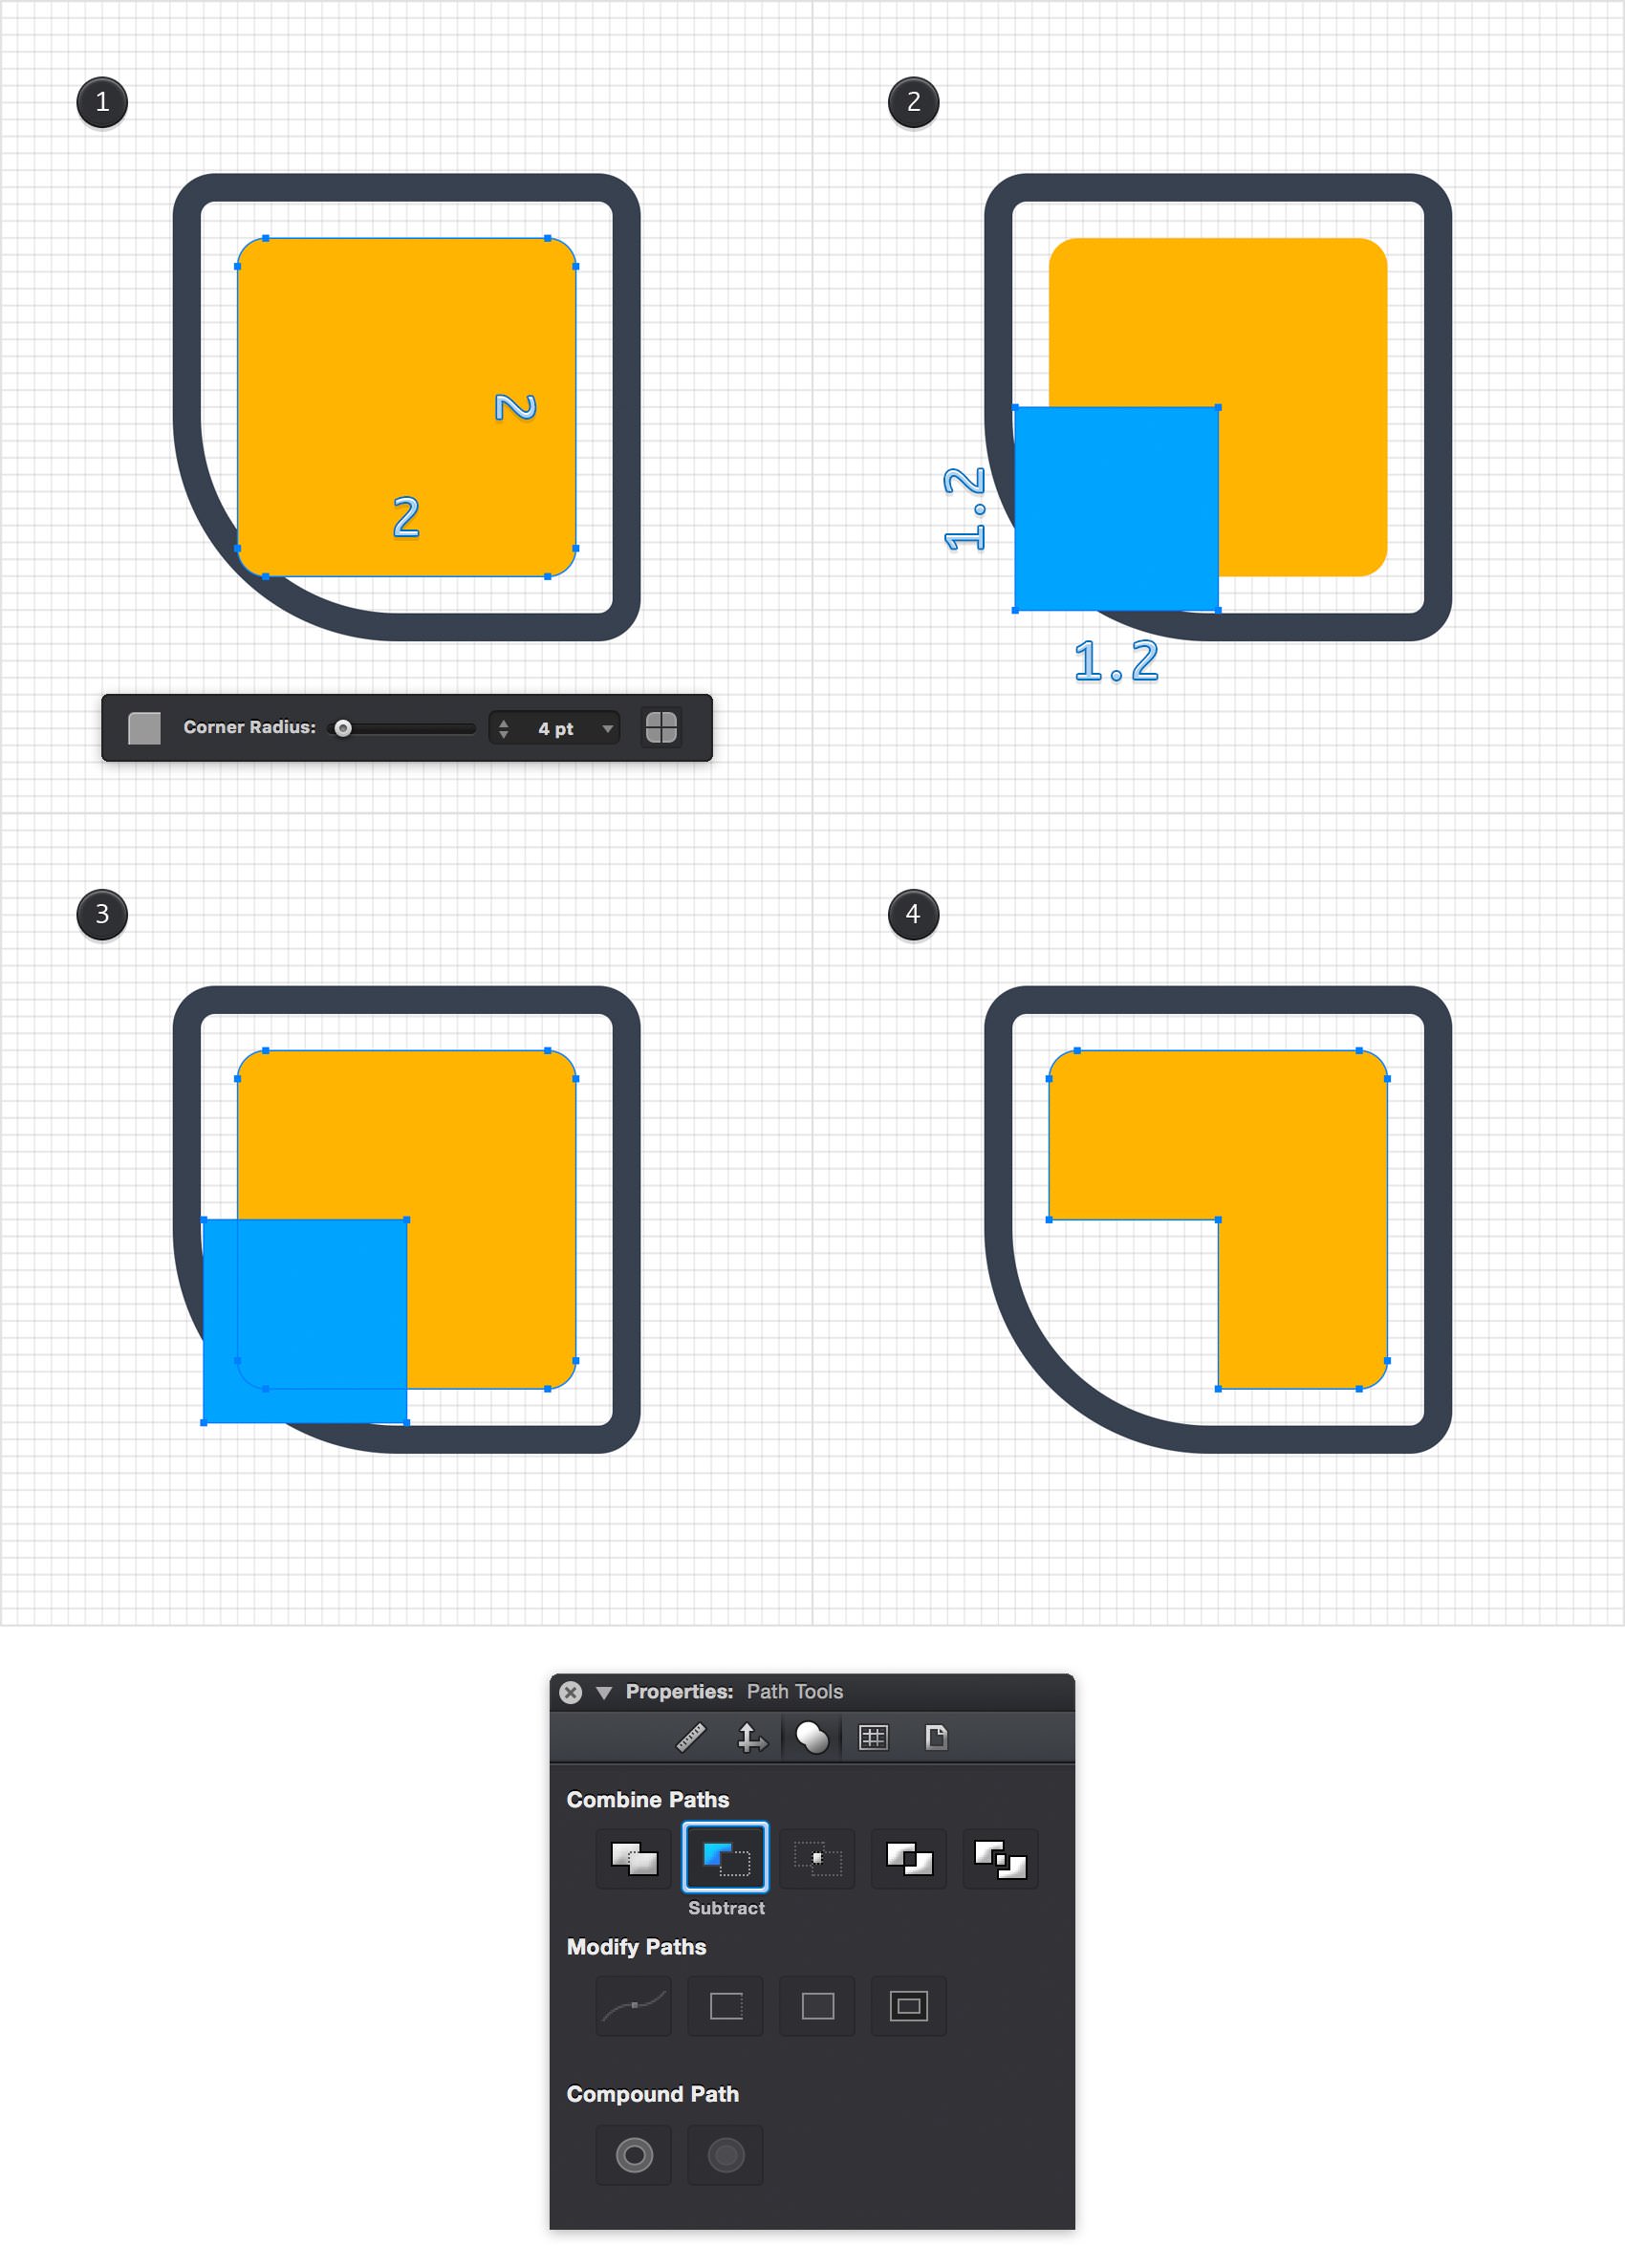
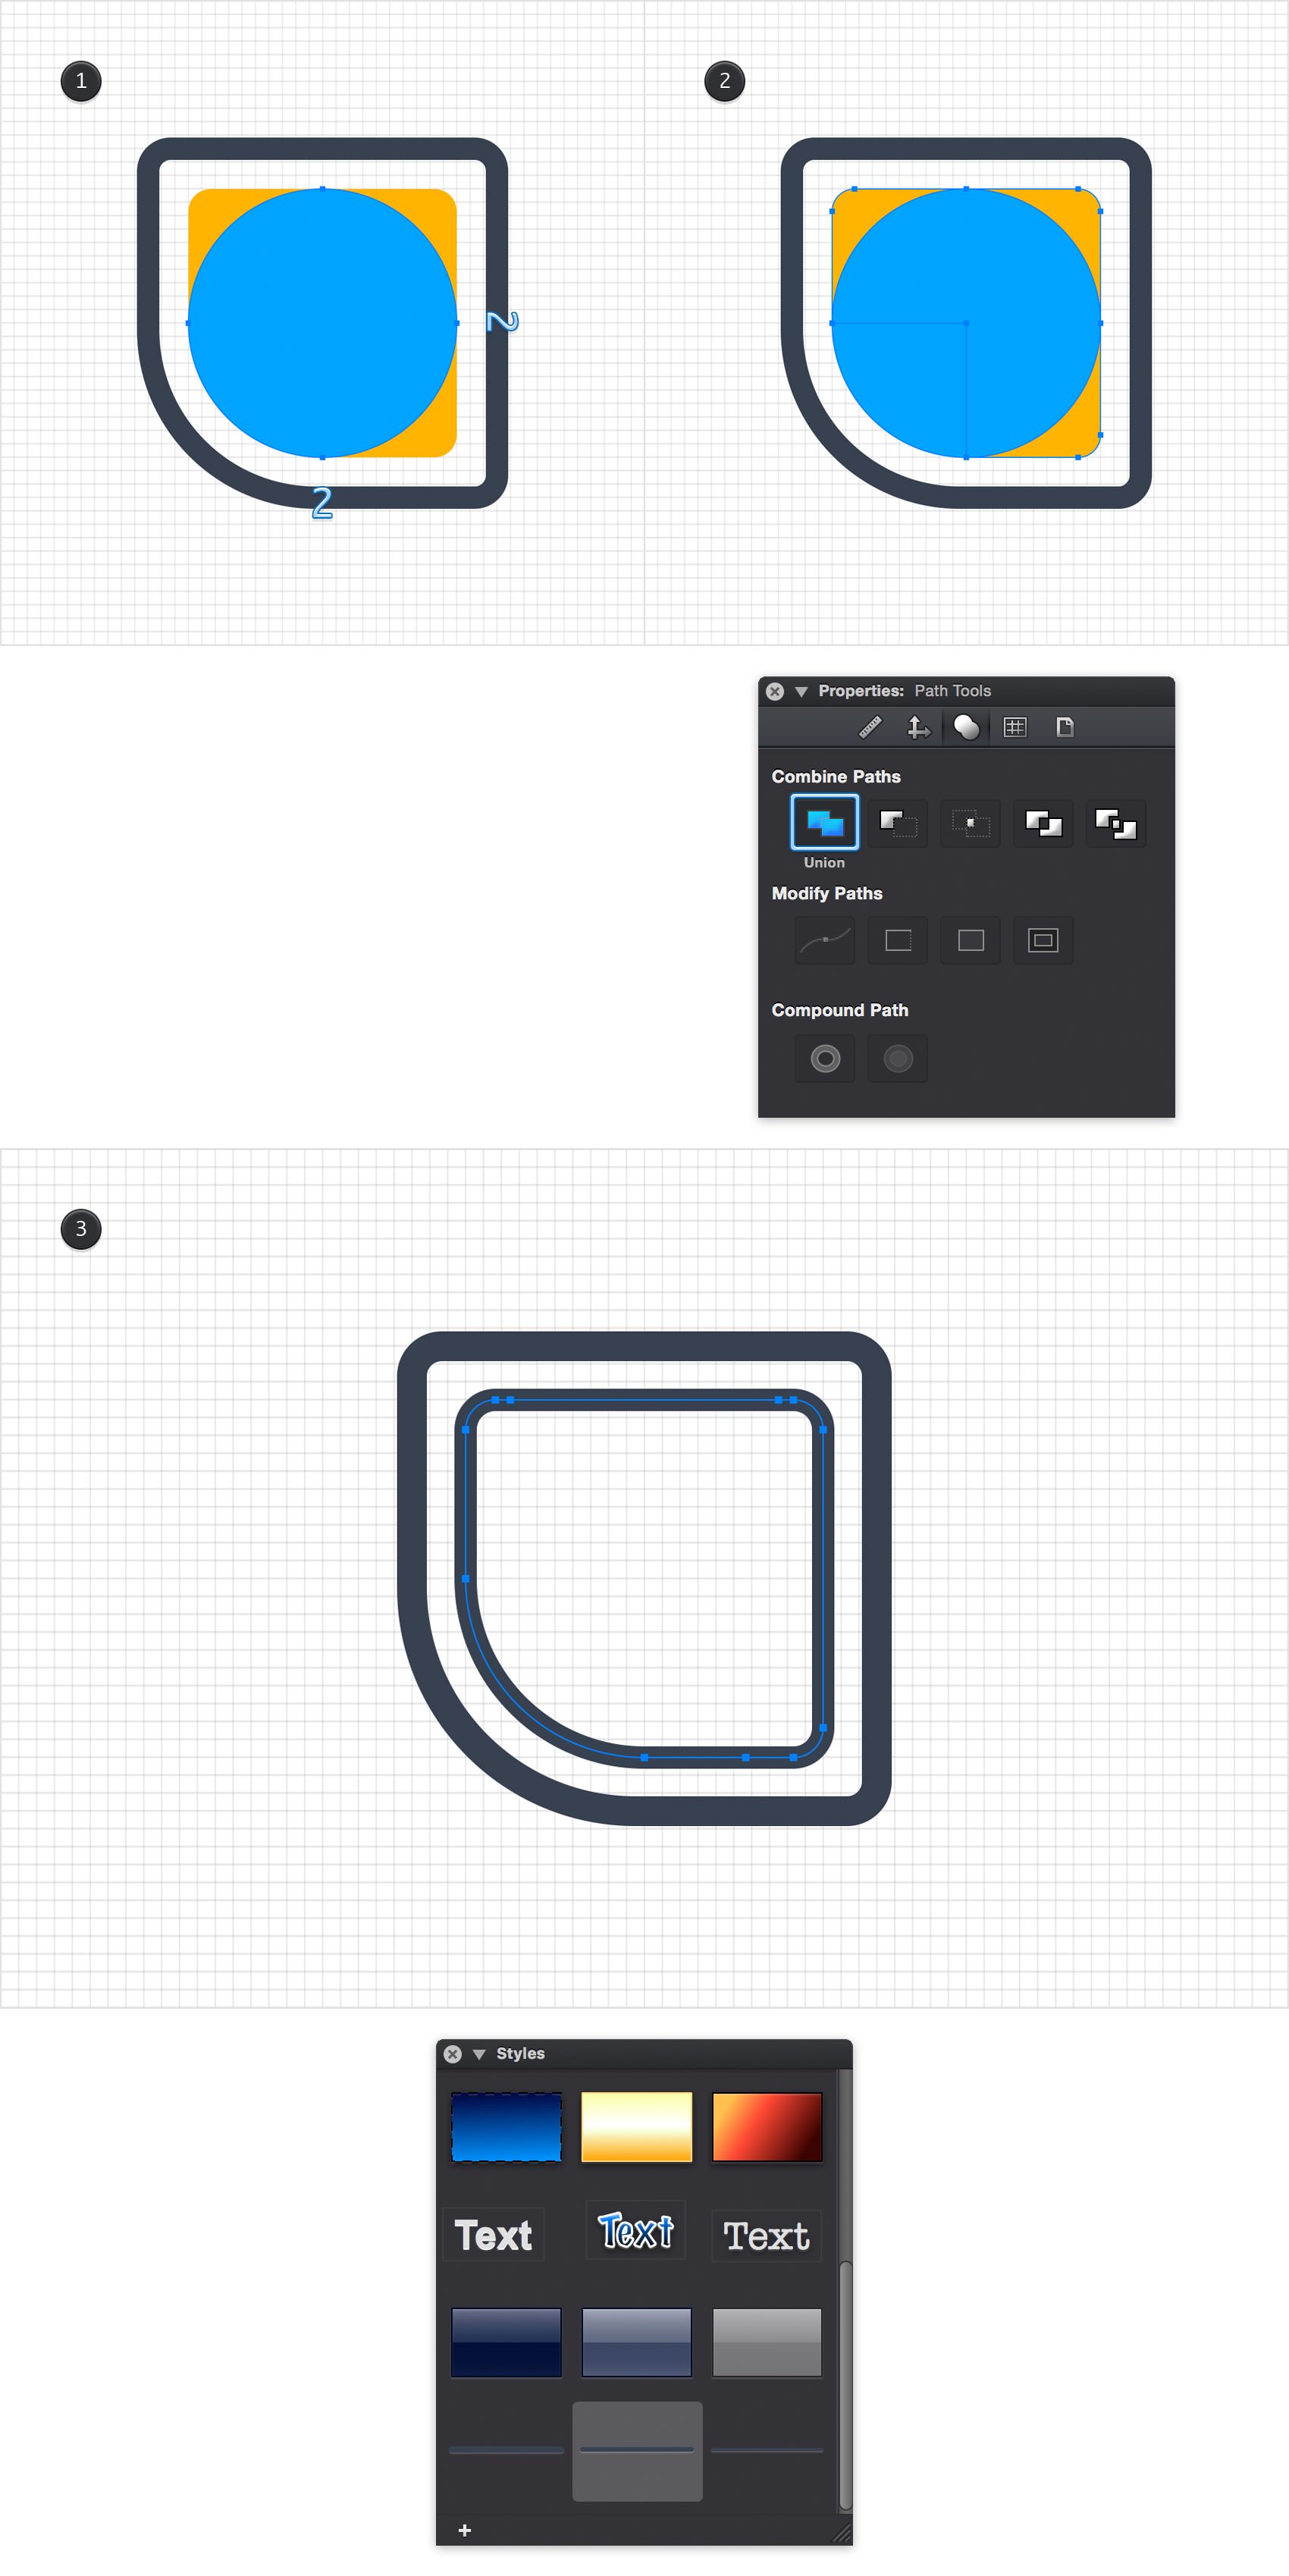
Pick the Rounded Rectangle Tool (Shift + M), focus on the Tool Options bar and drag the Corner Radius slider to 4 pt. Create a 2 x 2 ft shape and place it as shown in the first image. Switch to the Rectangle Tool (M), create a 1.2 ft square and place it exactly as shown in the second image.
Using the Move Tool (V) and the Shift key, select both shapes made in this step, go to the Path Tools pane and click the Subtract command. In the end your yellow shape should look like in the fourth image.
Step 12
Pick the Ellipse Tool (O), focus on your canvas, create a 2 ft circle and place it above the yellow shape, as shown in the first image.
Select this new circle along with the yellow shape, return to the Path Tools pane and click the Union command. Make sure that the resulting shape is selected and apply your second style from the Styles panel.
Step 13
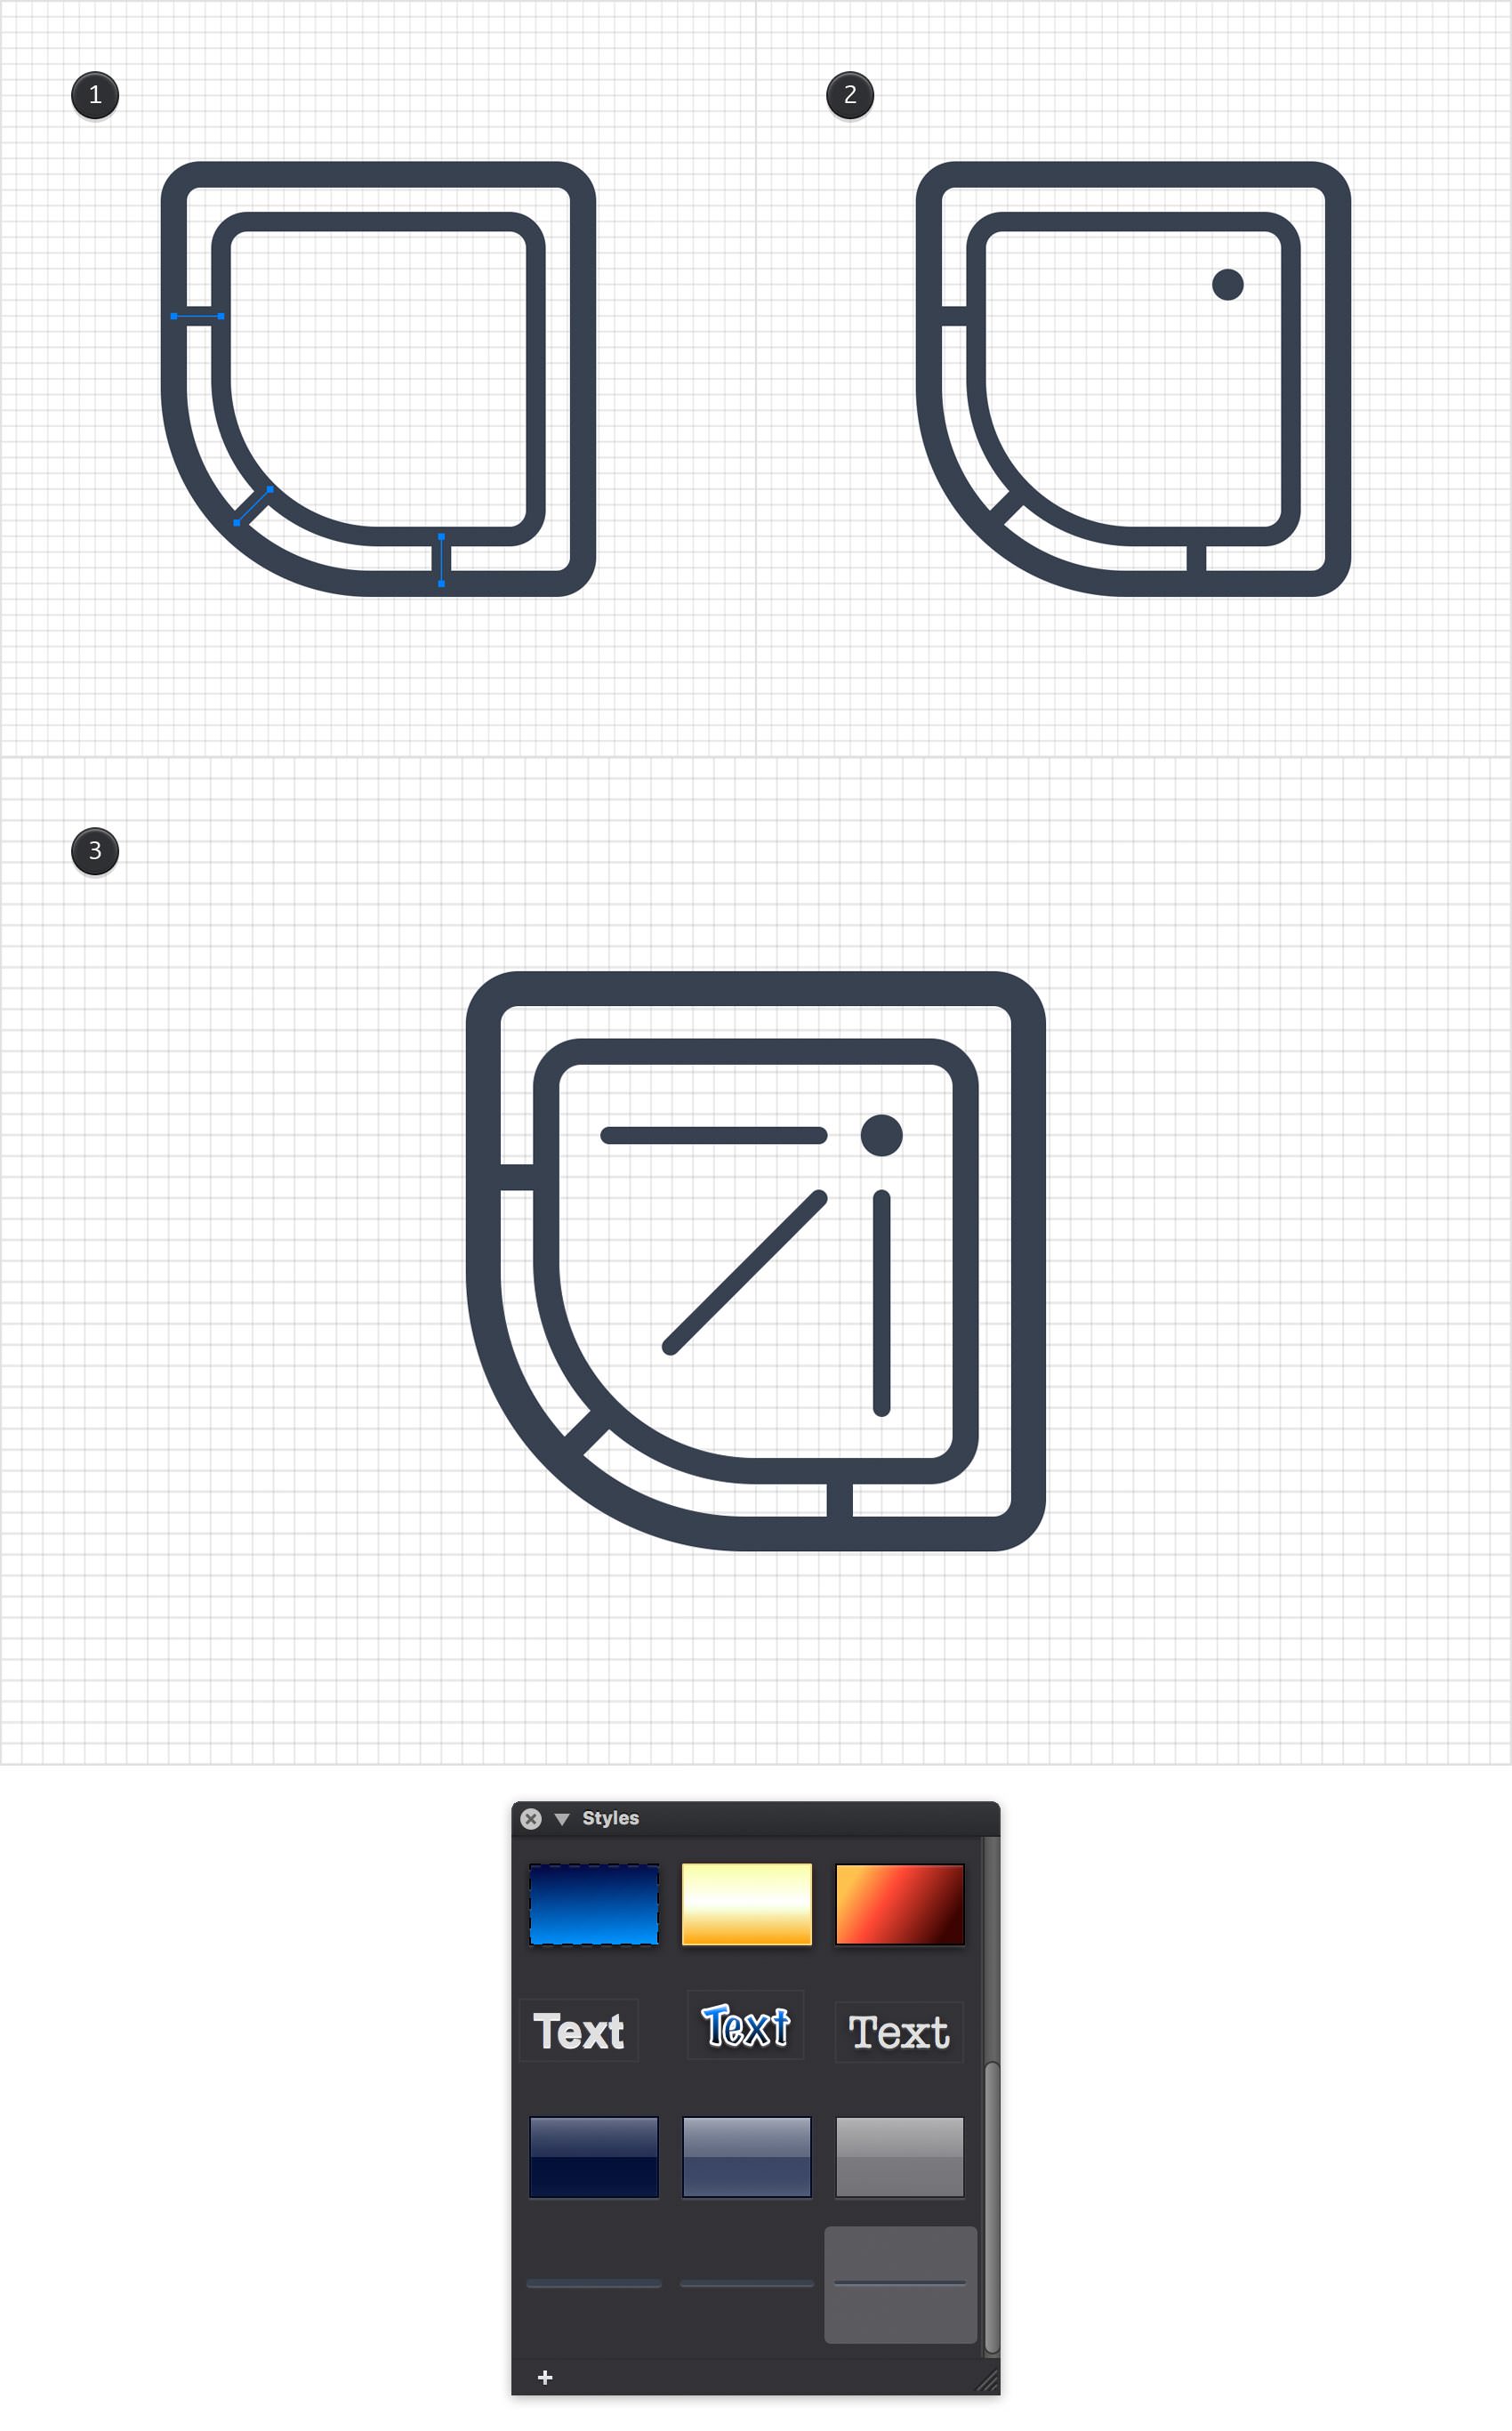
Using the Line Tool (L), add the three line segments shown in the first image and apply your second style from the Styles panel.
Switch to the Ellipse Tool (L) and create a 0.2 ft circle. Place this new shape as shown in the second image and don't forget to fill it with your saved color from the Color Palette.
Reselect the Line Tool (L), add the three line segments shown in the third image and apply your third style from the Styles panel.
Step 14
Move to the Layers panel and add a fourth layer. Rename it "toilet 1" and make sure that it stays selected.
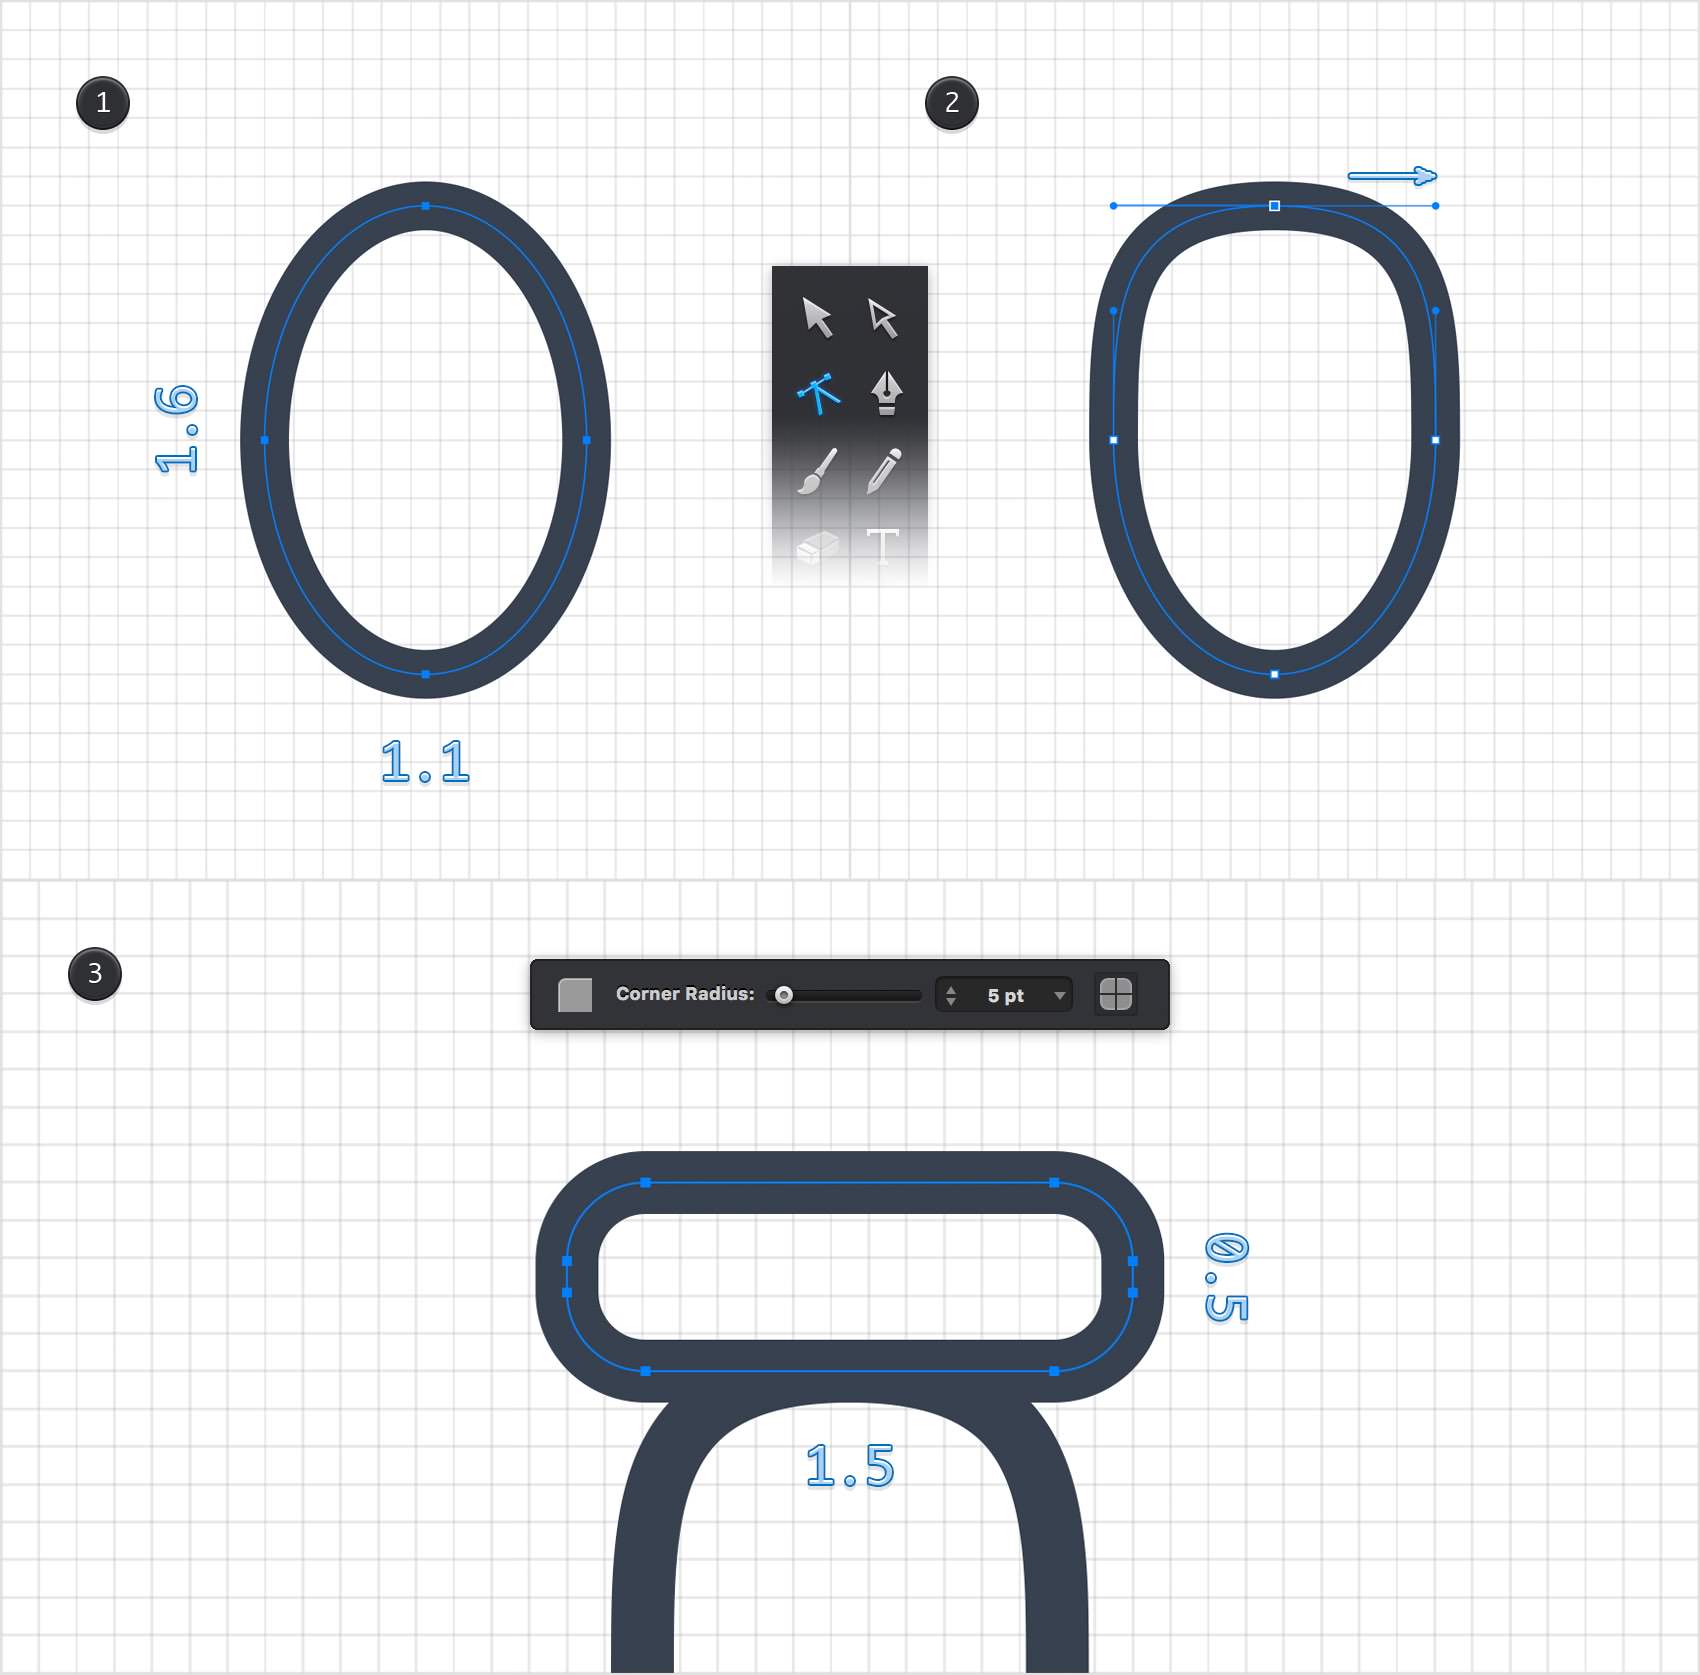
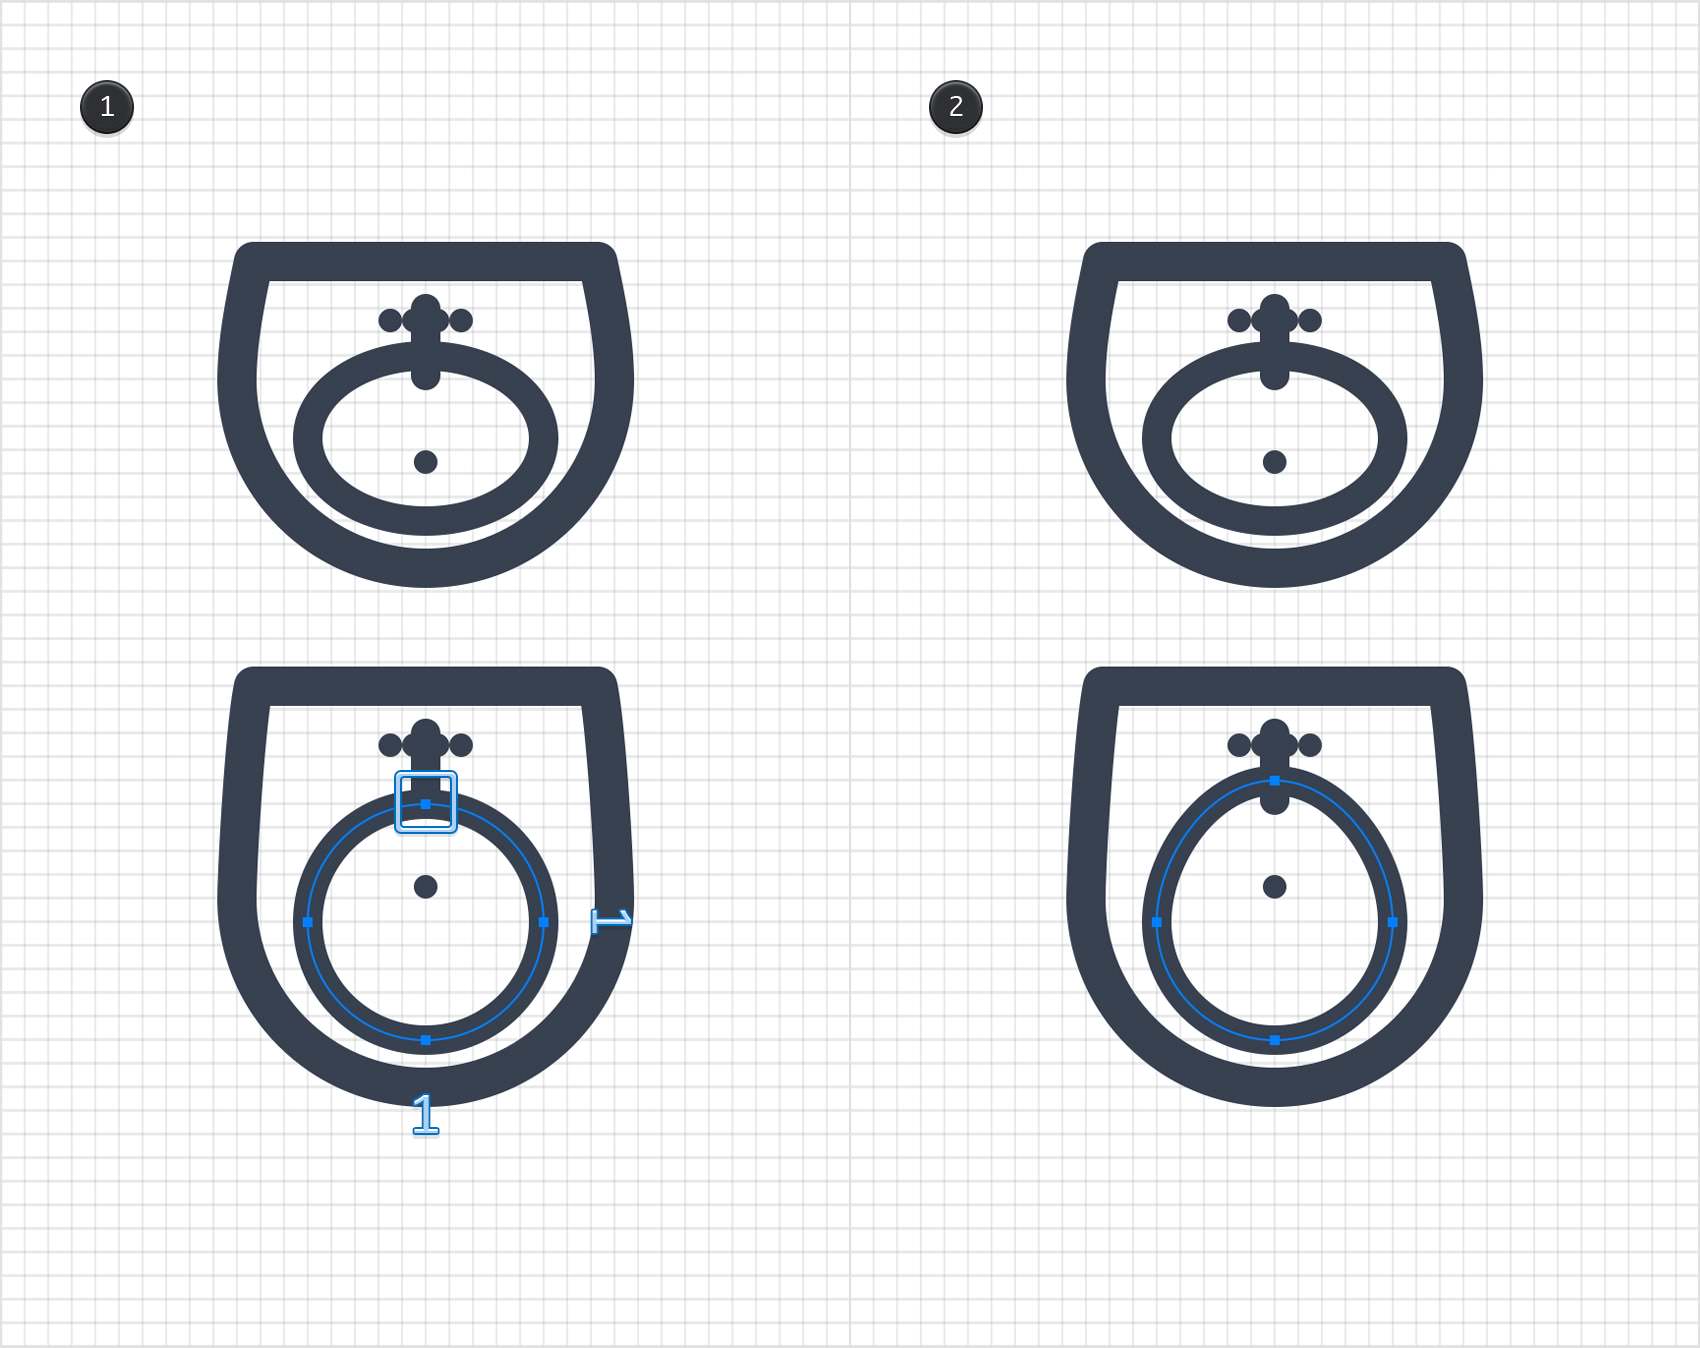
Using the Ellipse Tool (O), create a 1.1 x 1.6 ft shape and apply your first style from the Styles panel. Focus on the top side of this oval shape and pick the Convert Tool (Shift-C). click that top anchor point and drag those direction handles as shown in the second image. Once again, the grid and the Snap to Grid feature will ease your work.
Switch to the Rounded Rectangle Tool (Shift-M) and drag that Corner Radius slider to 5 pt. Move to your canvas, create a 1.5 x 0.5 ft shape, place it as shown in the third image and don't forget to apply your first style from the Styles panel.
Step 15
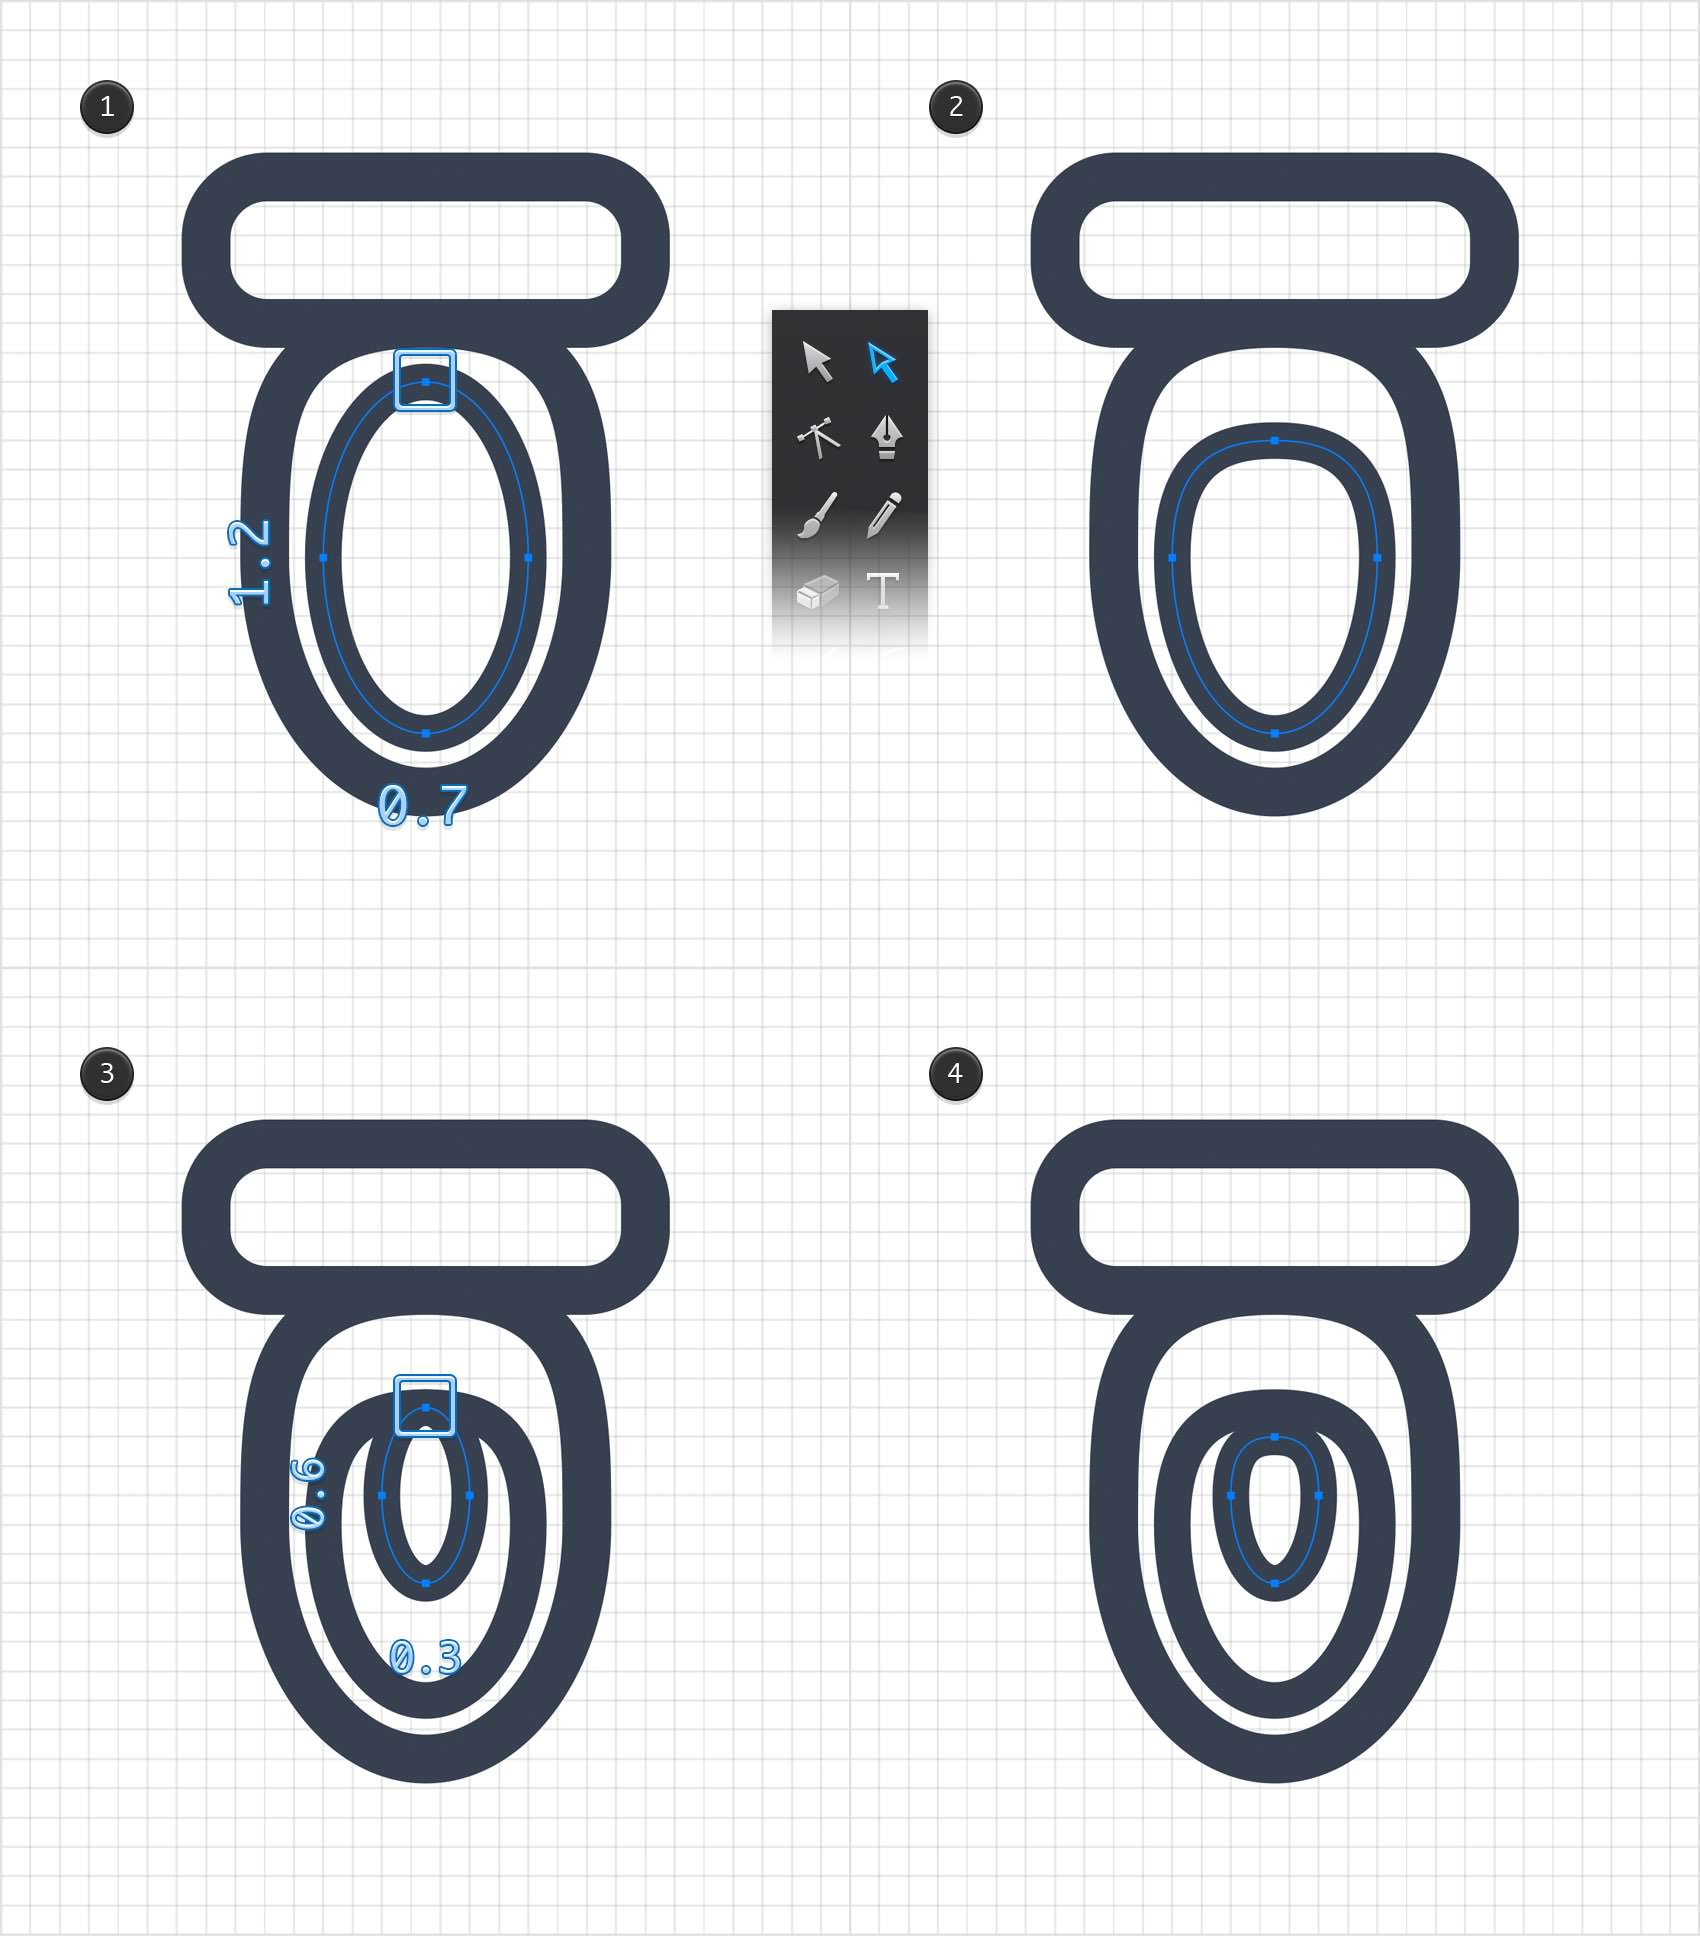
Using the Ellipse Tool (O), create a 0.7 x 1.2 ft shape, place it as shown in the first image and apply your second style. Keep focusing on this new oval shape and pick the Path Selection Tool (A). Select the top anchor point and drag it 0.2 ft down.
Reselect the Ellipse Tool (O), create a 0.3 x 0.6 ft shape, place it as shown in the third image and apply your second style. Switch to the Path Selection Tool (A), select the top anchor point and drag it 0.1 ft down.
Step 16
Using the Ellipse Tool (O), create a 0.7 x 0.4 shape, place it as shown in the first image and don't forget to apply your second style from the Styles panel.
Switch to the Rounded Rectangle Tool (Shift + M), create a 0.3 x 0.1 ft shape, place it as shown in the second image and fill it with your color from the Color Palette.
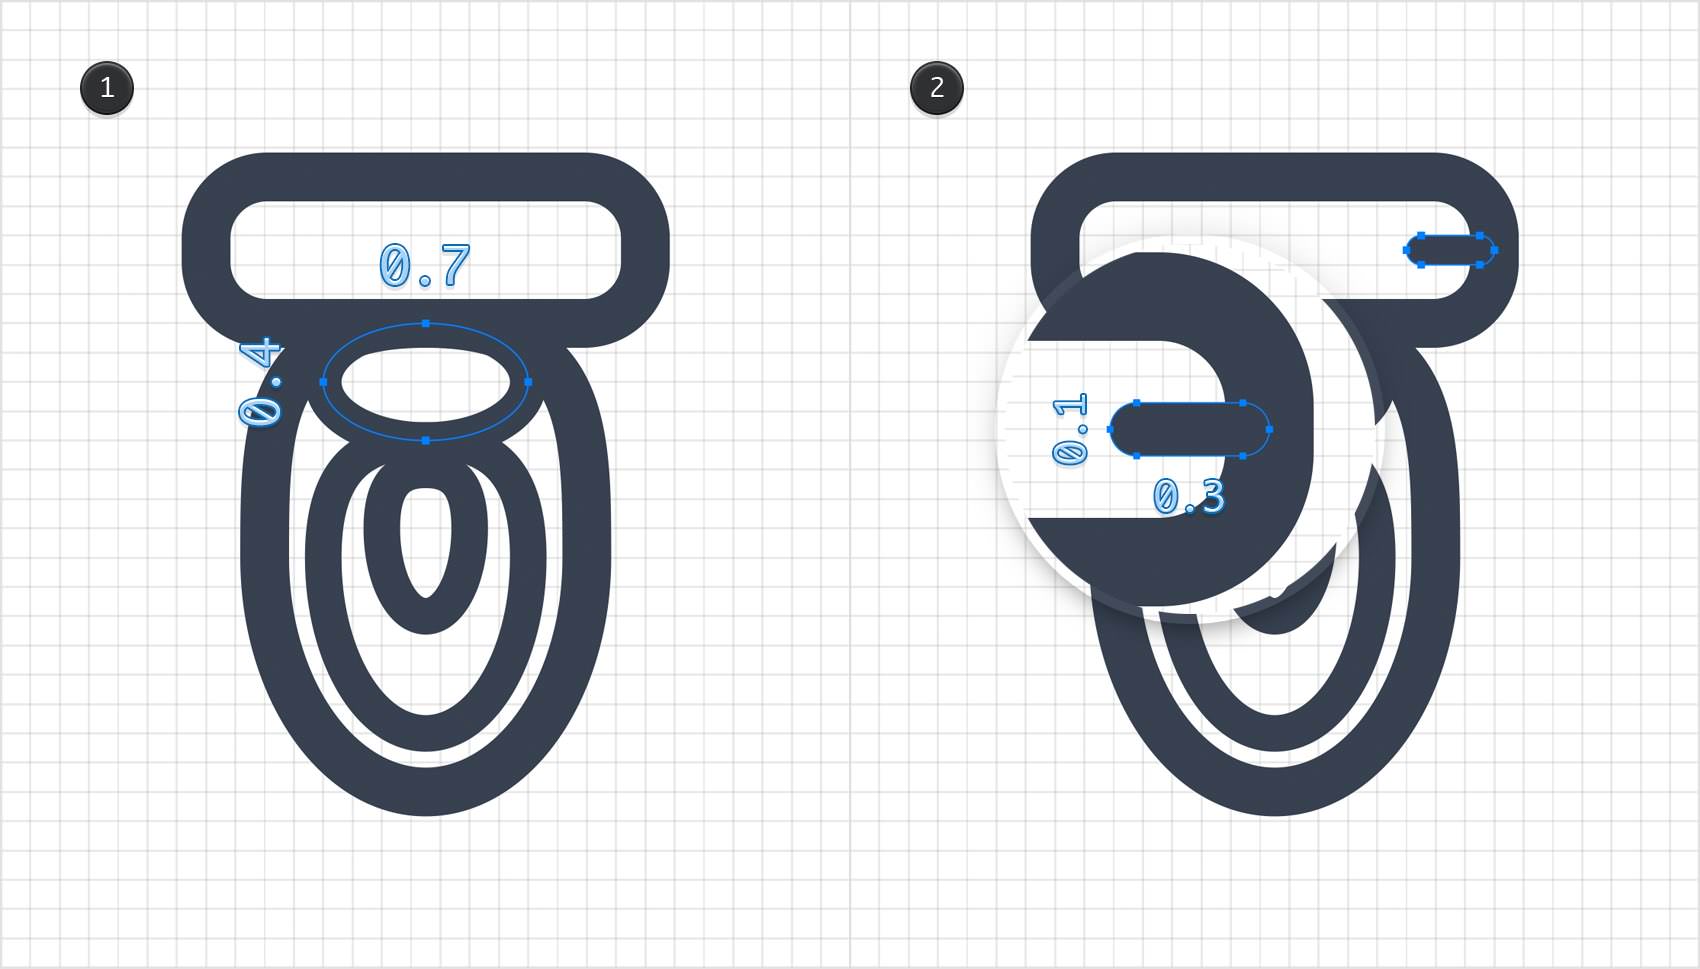
Step 17
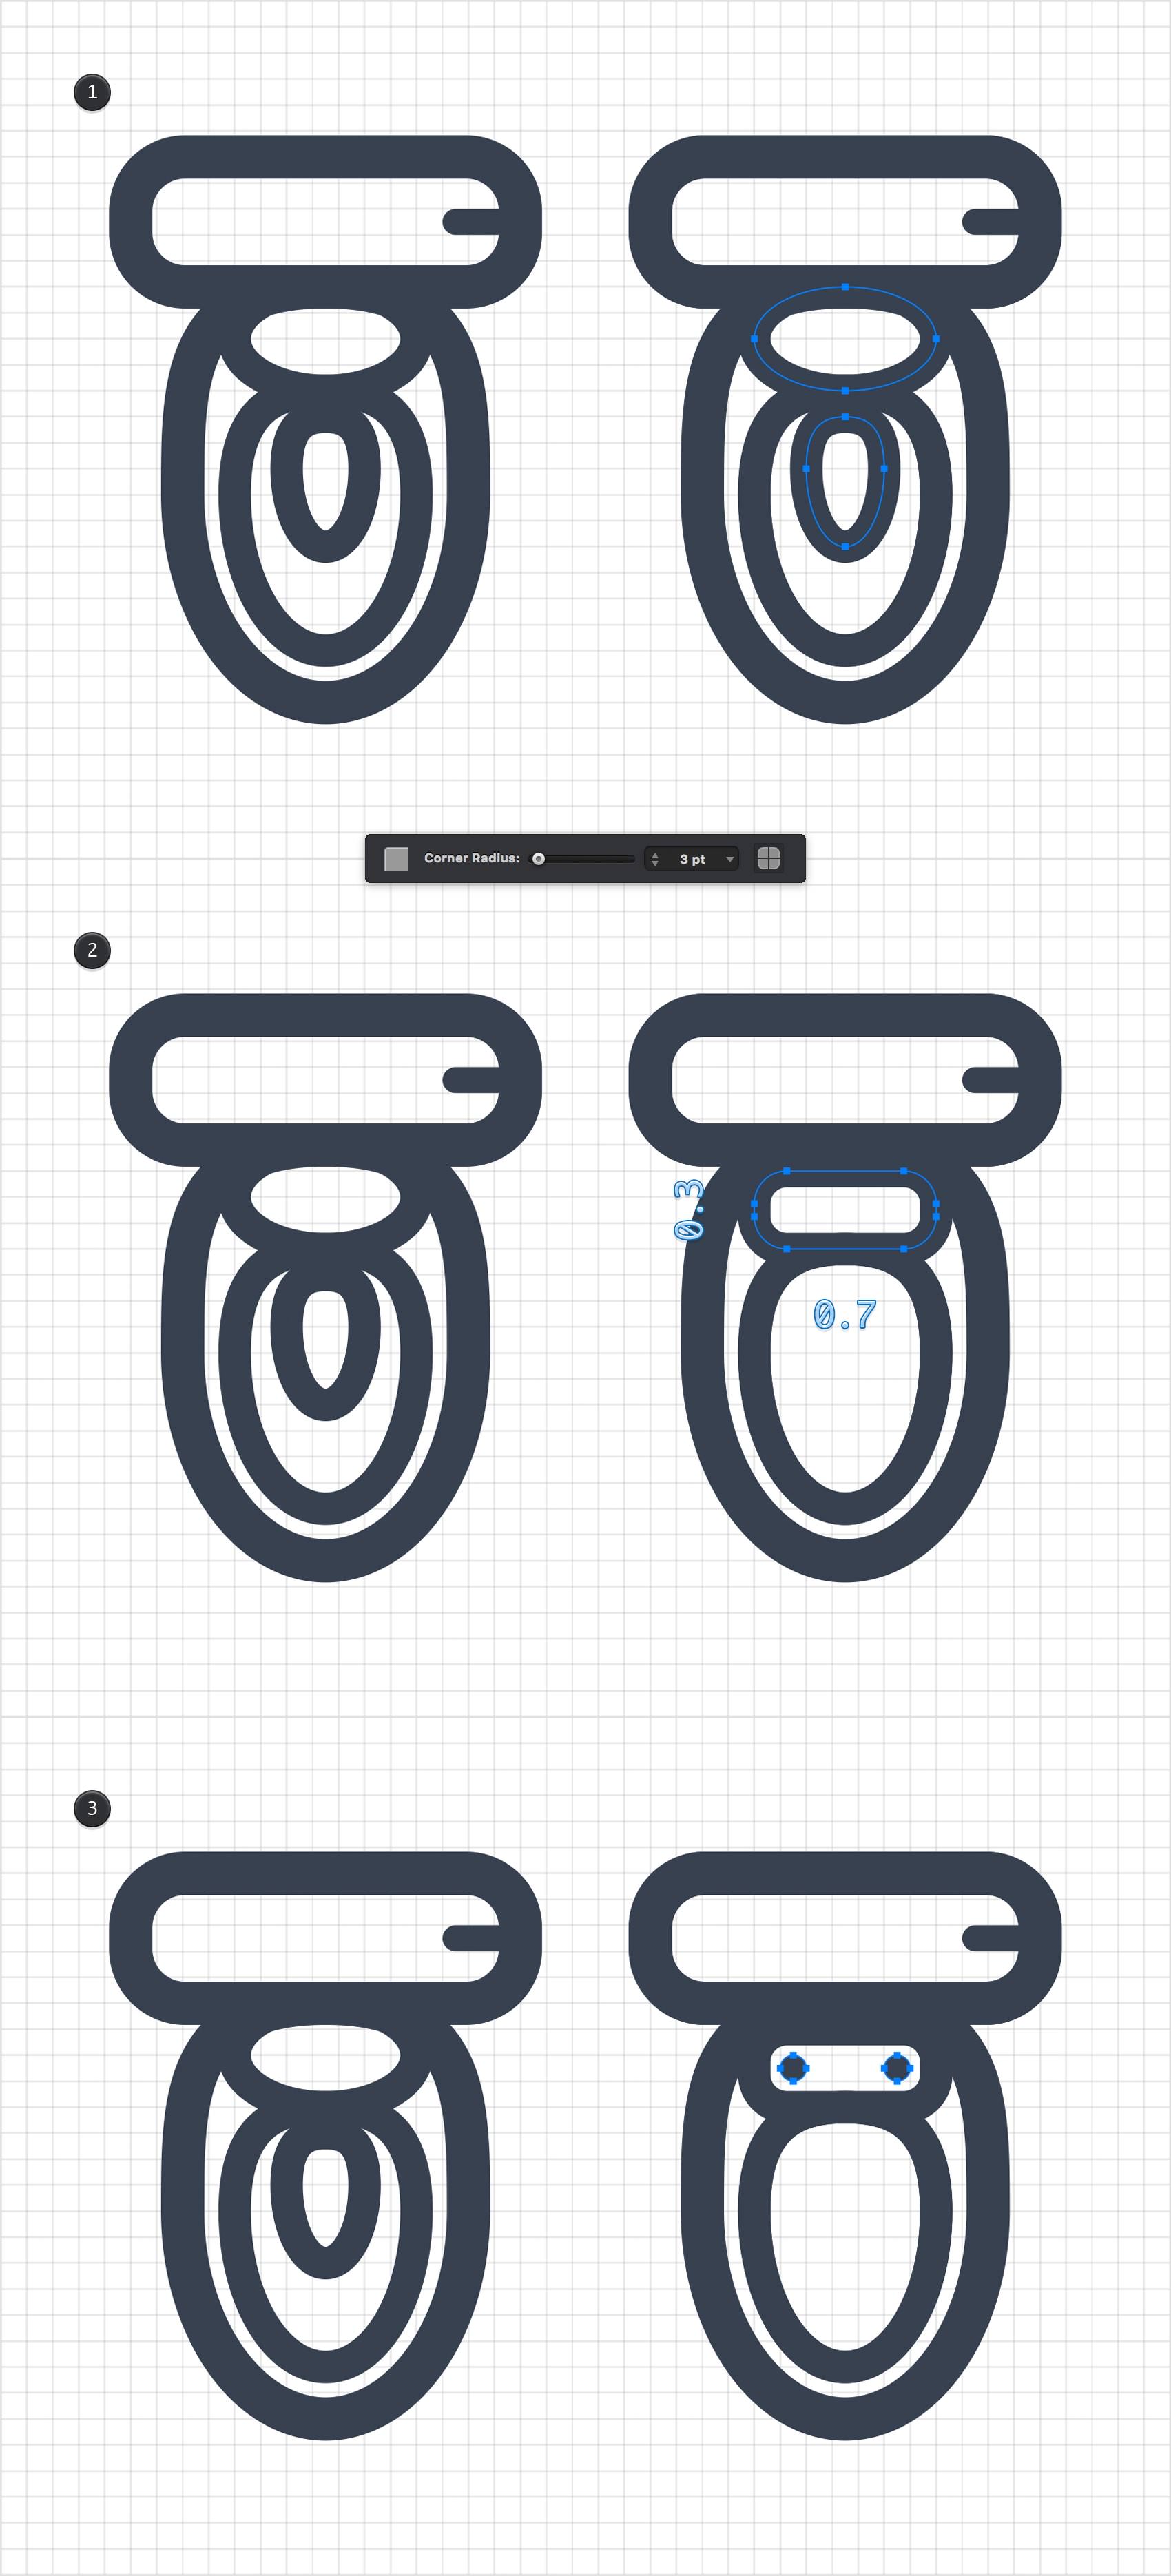
Focus on the Layers panel, right click on your "toilet 1" layer and go to Duplicate Layer. Select the layer copy and rename "toilet 2". Using the Move Tool (V), select all the shapes from your active layer and drag them to the right, roughly as shown in the first image. Using the same tool, select the two shapes highlighted in the first image and remove them using the Delete key (or the Backspace key).
Pick the Rounded Rectangle Tool (Shift + M), set the Corner Radius to 3 pt and create a 0.7 x 0.3 ft shape. Place it as shown in the second image, apply your second style from the Styles panel, and then switch to the Ellipse Tool (O). Create two, 0.1 ft circles, place them exactly as shown in the third image and don't forget to fill these tiny, new shapes with your color from the Color Palette.
Step 18
Move to the Layers panel, add a new layer and rename it "doors". Select this new layer and make sure that it lies in the top of the panel.
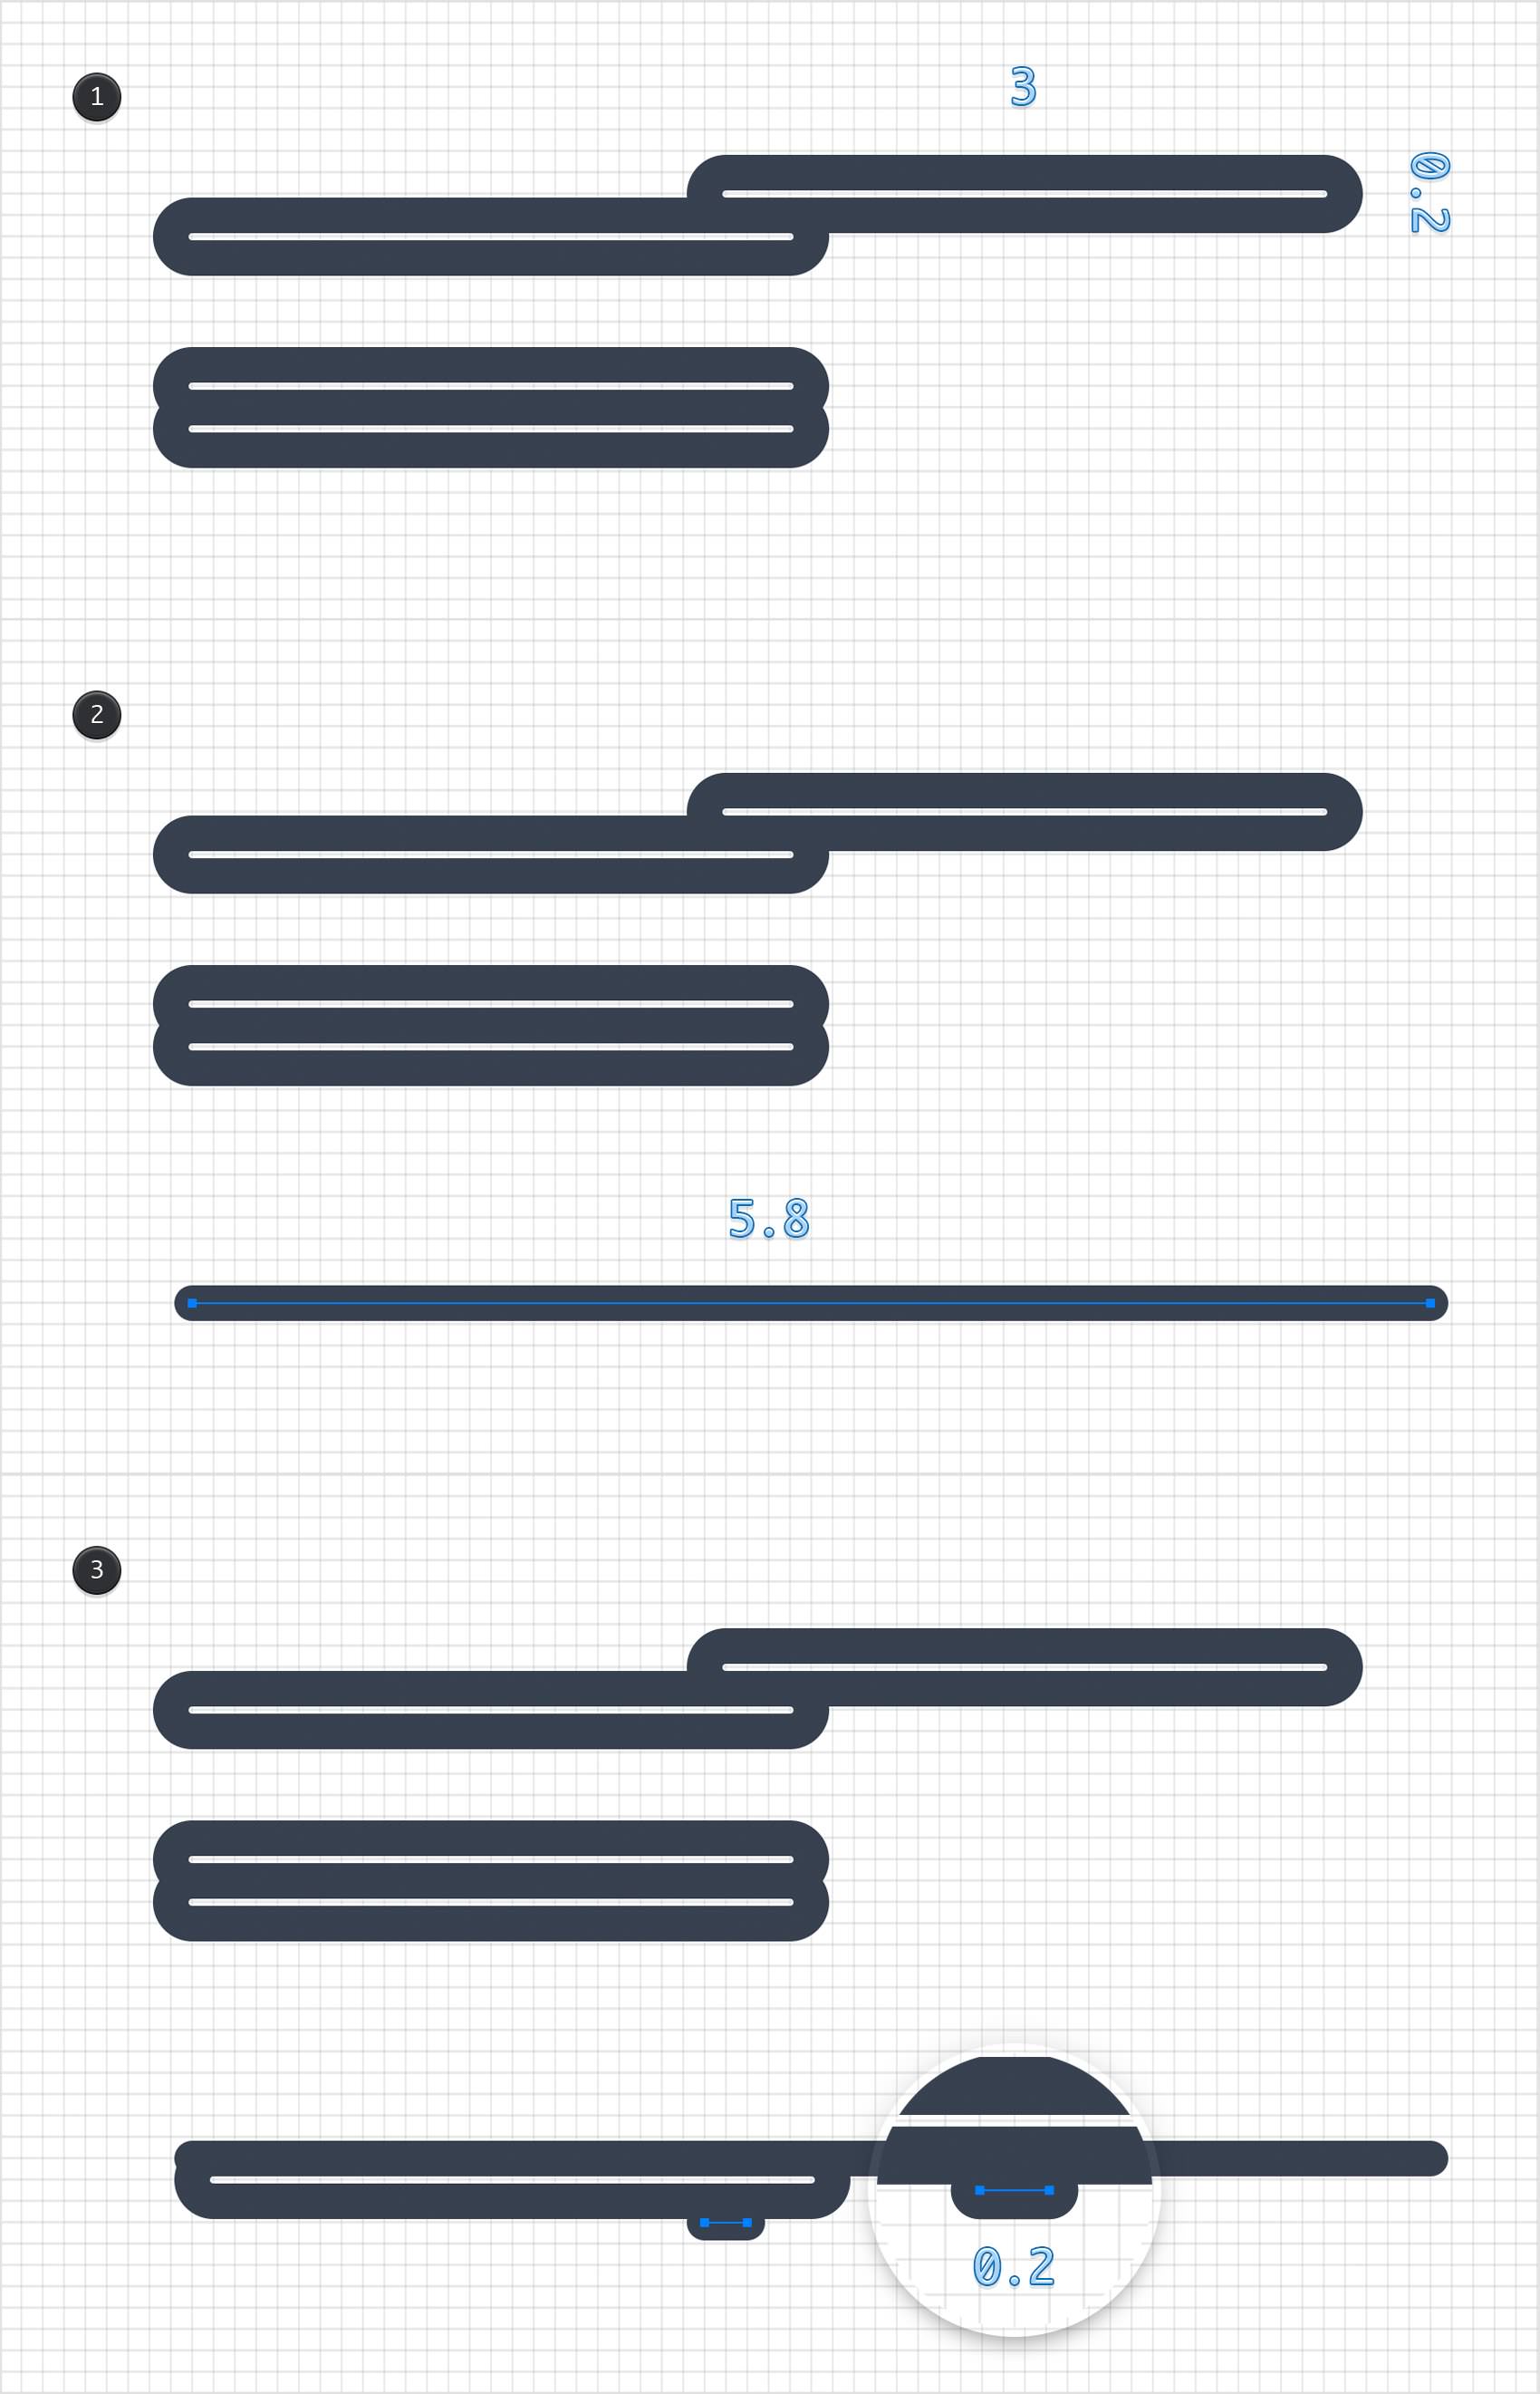
Using the Rounded Rectangle Tool (Shift + M), create a 3 x 0.2 ft shape and apply your first style from the Styles panel. Make three copies of this new shape and spread them as shown in the first image.
Using the Line Tool (L), create a 5.8 ft, horizontal path and apply that same style from the Styles panel. Make a new copy of the rounded rectangle created in this step and place it as shown in the third image.
Reselect the Line Tool (L) and this time create a 0.2 ft, horizontal path. Place it as shown in the third image and don't forget to apply your first style from the Styles panel.
Step 19
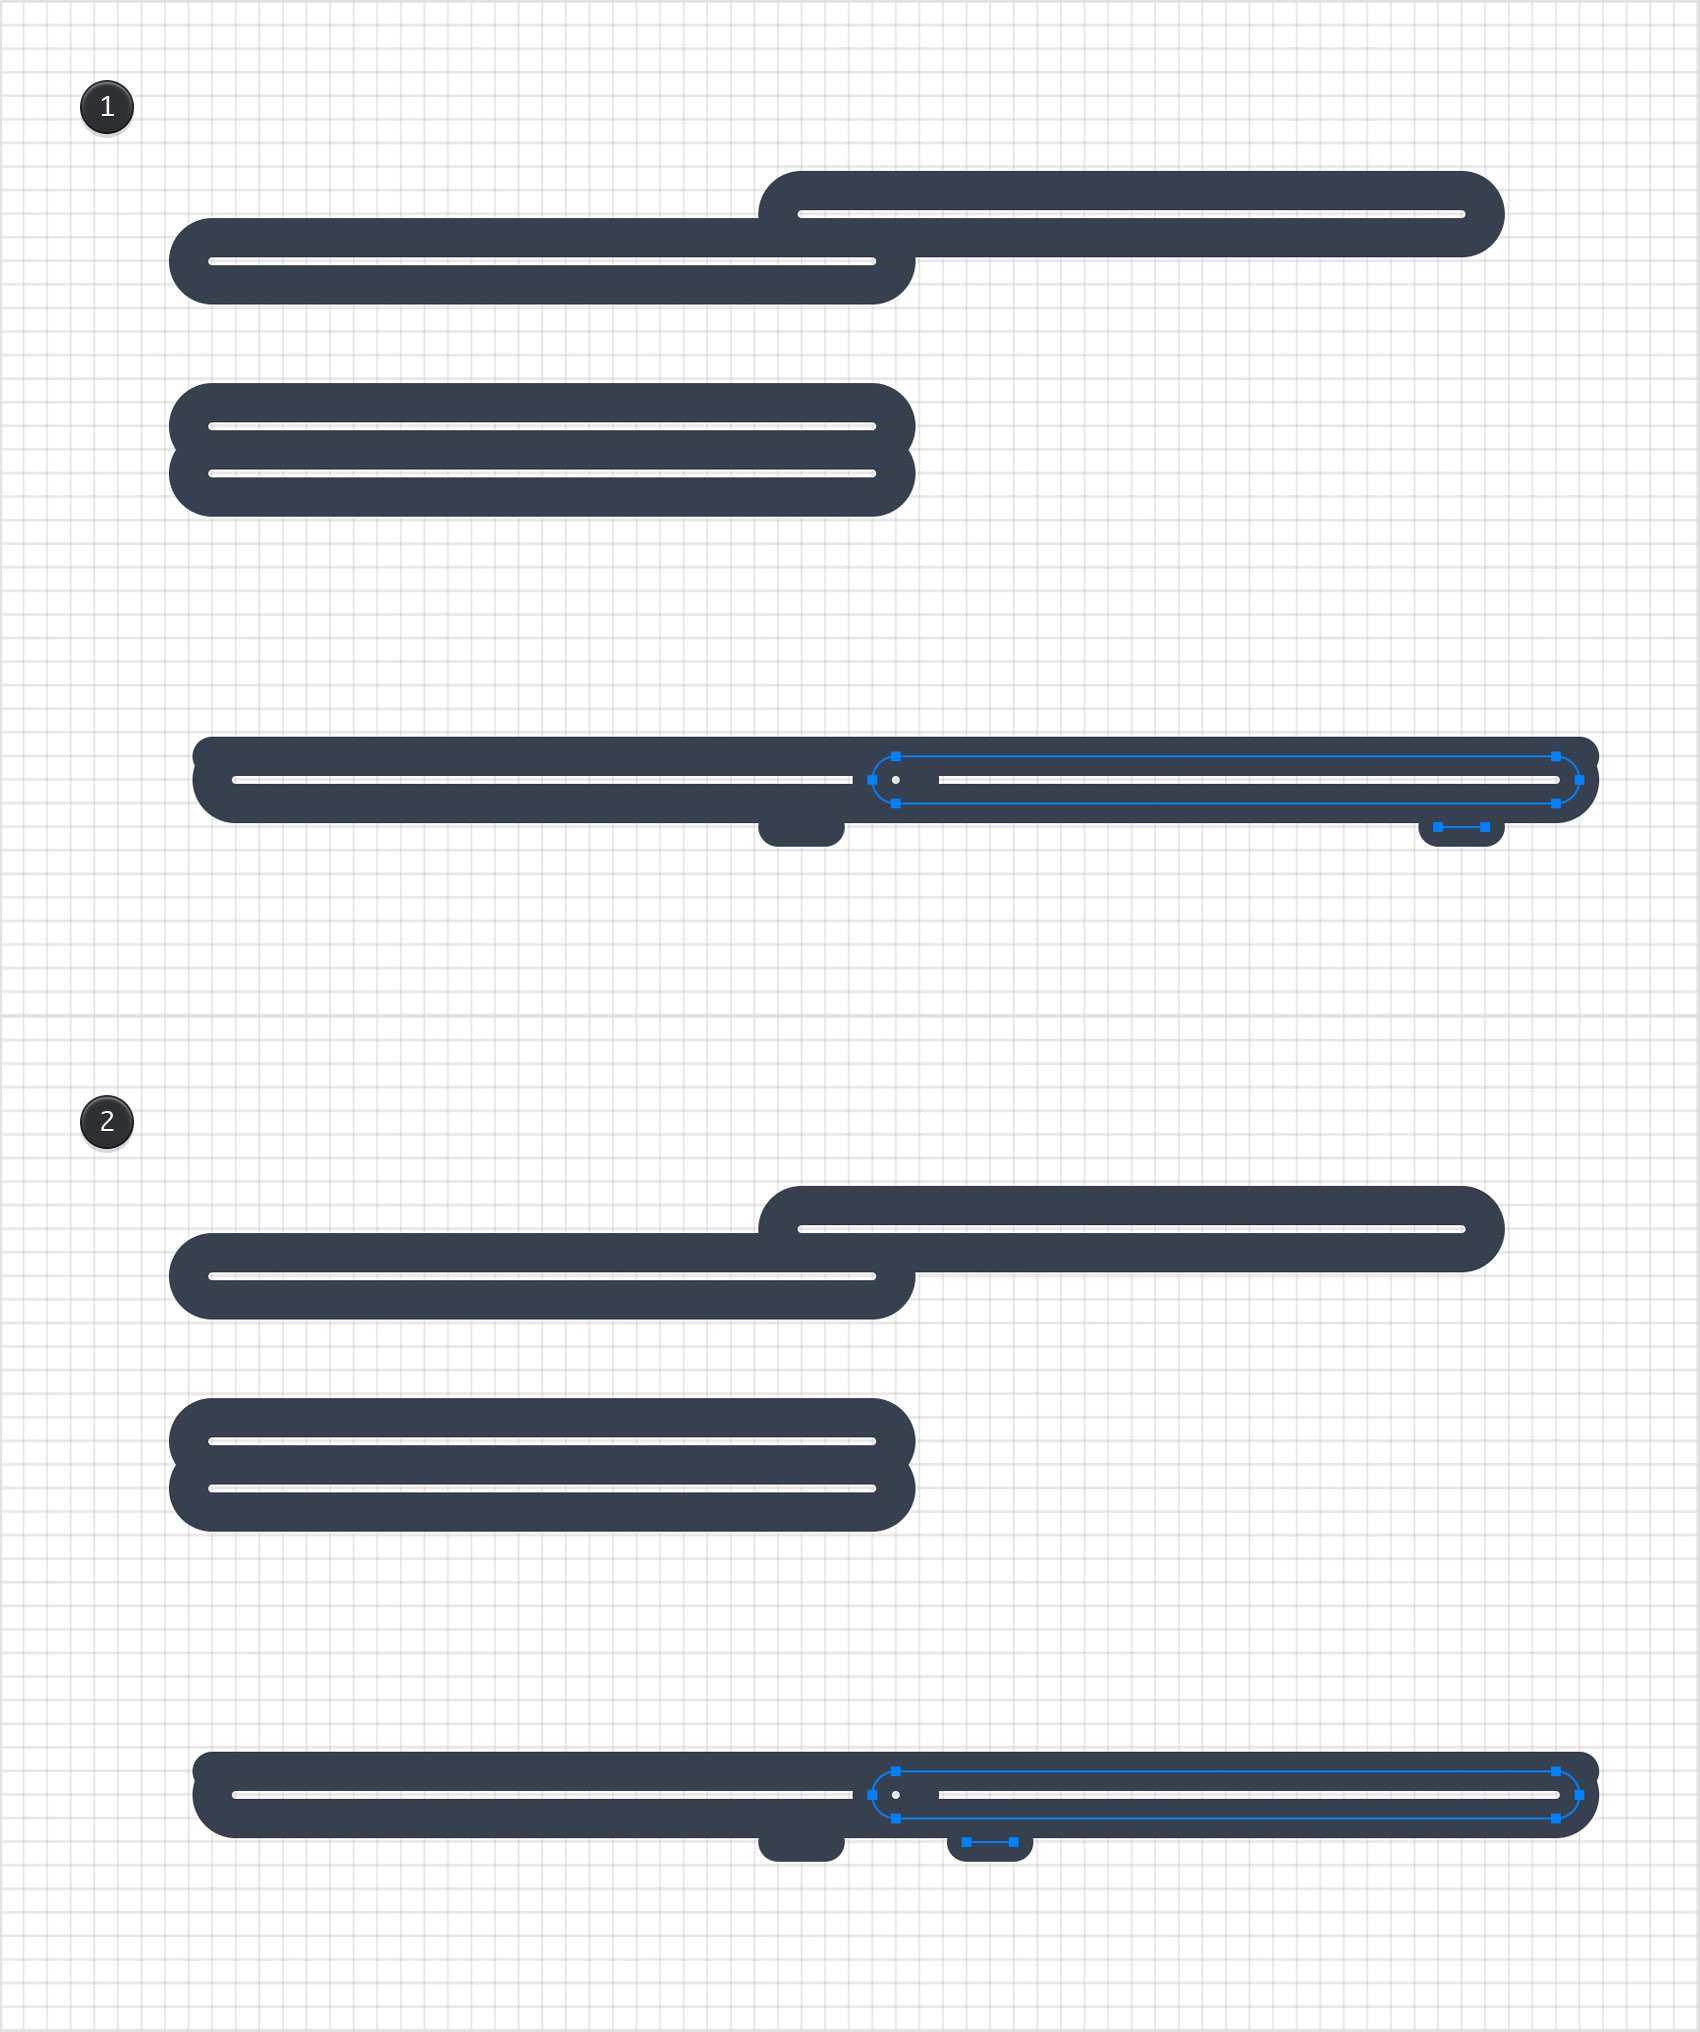
Keep focusing on the shapes made in the previous step. Select the rounded rectangle and the tiny, horizontal path made in the finale of the previous step and Group them using the Command + G keyboard shortcut. Make a copy of this group using the Command + C > Command + V keyboard shortcut.
Select this newly made group, place it as shown in the first image and then flip it horizontally using Modify > Rotate and Transform > Flip Horizontal command.
Step 20
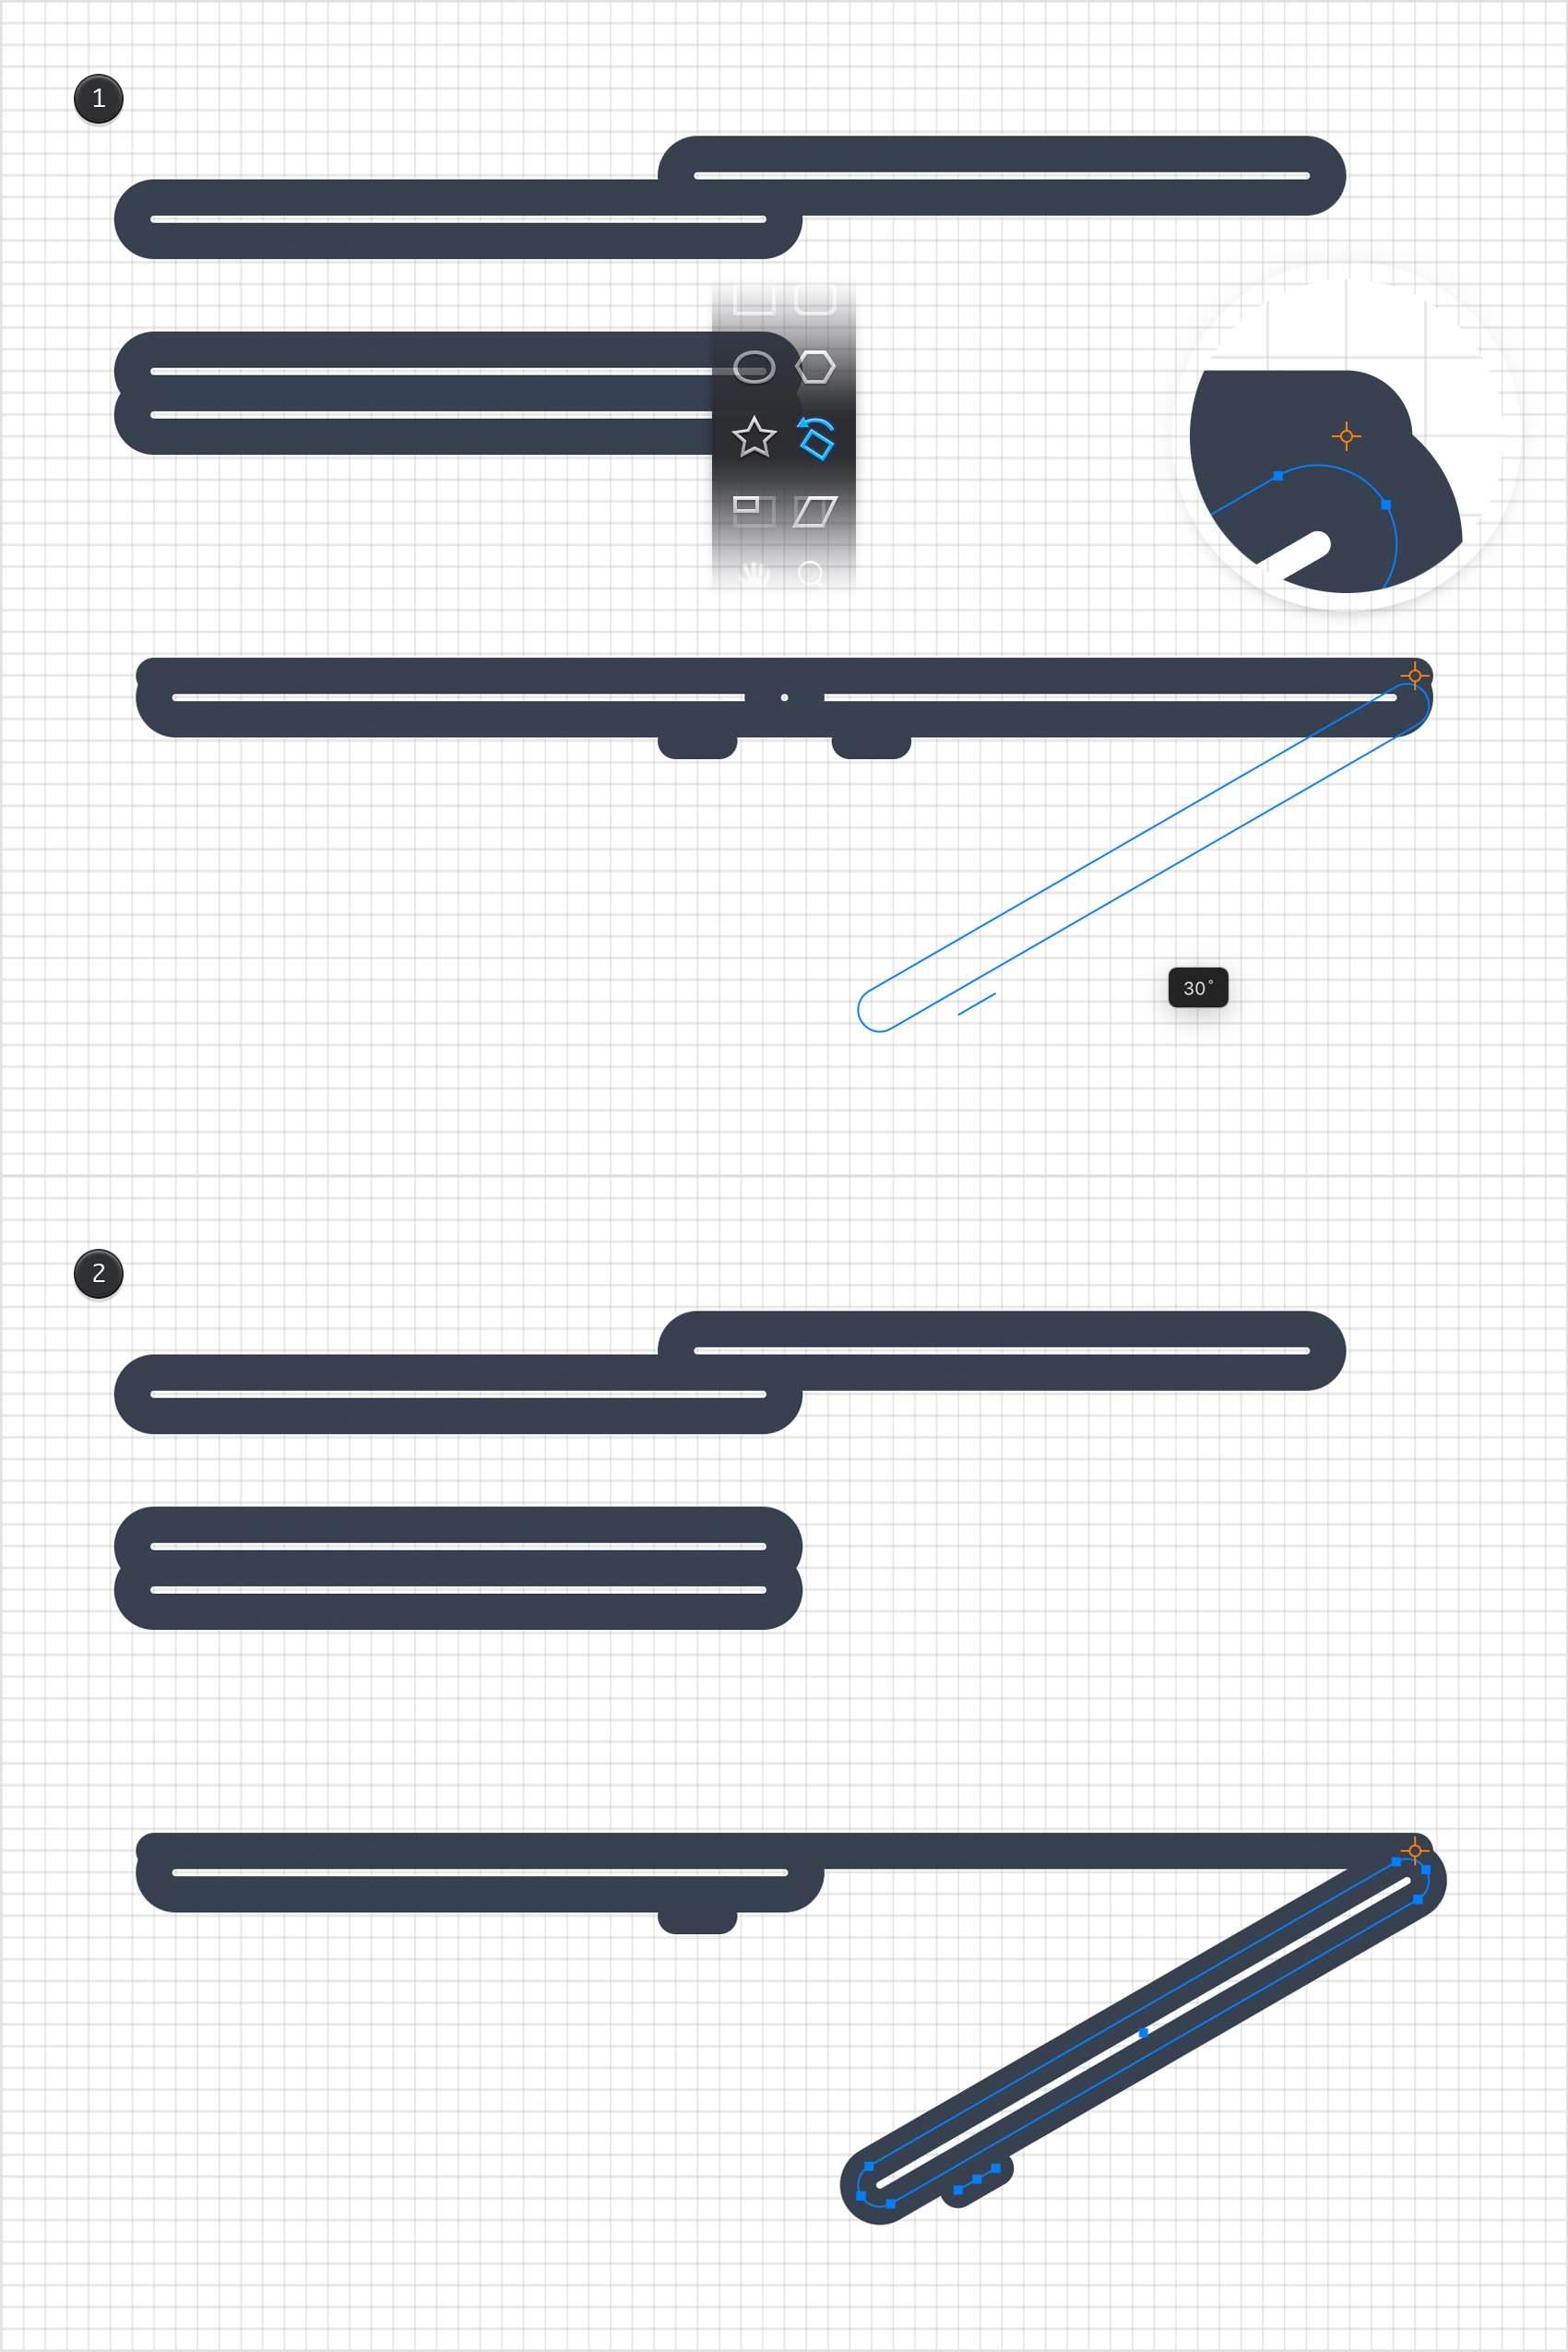
Keep focusing on the two groups made in the previous step. Select the right one and pick the Rotate Tool (R). Use a simple click to place the reference point in the top, right corner of your selected group and then click and drag to rotate your selection 30 degrees. Hold the Shift key while dragging to constrain the rotation to 15 degrees increments.
Step 21
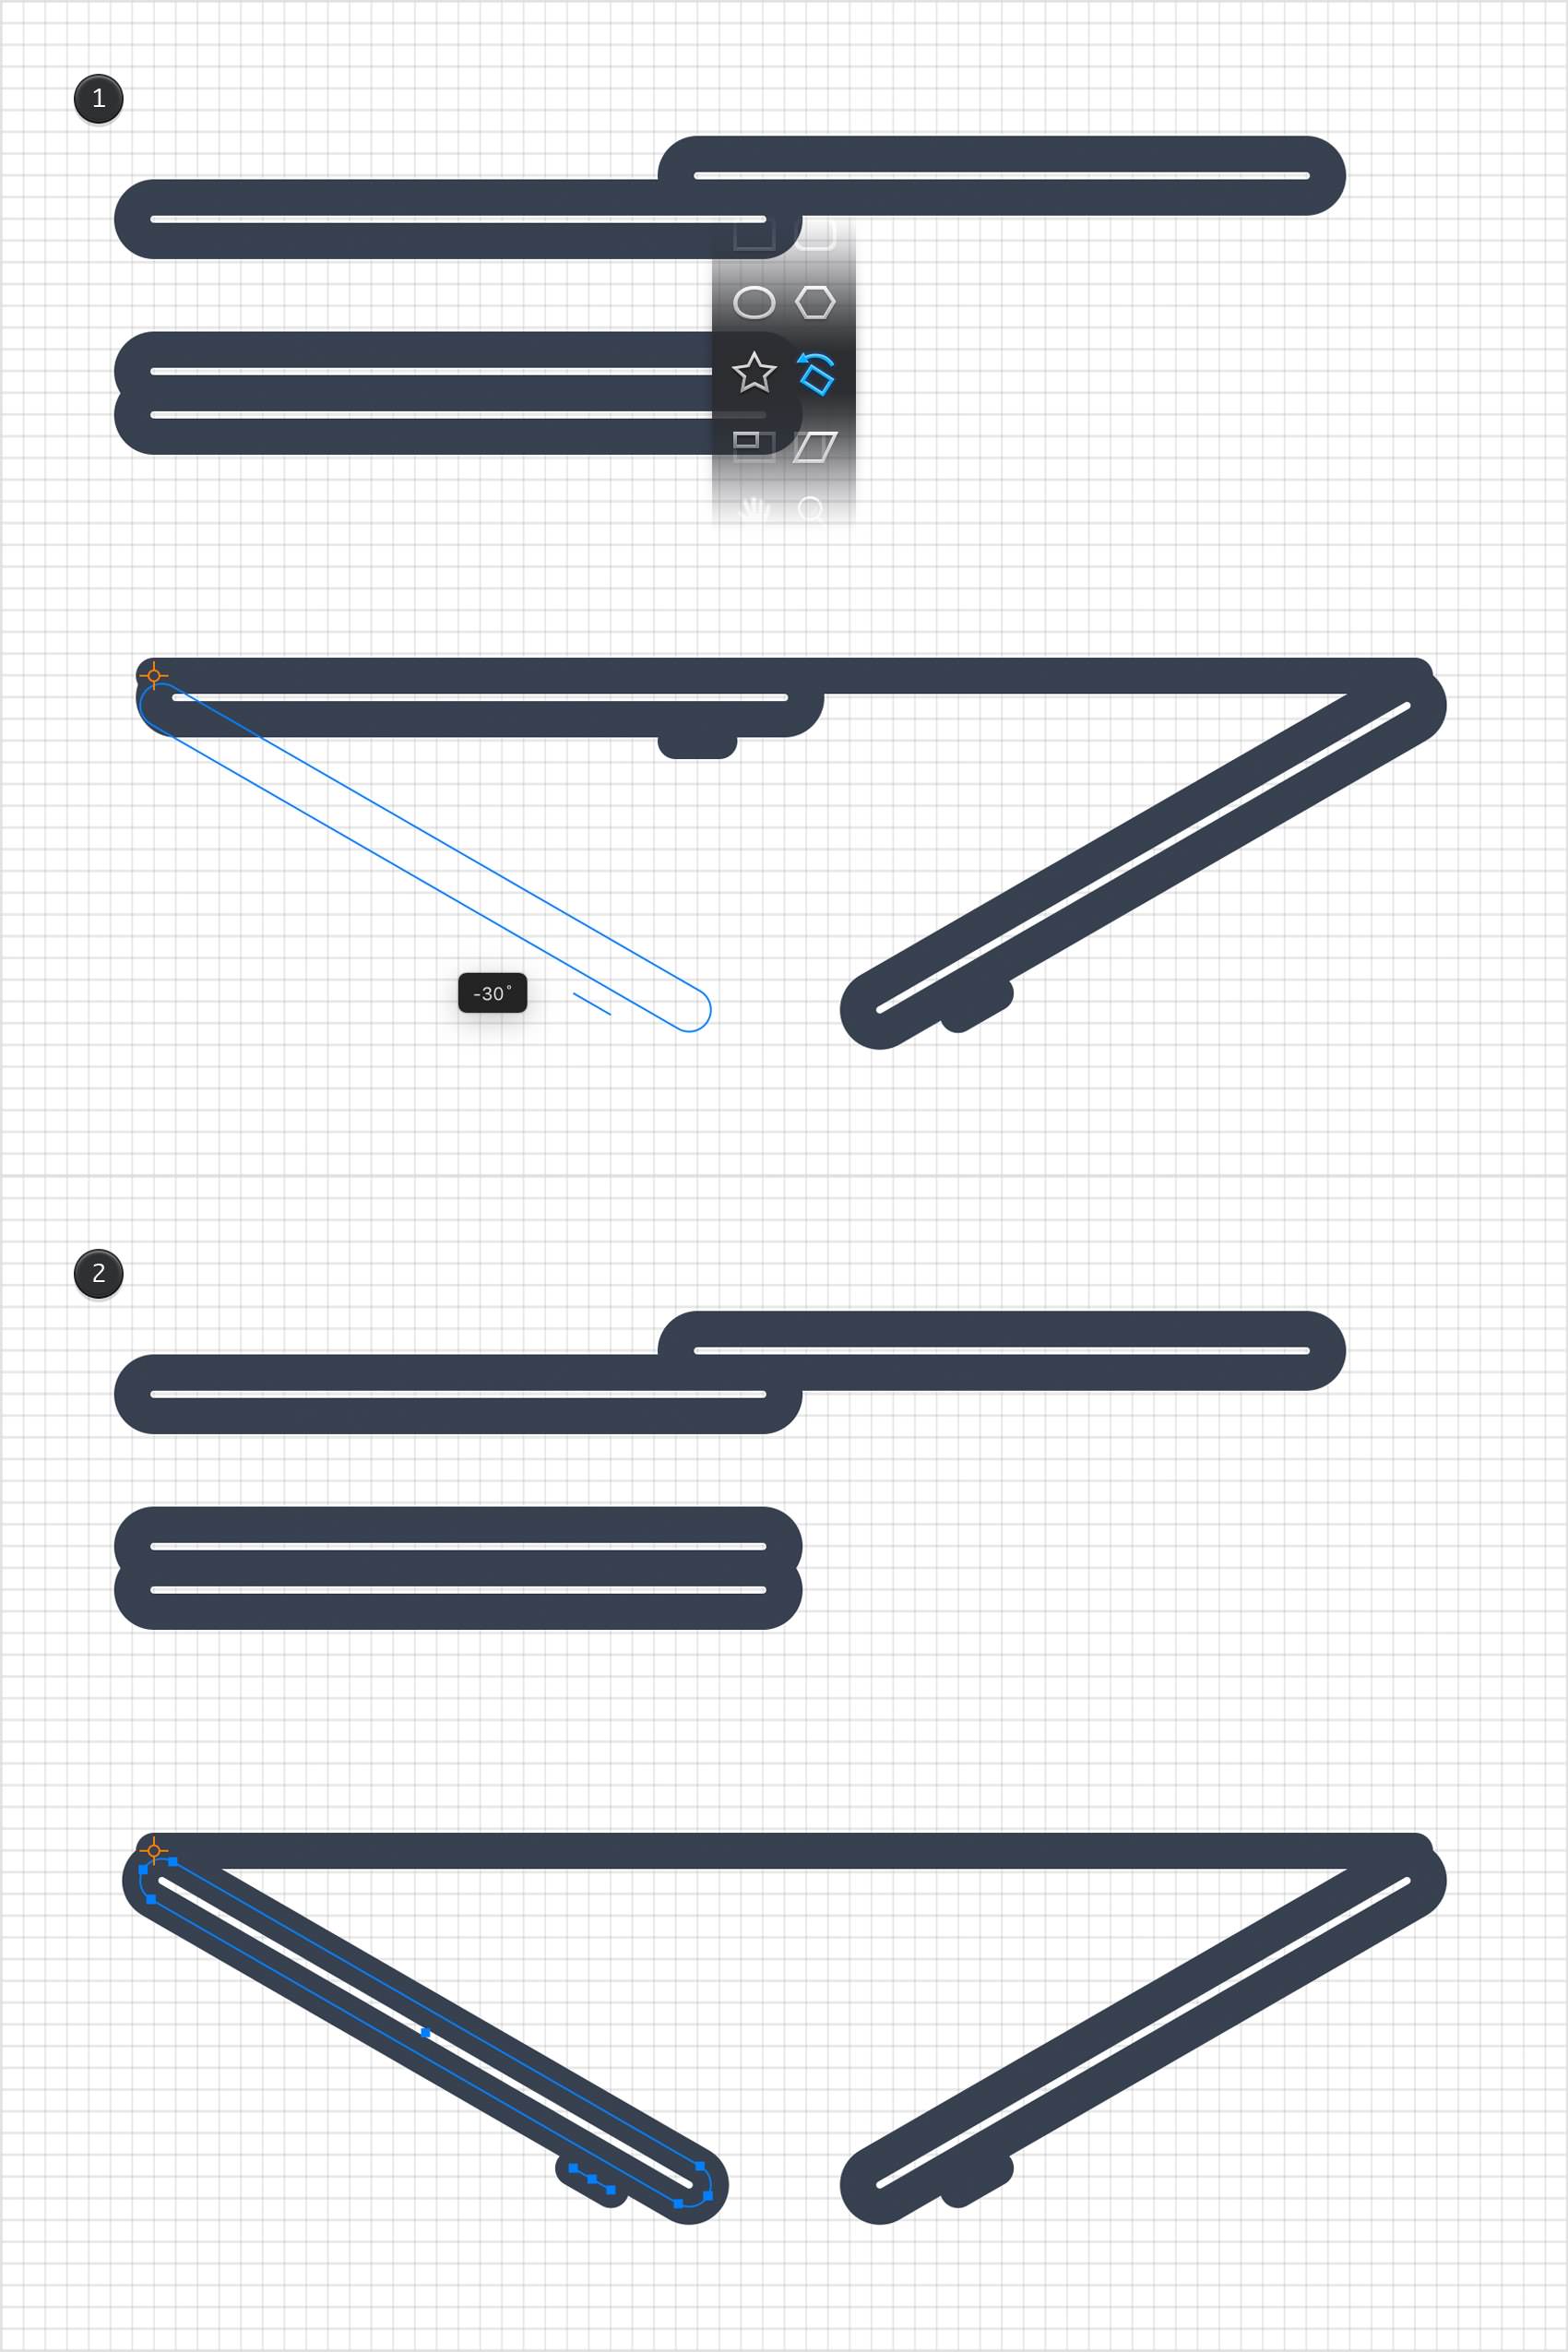
Duplicate the shapes that make up your double door, select the copies and drag them down about as shown in the first image. Focus on these copies, select your left group and pick the Rotate Tool (R). Place the reference point in the top, left corner and then rotate your selection -30 degress as shown below.
Step 22
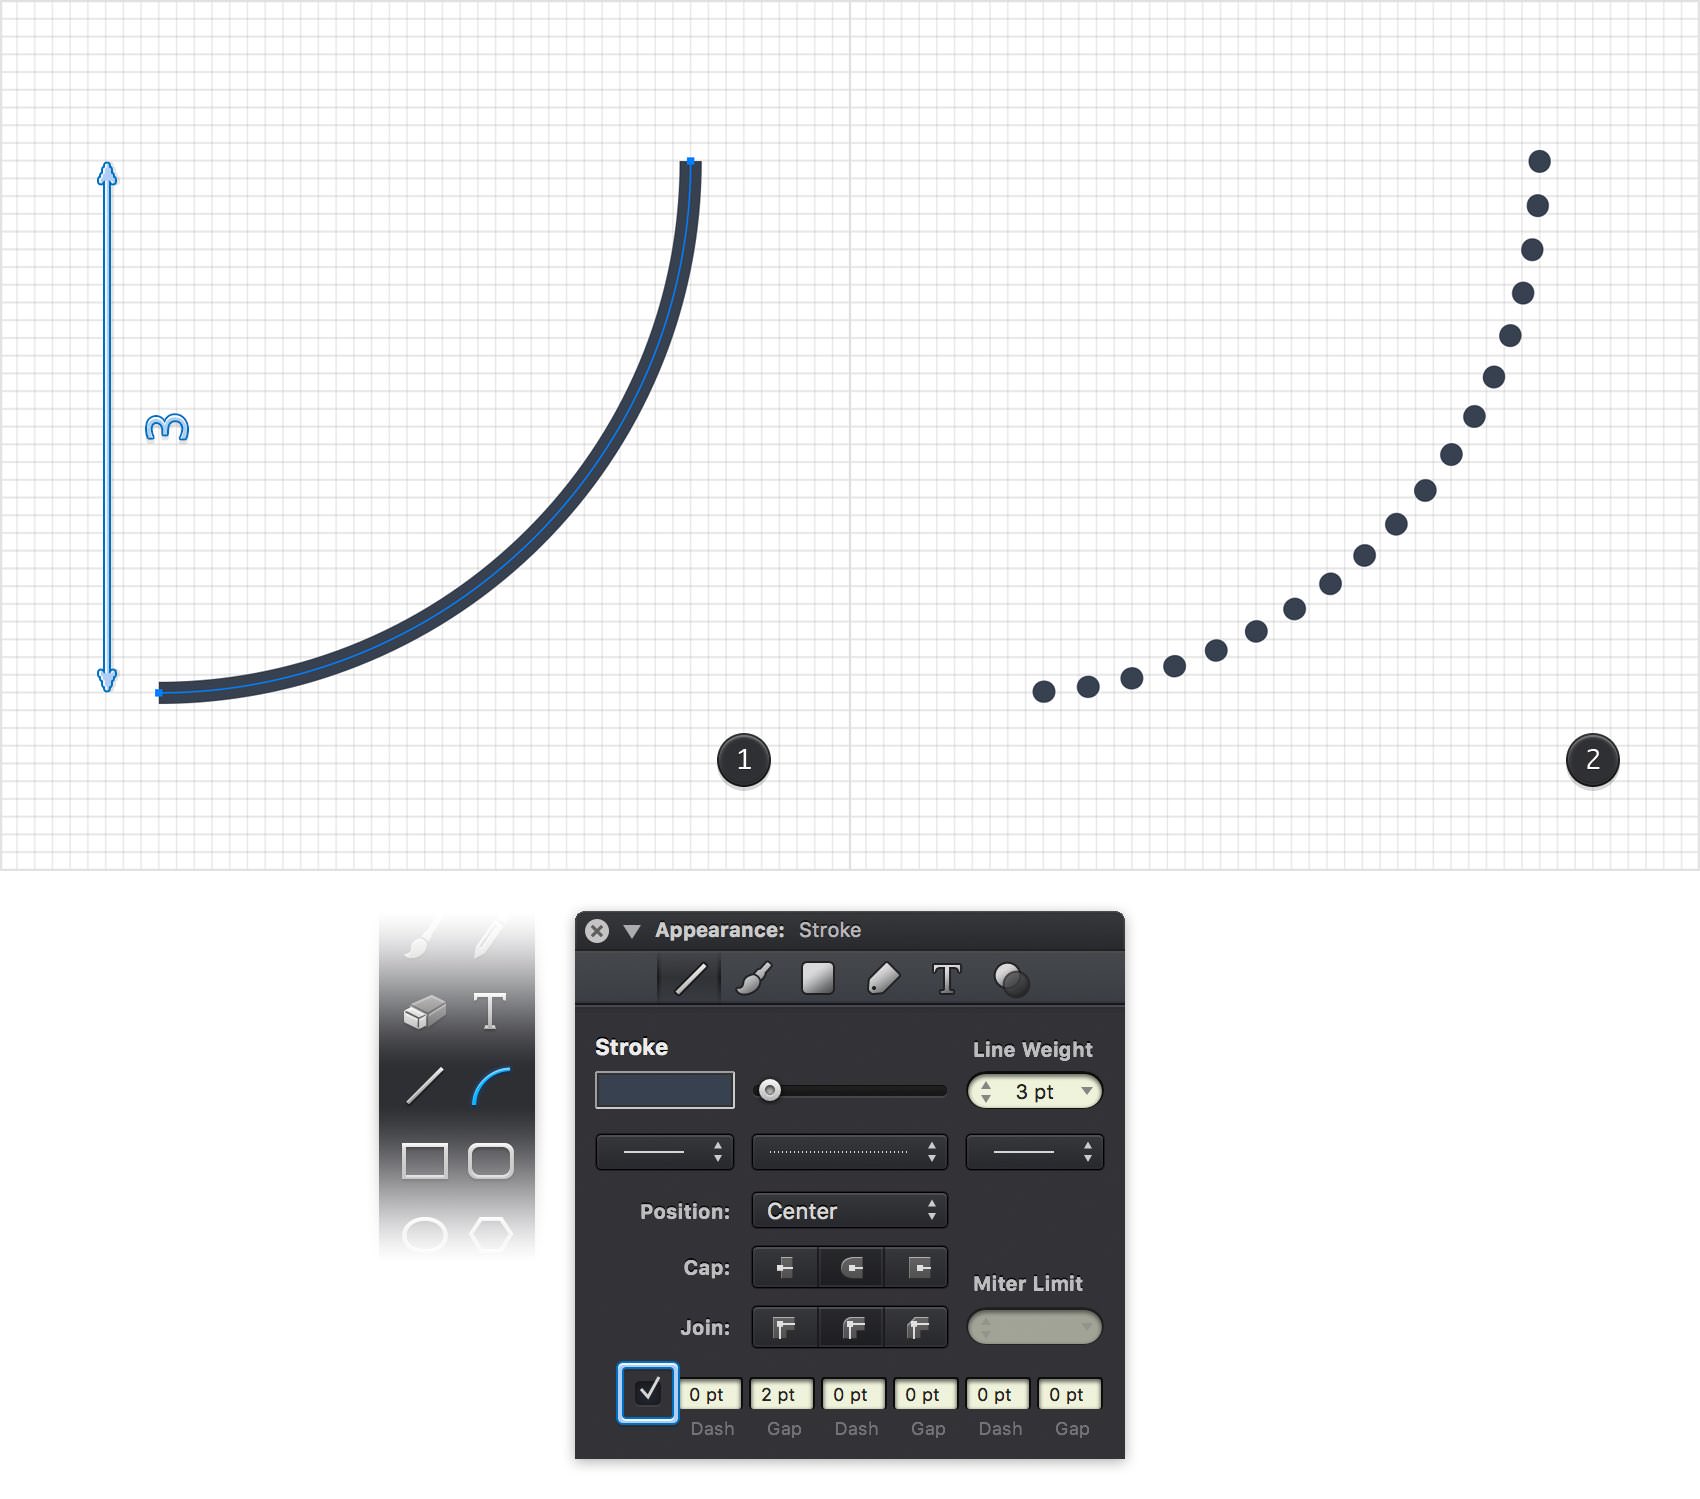
Pick the Arc Tool (K) and create a perfect, 3 ft arc. Hold the Shift key to easily create a perfect arc.
Apply your second style for this new path and then go to the Stroke pane. Check that bottom checkbox and then enter 0 pt in the first Dash box and 2 pt in the first Gap box. In the end you should have a neat dotted path as shown in the second image.
Step 23
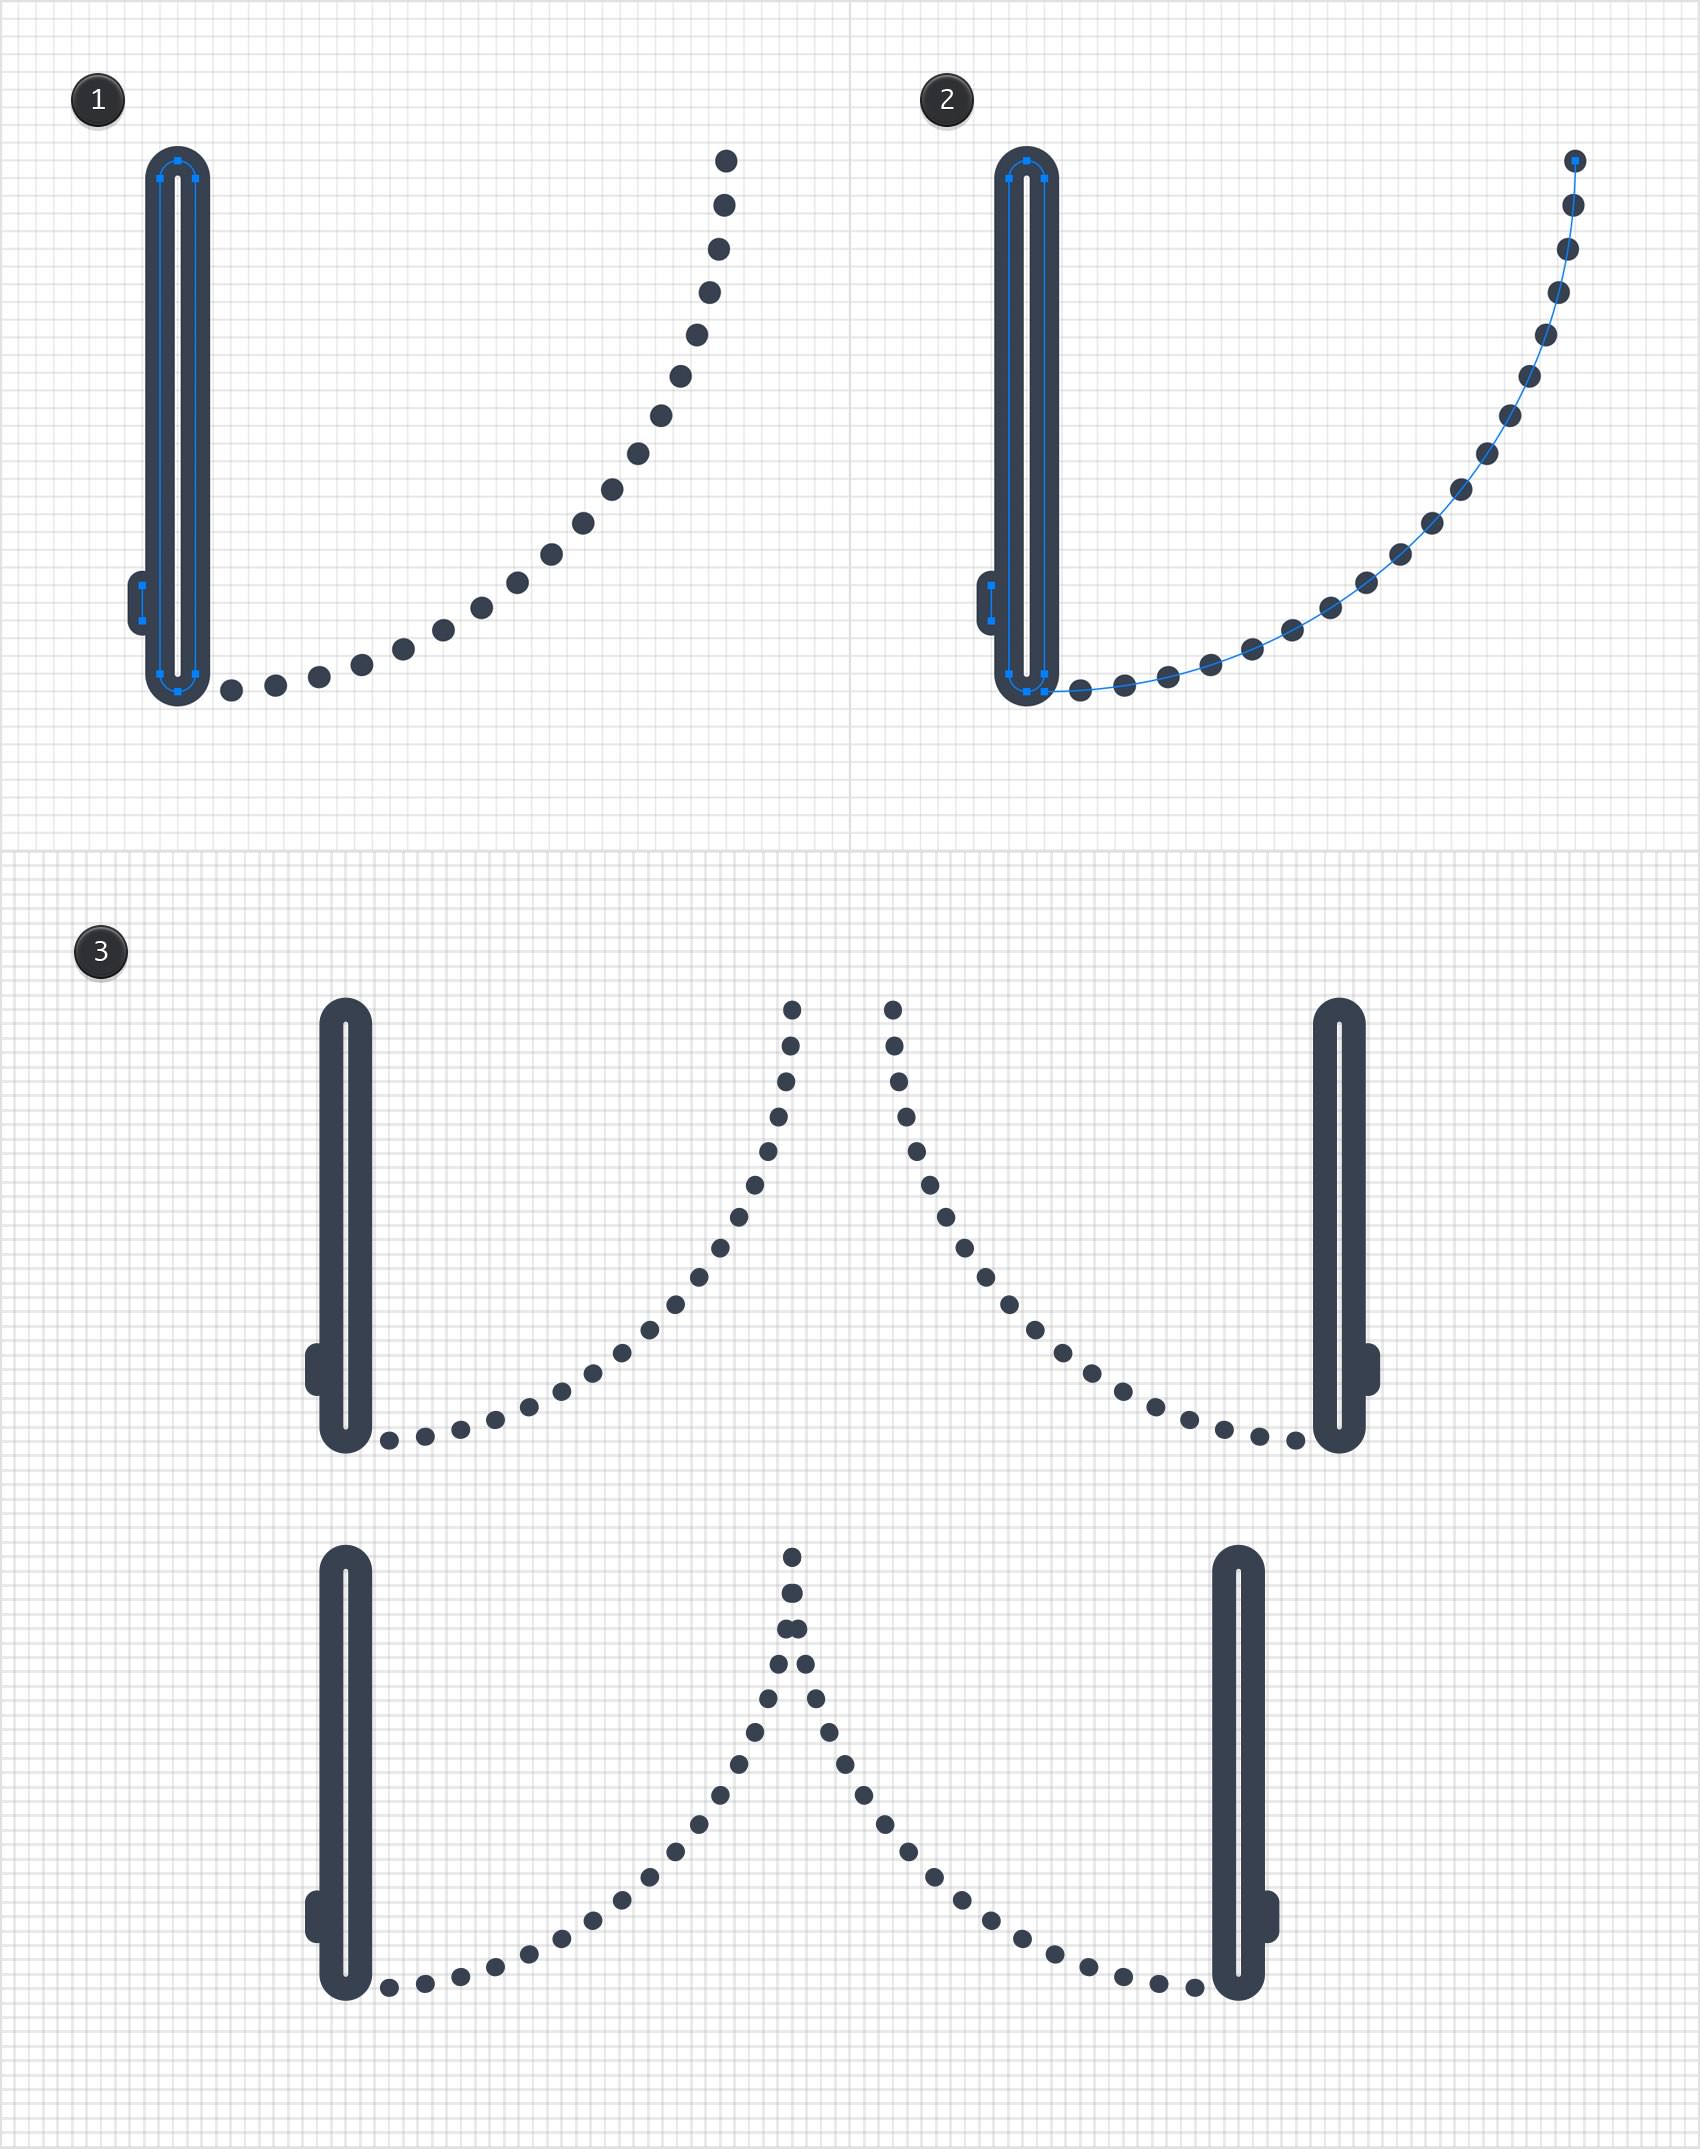
Make a new copy of the group that makes up your door and place it next to the dotted path as shown in the first image. Select this group along with the dotted path and Group them (Command + G). Once you're done, you can easily flip or rotate this group however you want.
Step 24
Move to the Layers panel and add a new layer. Rename it "sink 1" and make sure that it stays selected.
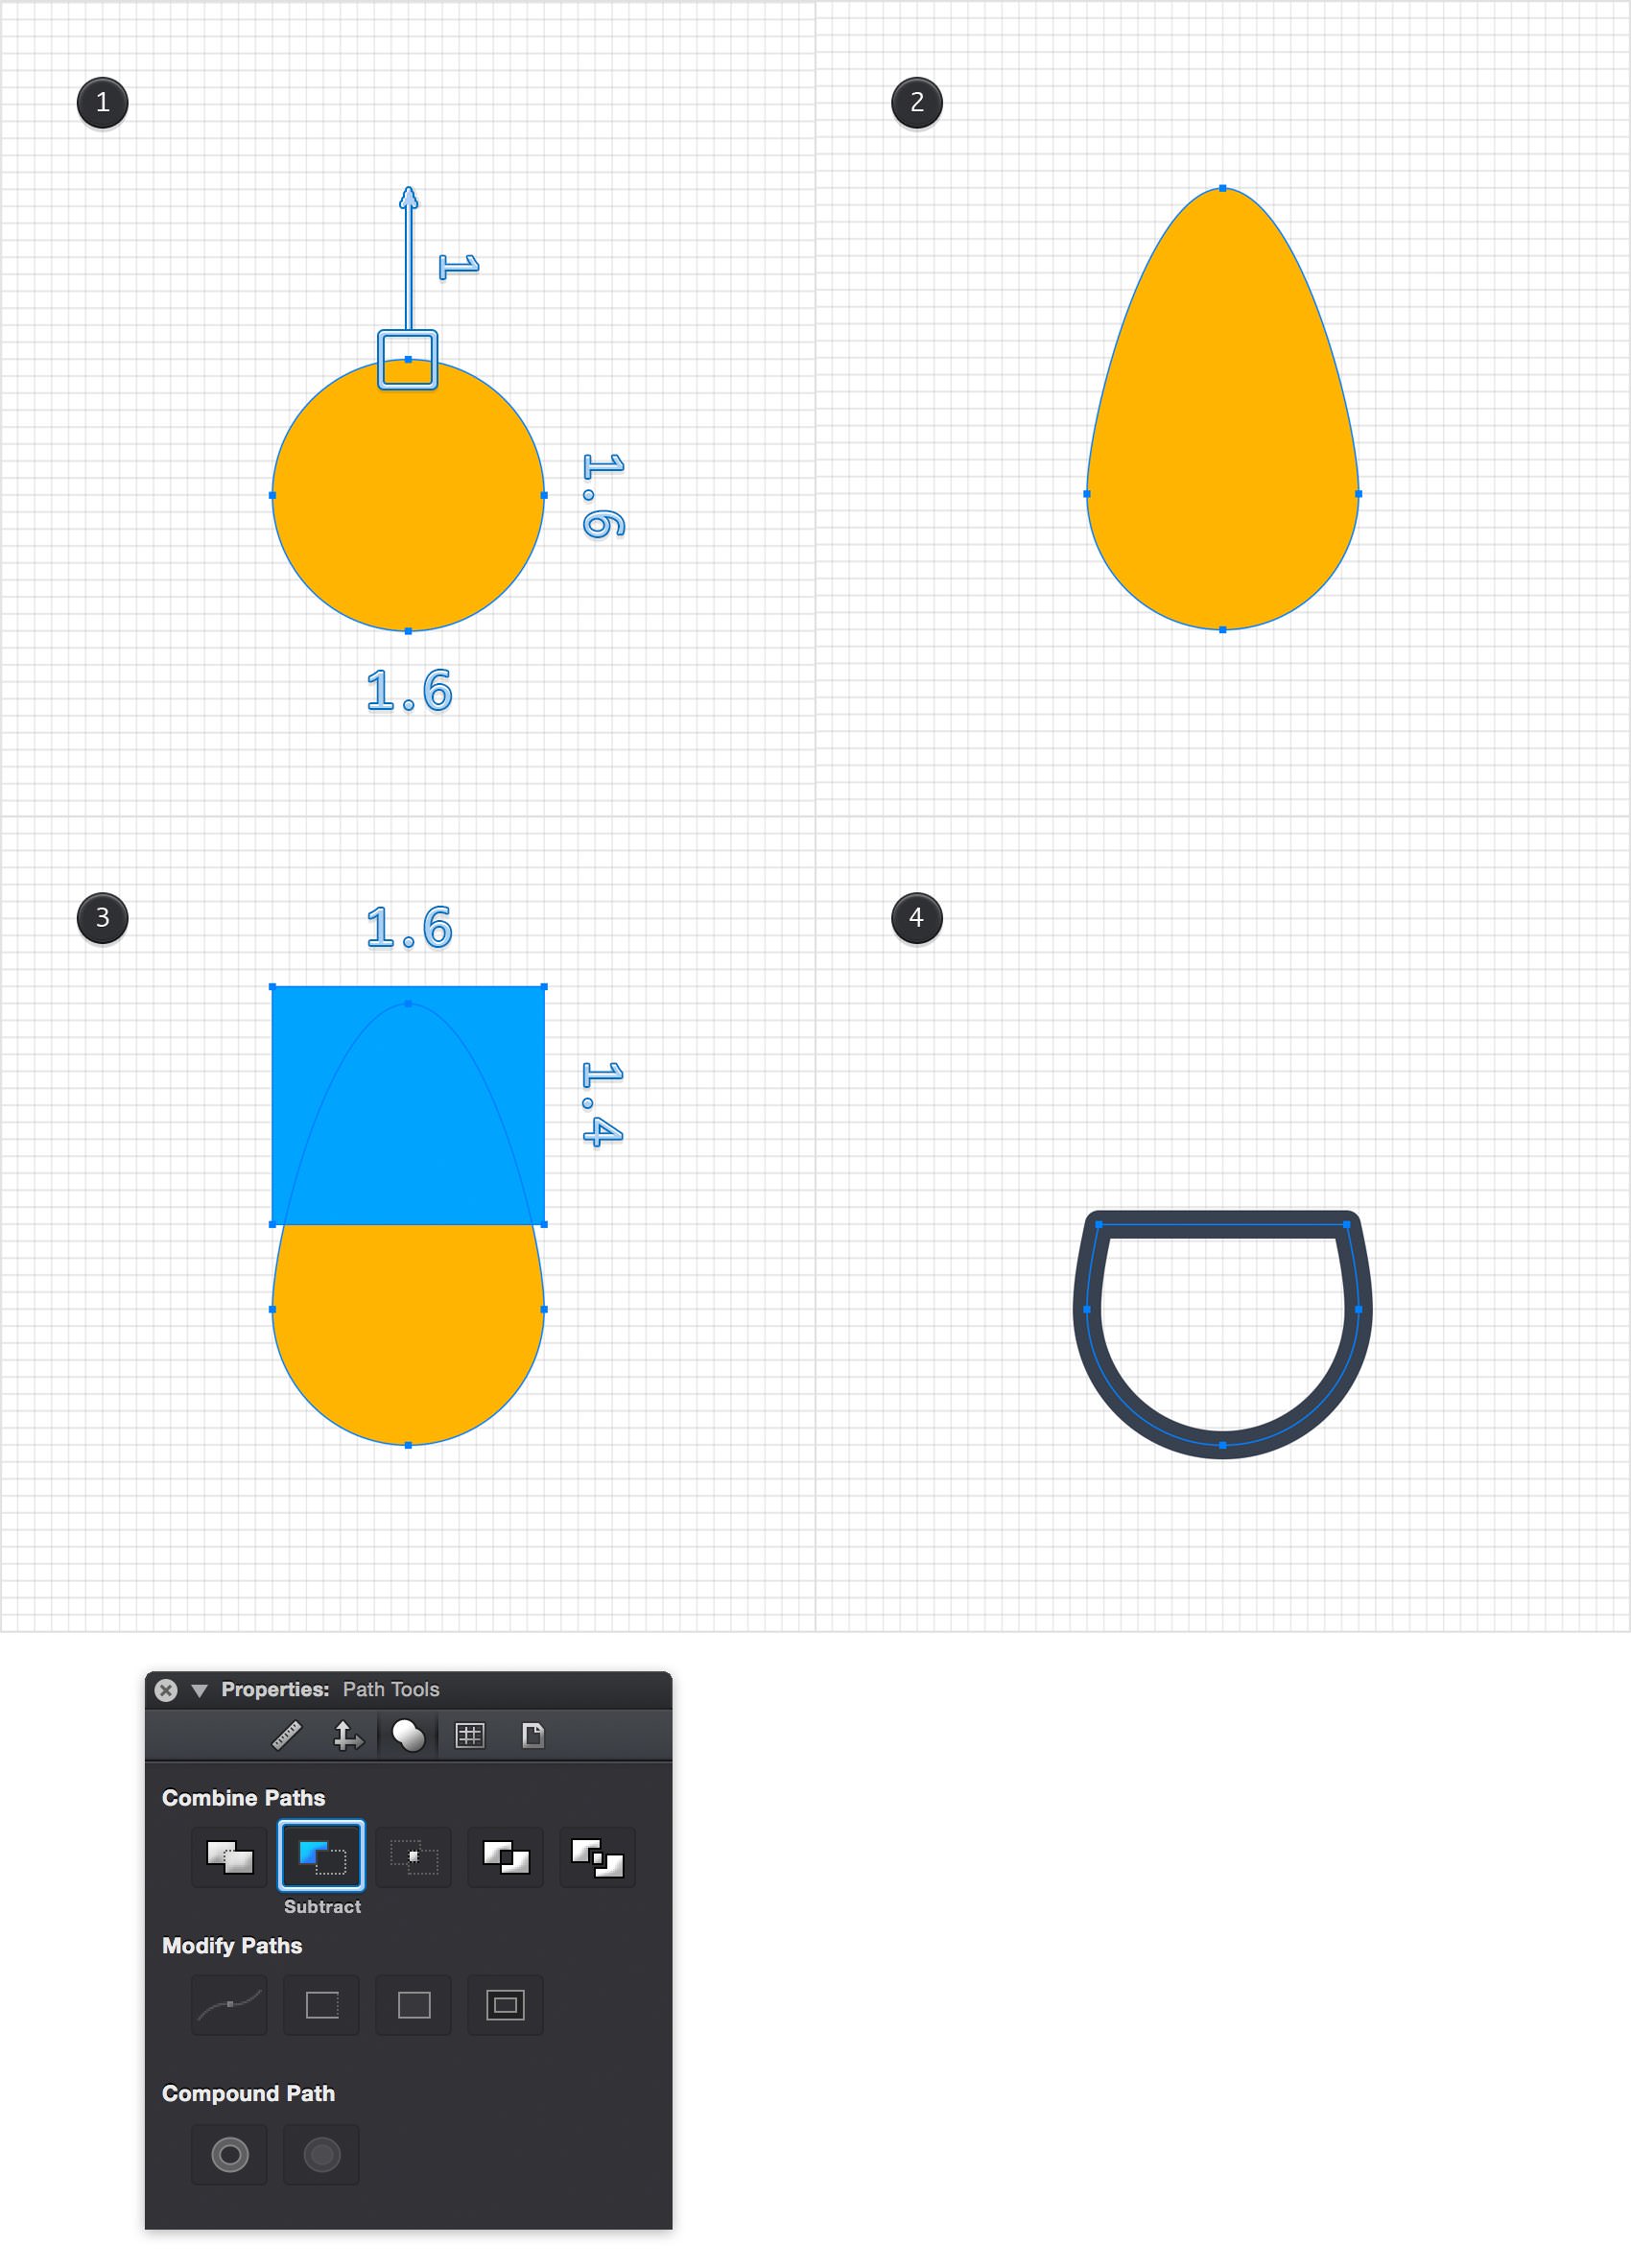
Using the Ellipse Tool (O), create a 1.6 ft circle and fill it with a random yellow. Switch to the Path Selection Tool (A) and keep focusing on your new shape. Select the top anchor point and drag it 1 ft up.
Pick the Rectangle Tool (M), create a 1. 6 x 1.4 ft shape, fill it with a random blue and place it as shown in the third image. Select both shapes made in this step, go to the Path Tools pane and click the Subtract command. Make sure that the resulting shape is selected and apply your first style from the Styles panel.
Step 25
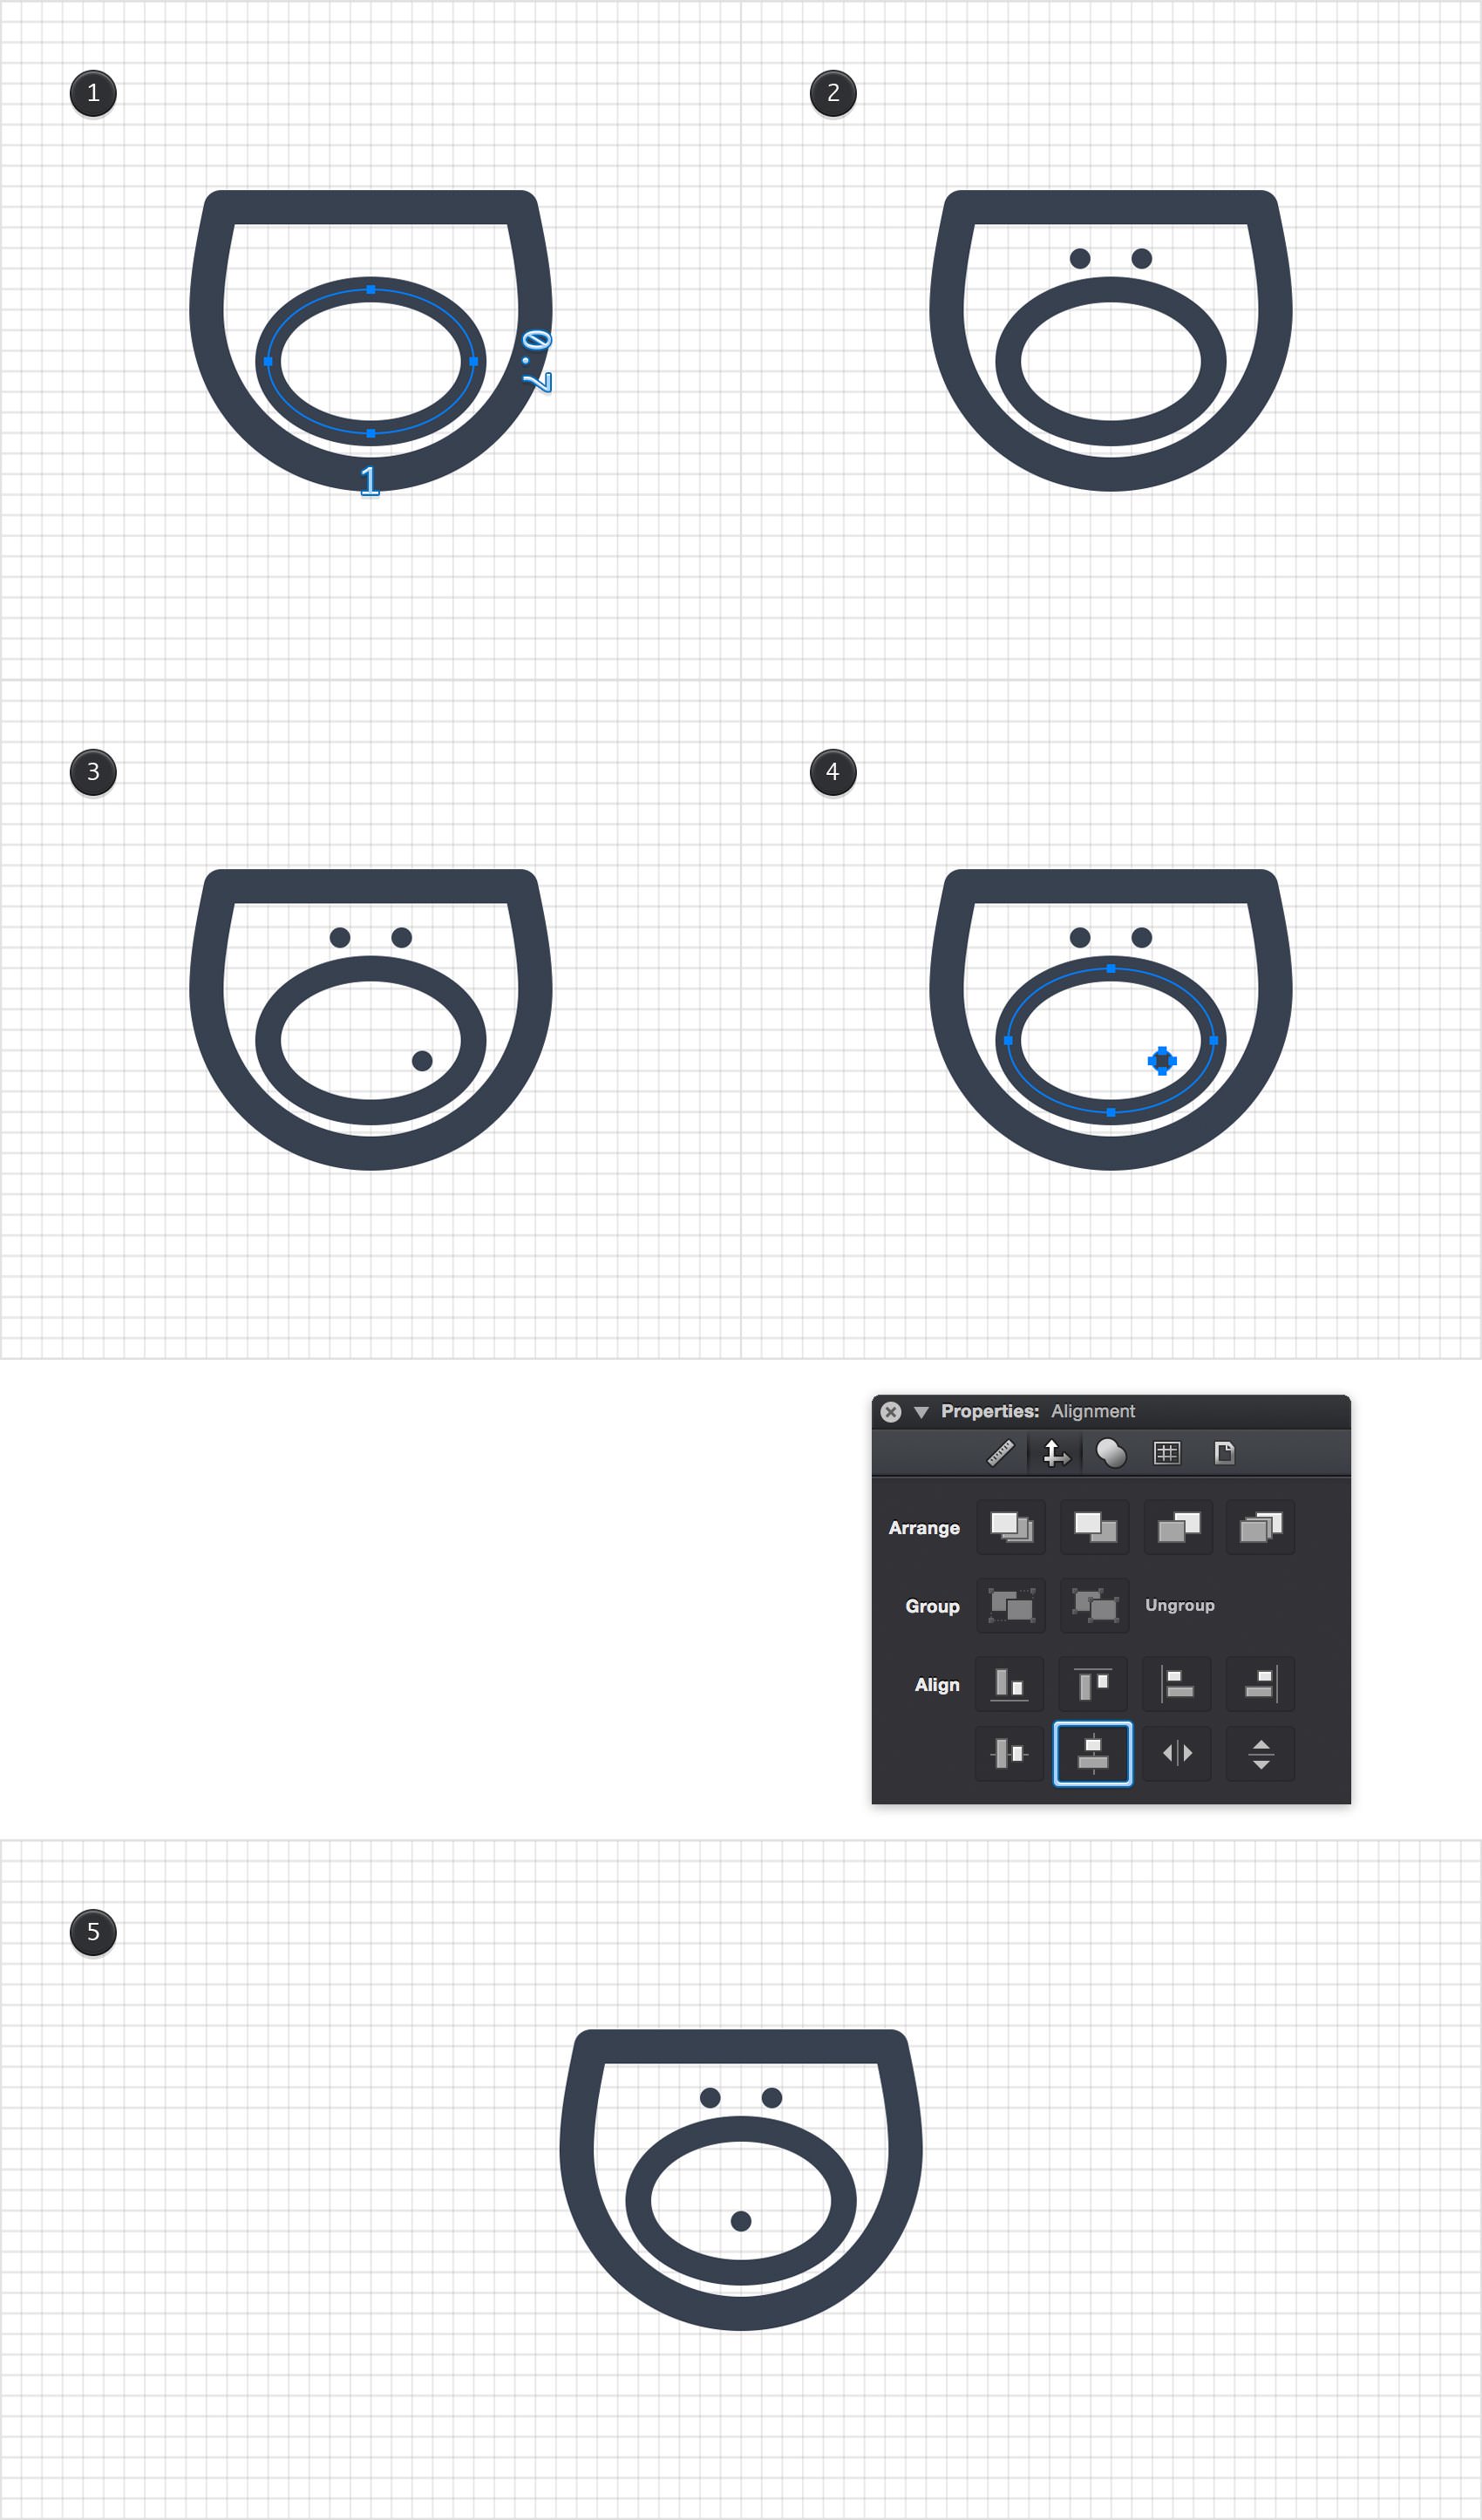
Using the Ellipse Tool (O), create a 1 x 0.7 ft shape, place it as shown in the first image and apply your second style. Create two, 0.1 ft circle, place them as shown in the first image and fill both shapes with your saved color.
Add a third, 0.1 ft circle, fill it with the same color and place it as shown in the third image. Select this tiny, new circle along with the oval shape made in the beginning of the step, go to the Alignment pane from the Properties panel and click the Vertical Centers command.
Step 26
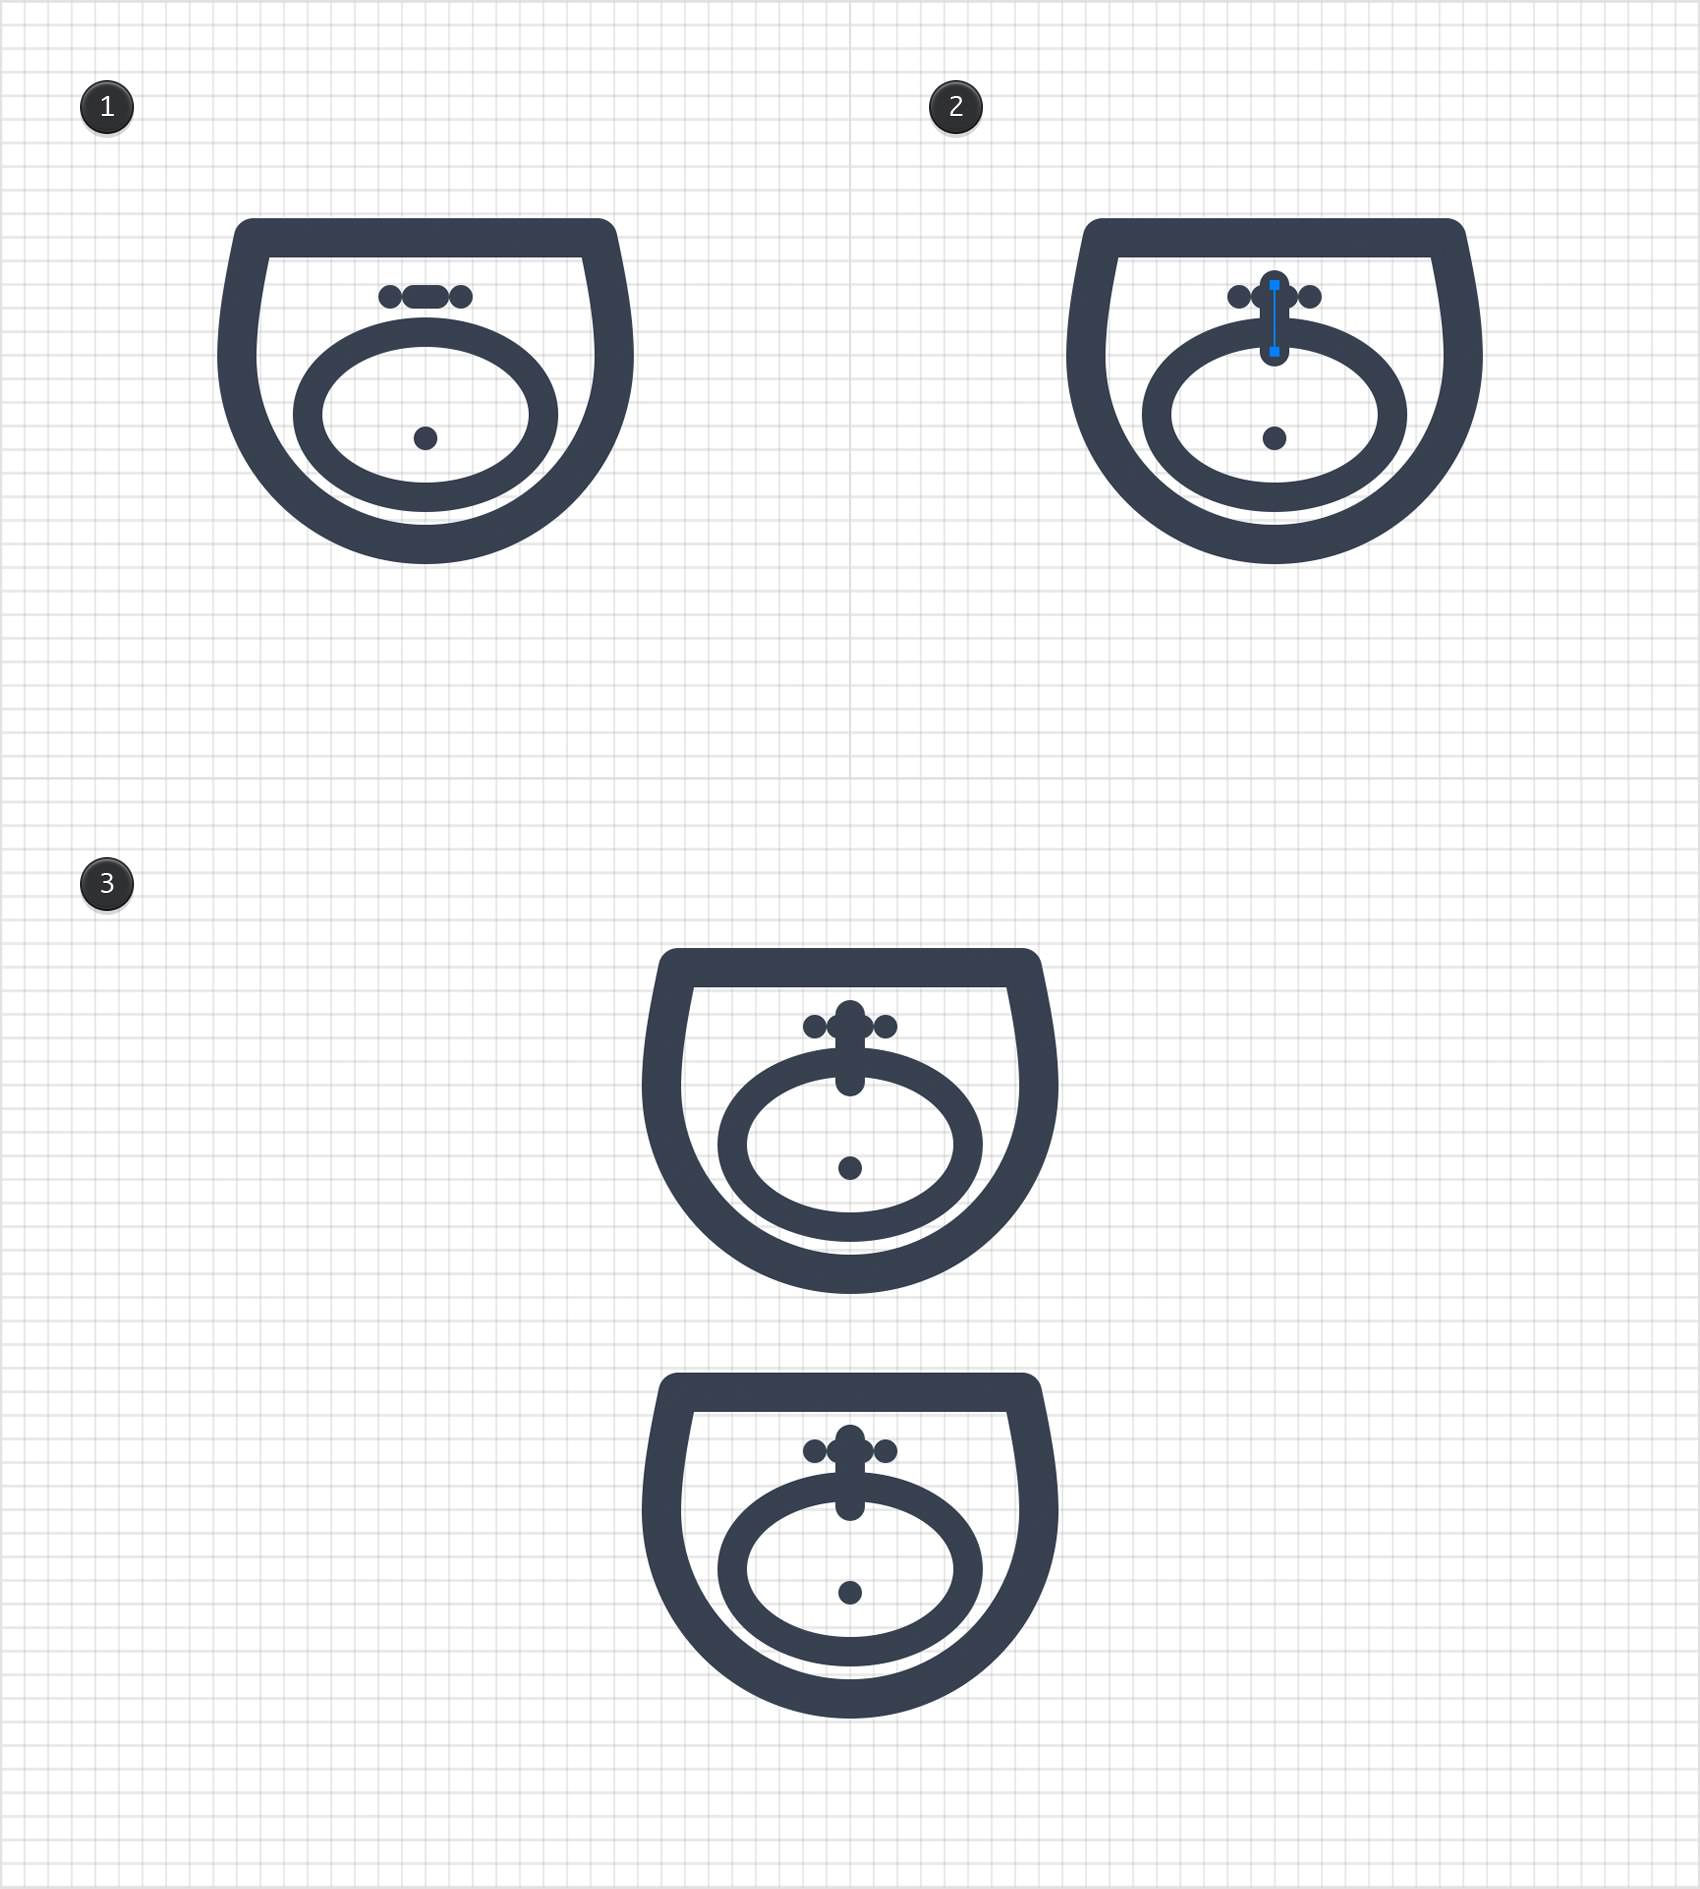
Using the Rectangle Tool (Shift + M), create a 0.2 x 0.1 ft shape, place it as shown in the first image and fill it with your color. Switch to the Line Tool (L), create a 0.3 ft, vertical path, place it as shown in the second image and apply your second style.
Move to the Layers panel and duplicate your "sink 1" layer. Rename this group copy "sink 1 Large". Select all the shapes from this newly added layer and drag them down, about as shown in the third image.
Step 27
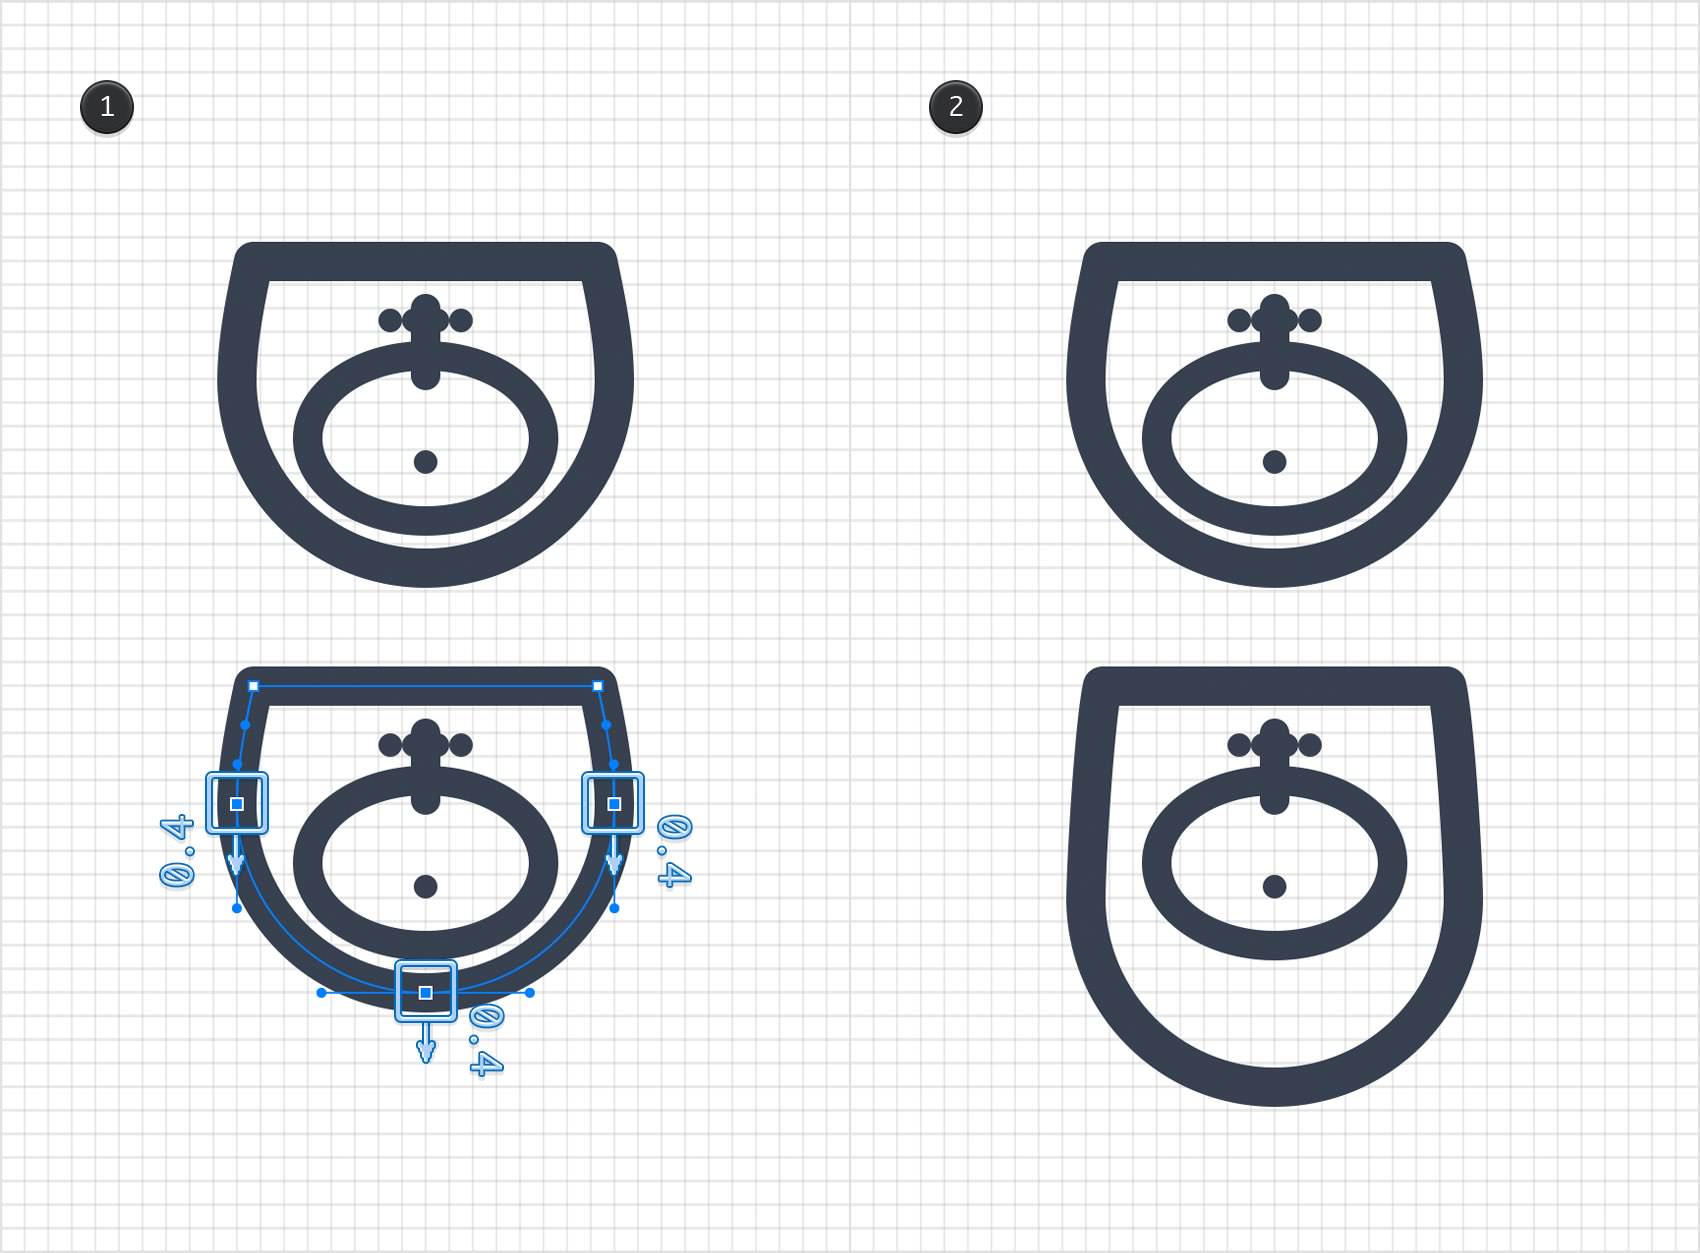
Make sure that your "Sink 1 Large" layer is still selected and focus on the main shape. Using the Path Selection Tool (A), select the three anchor points highlighted in the first image and drag them 0.4 ft down as shown in the second image.
Step 28
Delete the oval shapes that lies inside your "Sink 1 Large" layer and replace it with a 1 ft circle as shown in the first image. Don't forget to apply the second style for this new shape.
Focus on the top side of this circle and pick the Path Selection Tool (A). Select that anchor point and drag it 0.1 ft up as shown in the second image.
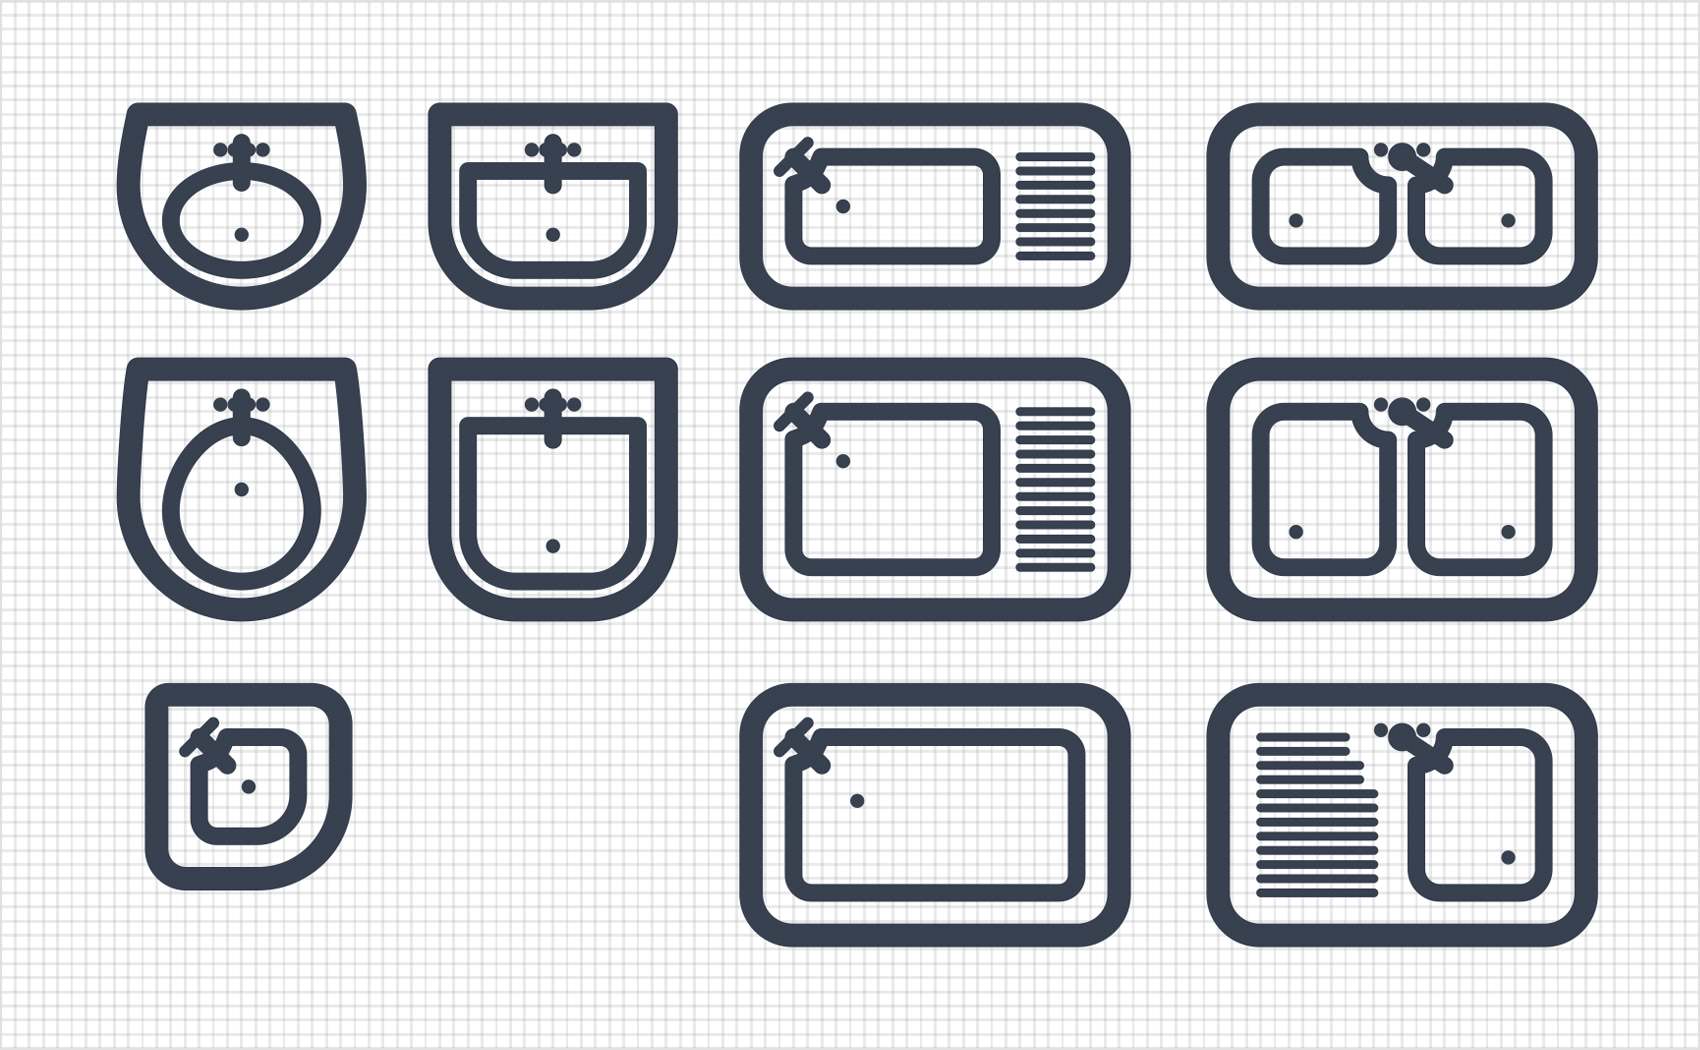
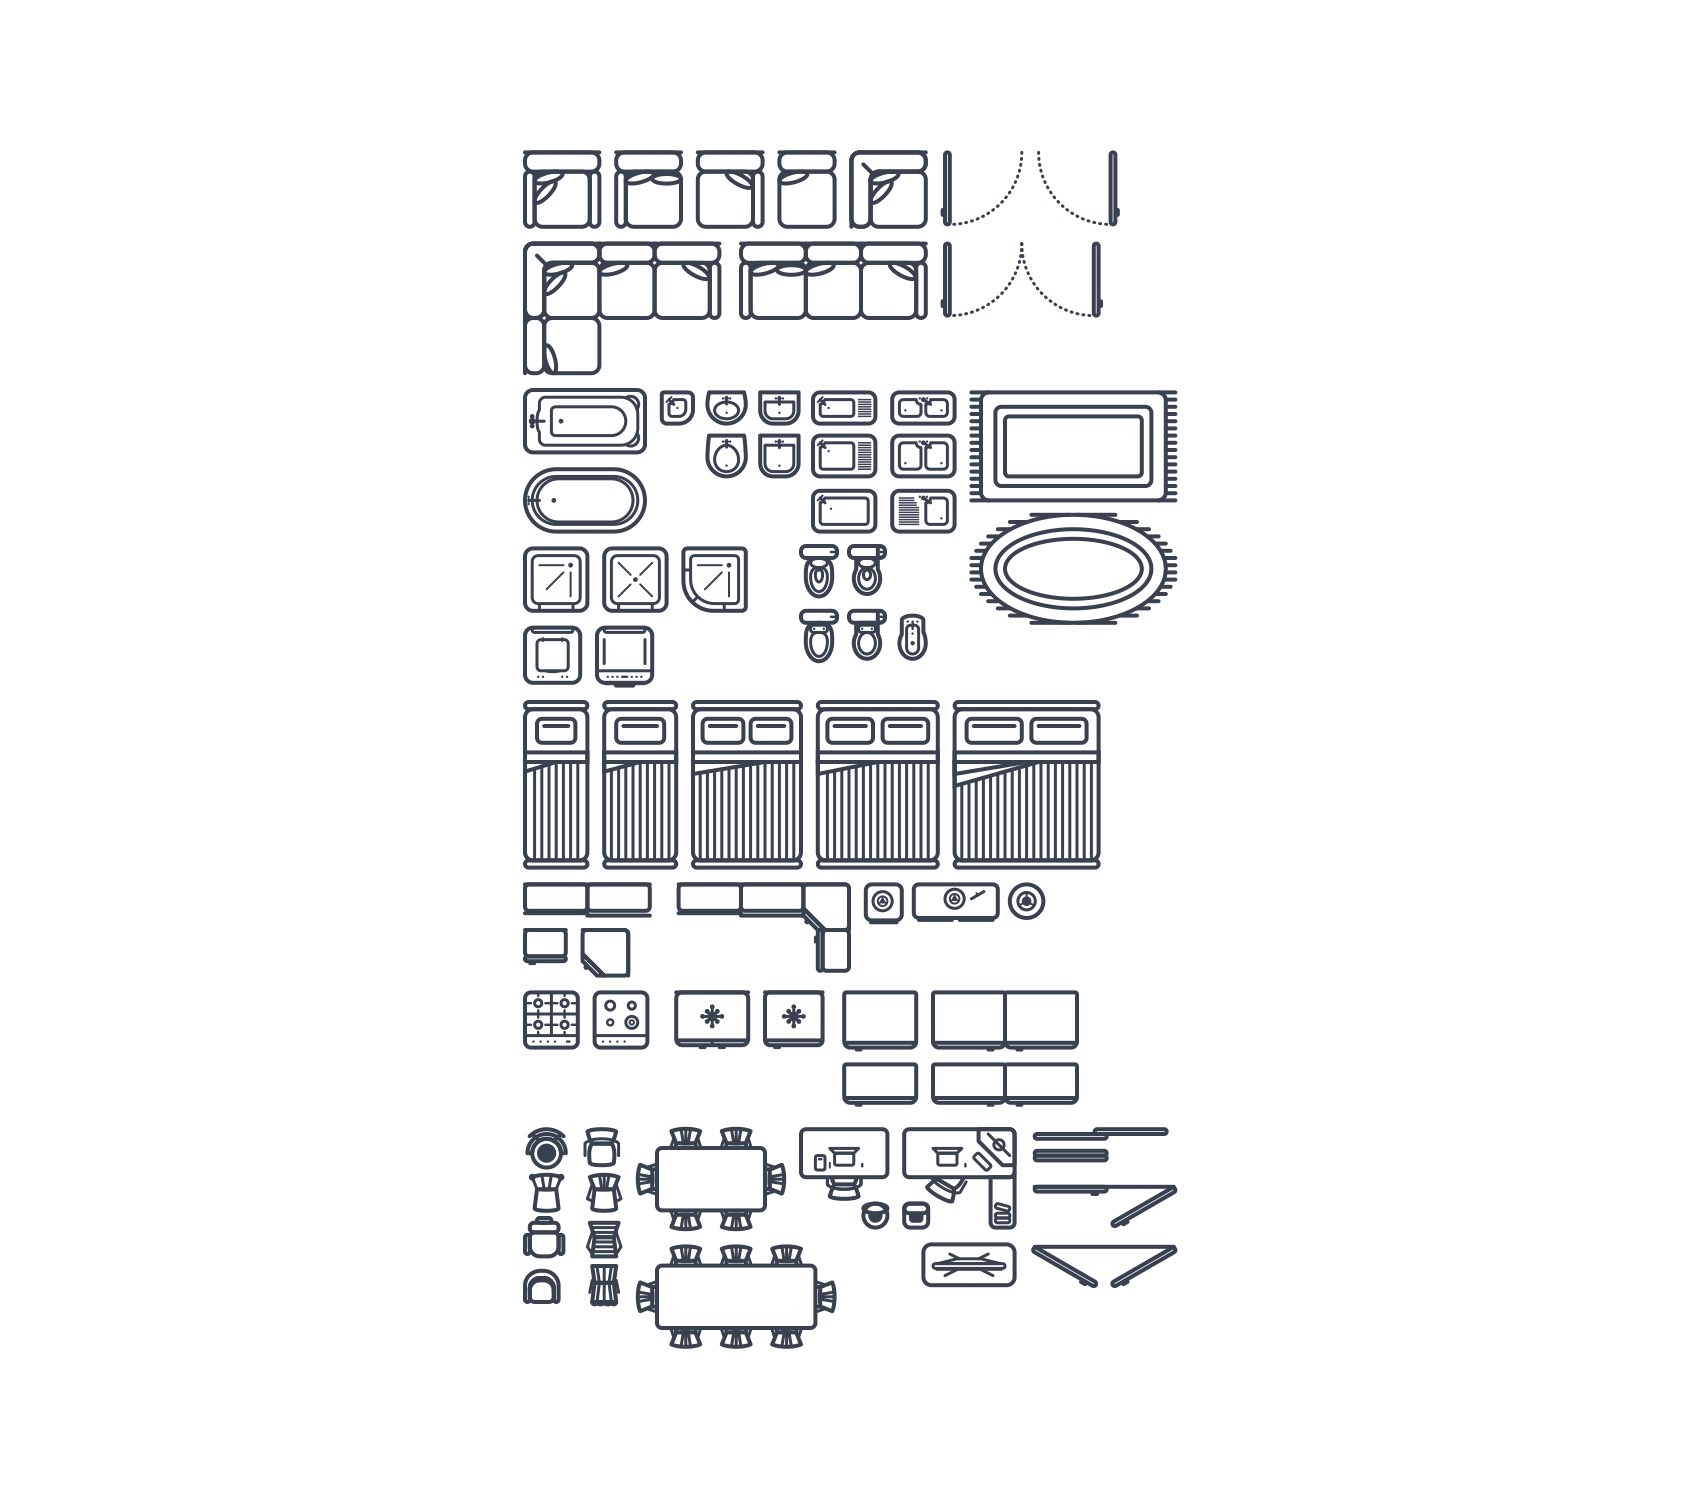
Using the tools, techniques and styles mentioned in the previous step you can create a variety of sink symbols as shown in the following image.
Step 29
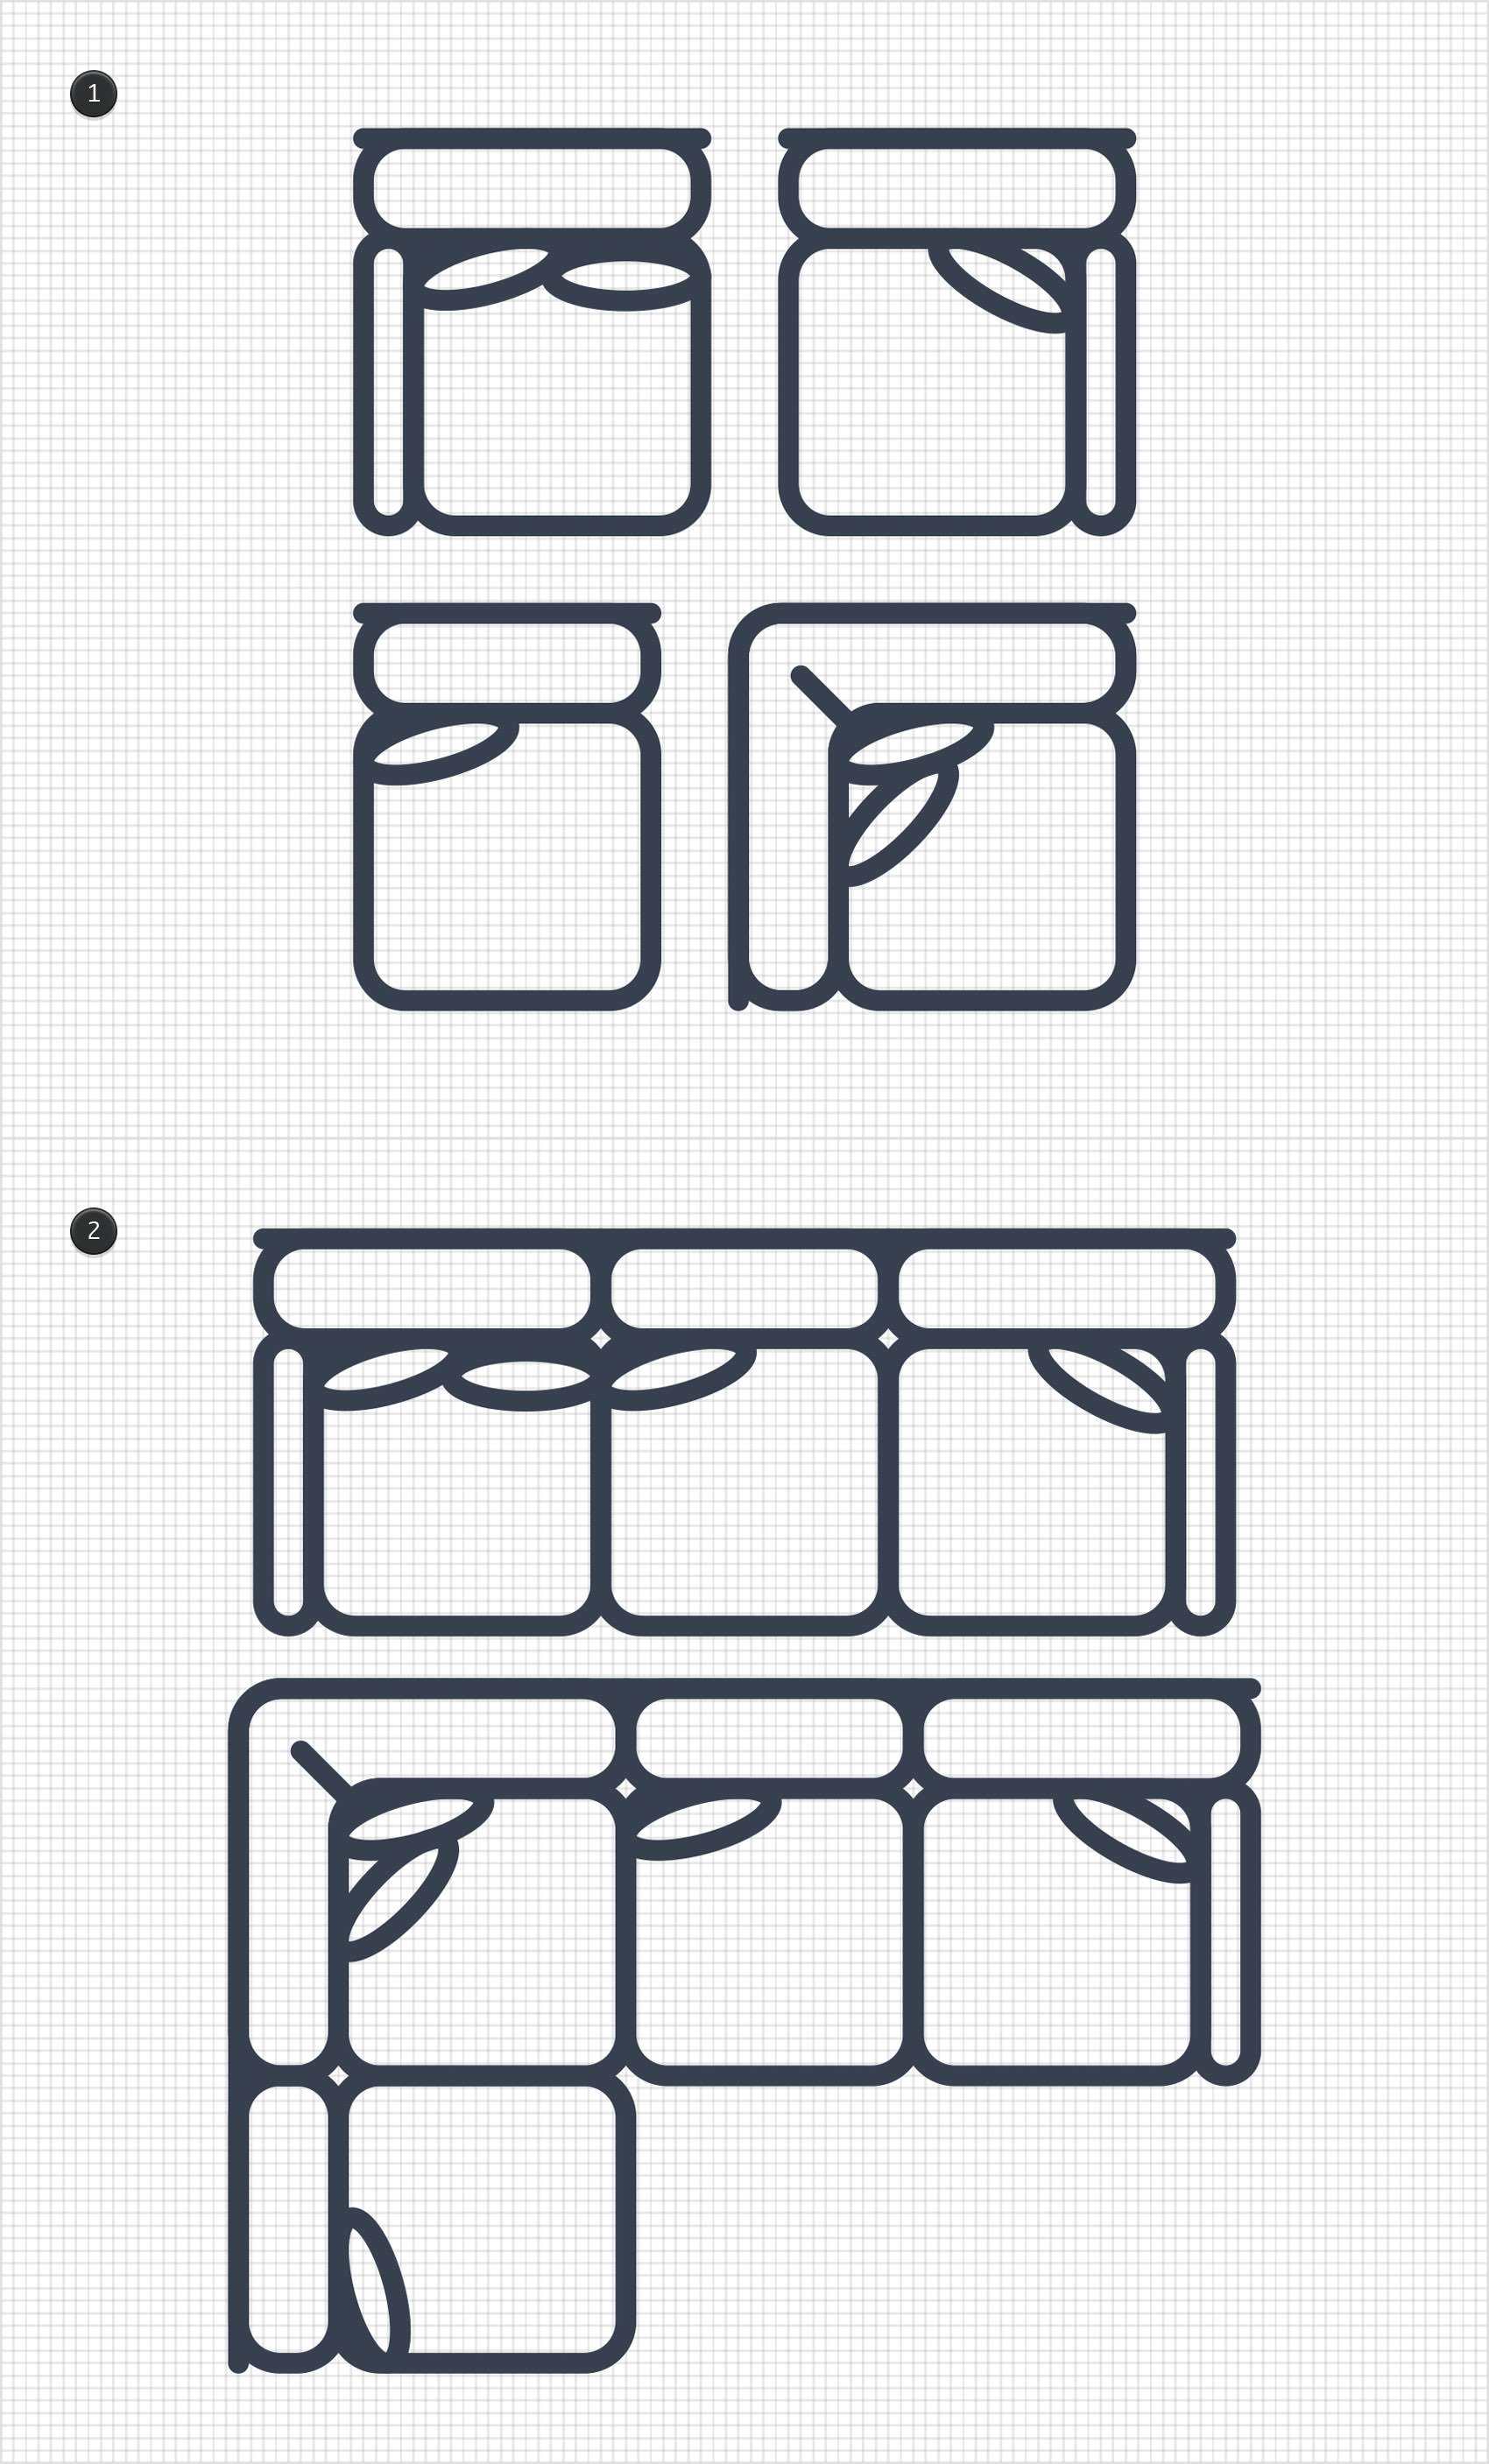
Using the same tool, techniques and styles mentioned in the previous step you can create pieces of a sofa and combine them to create bigger sofas.
Or, you can create pieces of a closet and combine them to create bigger closets.
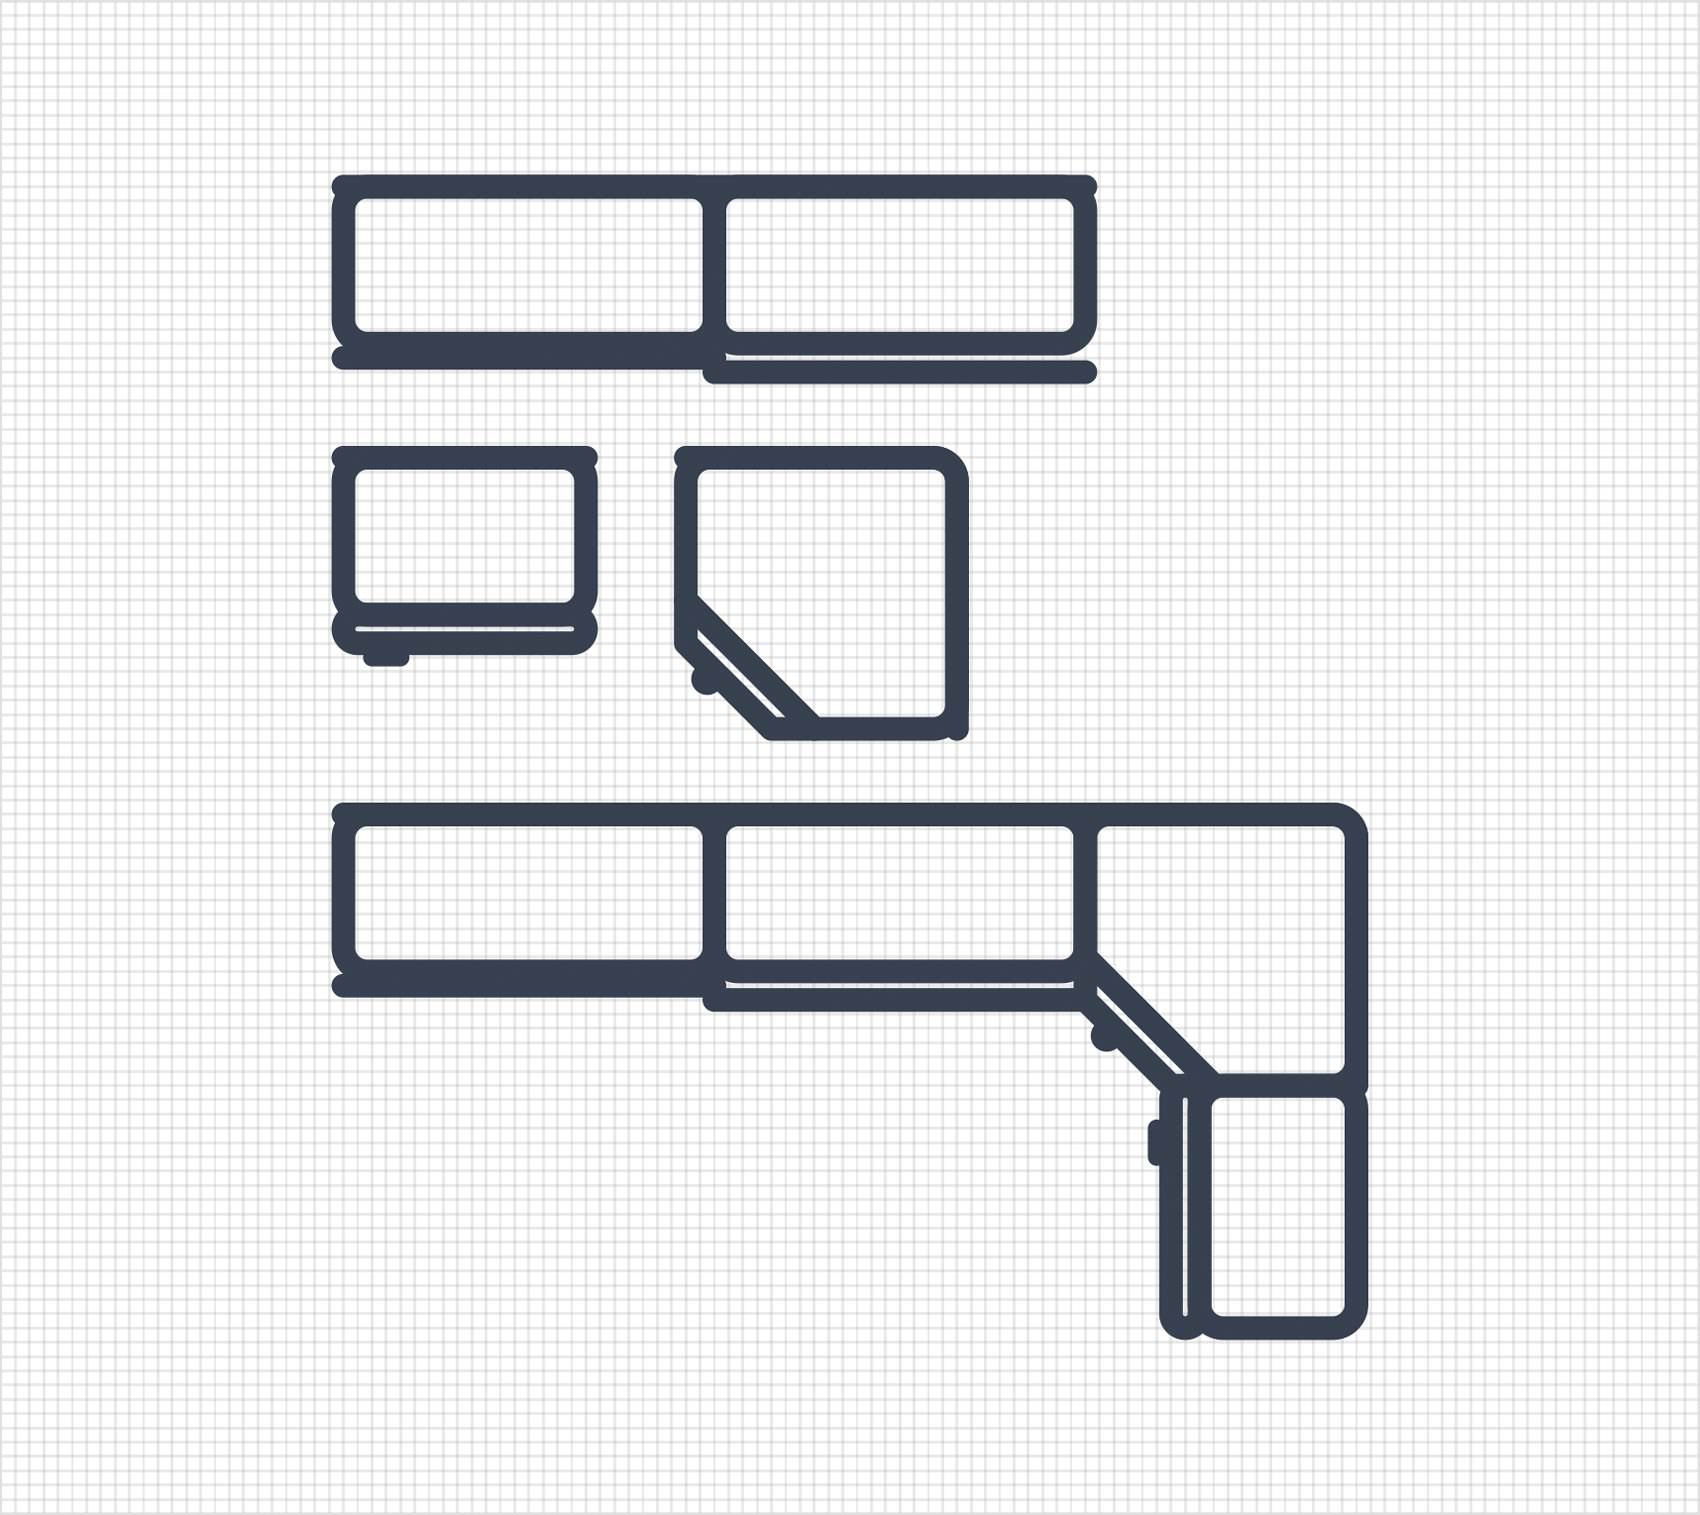
Or, you can create any of the symbols shown below.
Step 30
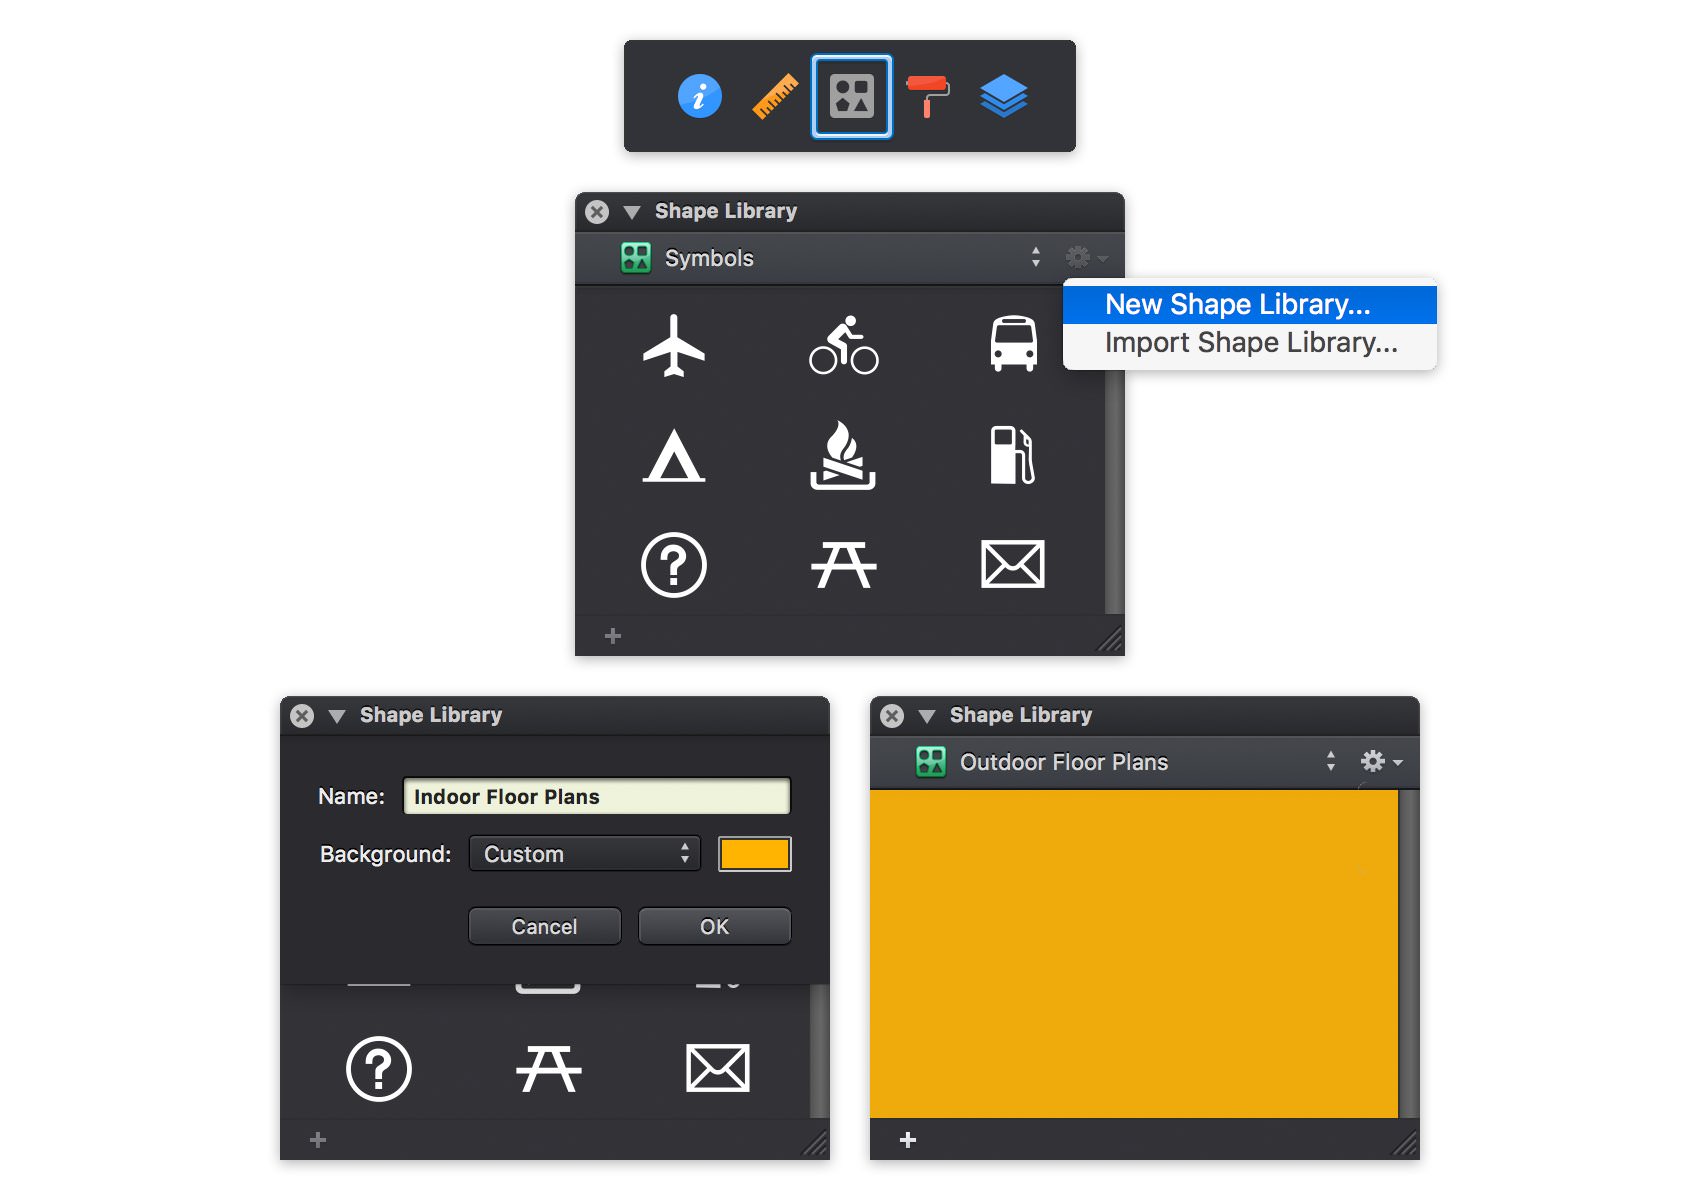
Finally, let's learn how to save your symbols inside a shape library. Open the Shape Library panel and click that settings button from the top, right corner. Go to New Shape Library... and the window with the attributes of your new shape library will open. Enter a name for your new shape library, pick a background color and then click the OK button.
By default your new shape library will open. Keep in mind that you can easily switch between shape libraries using the drop-down menu from the top of the panel.
Step 31
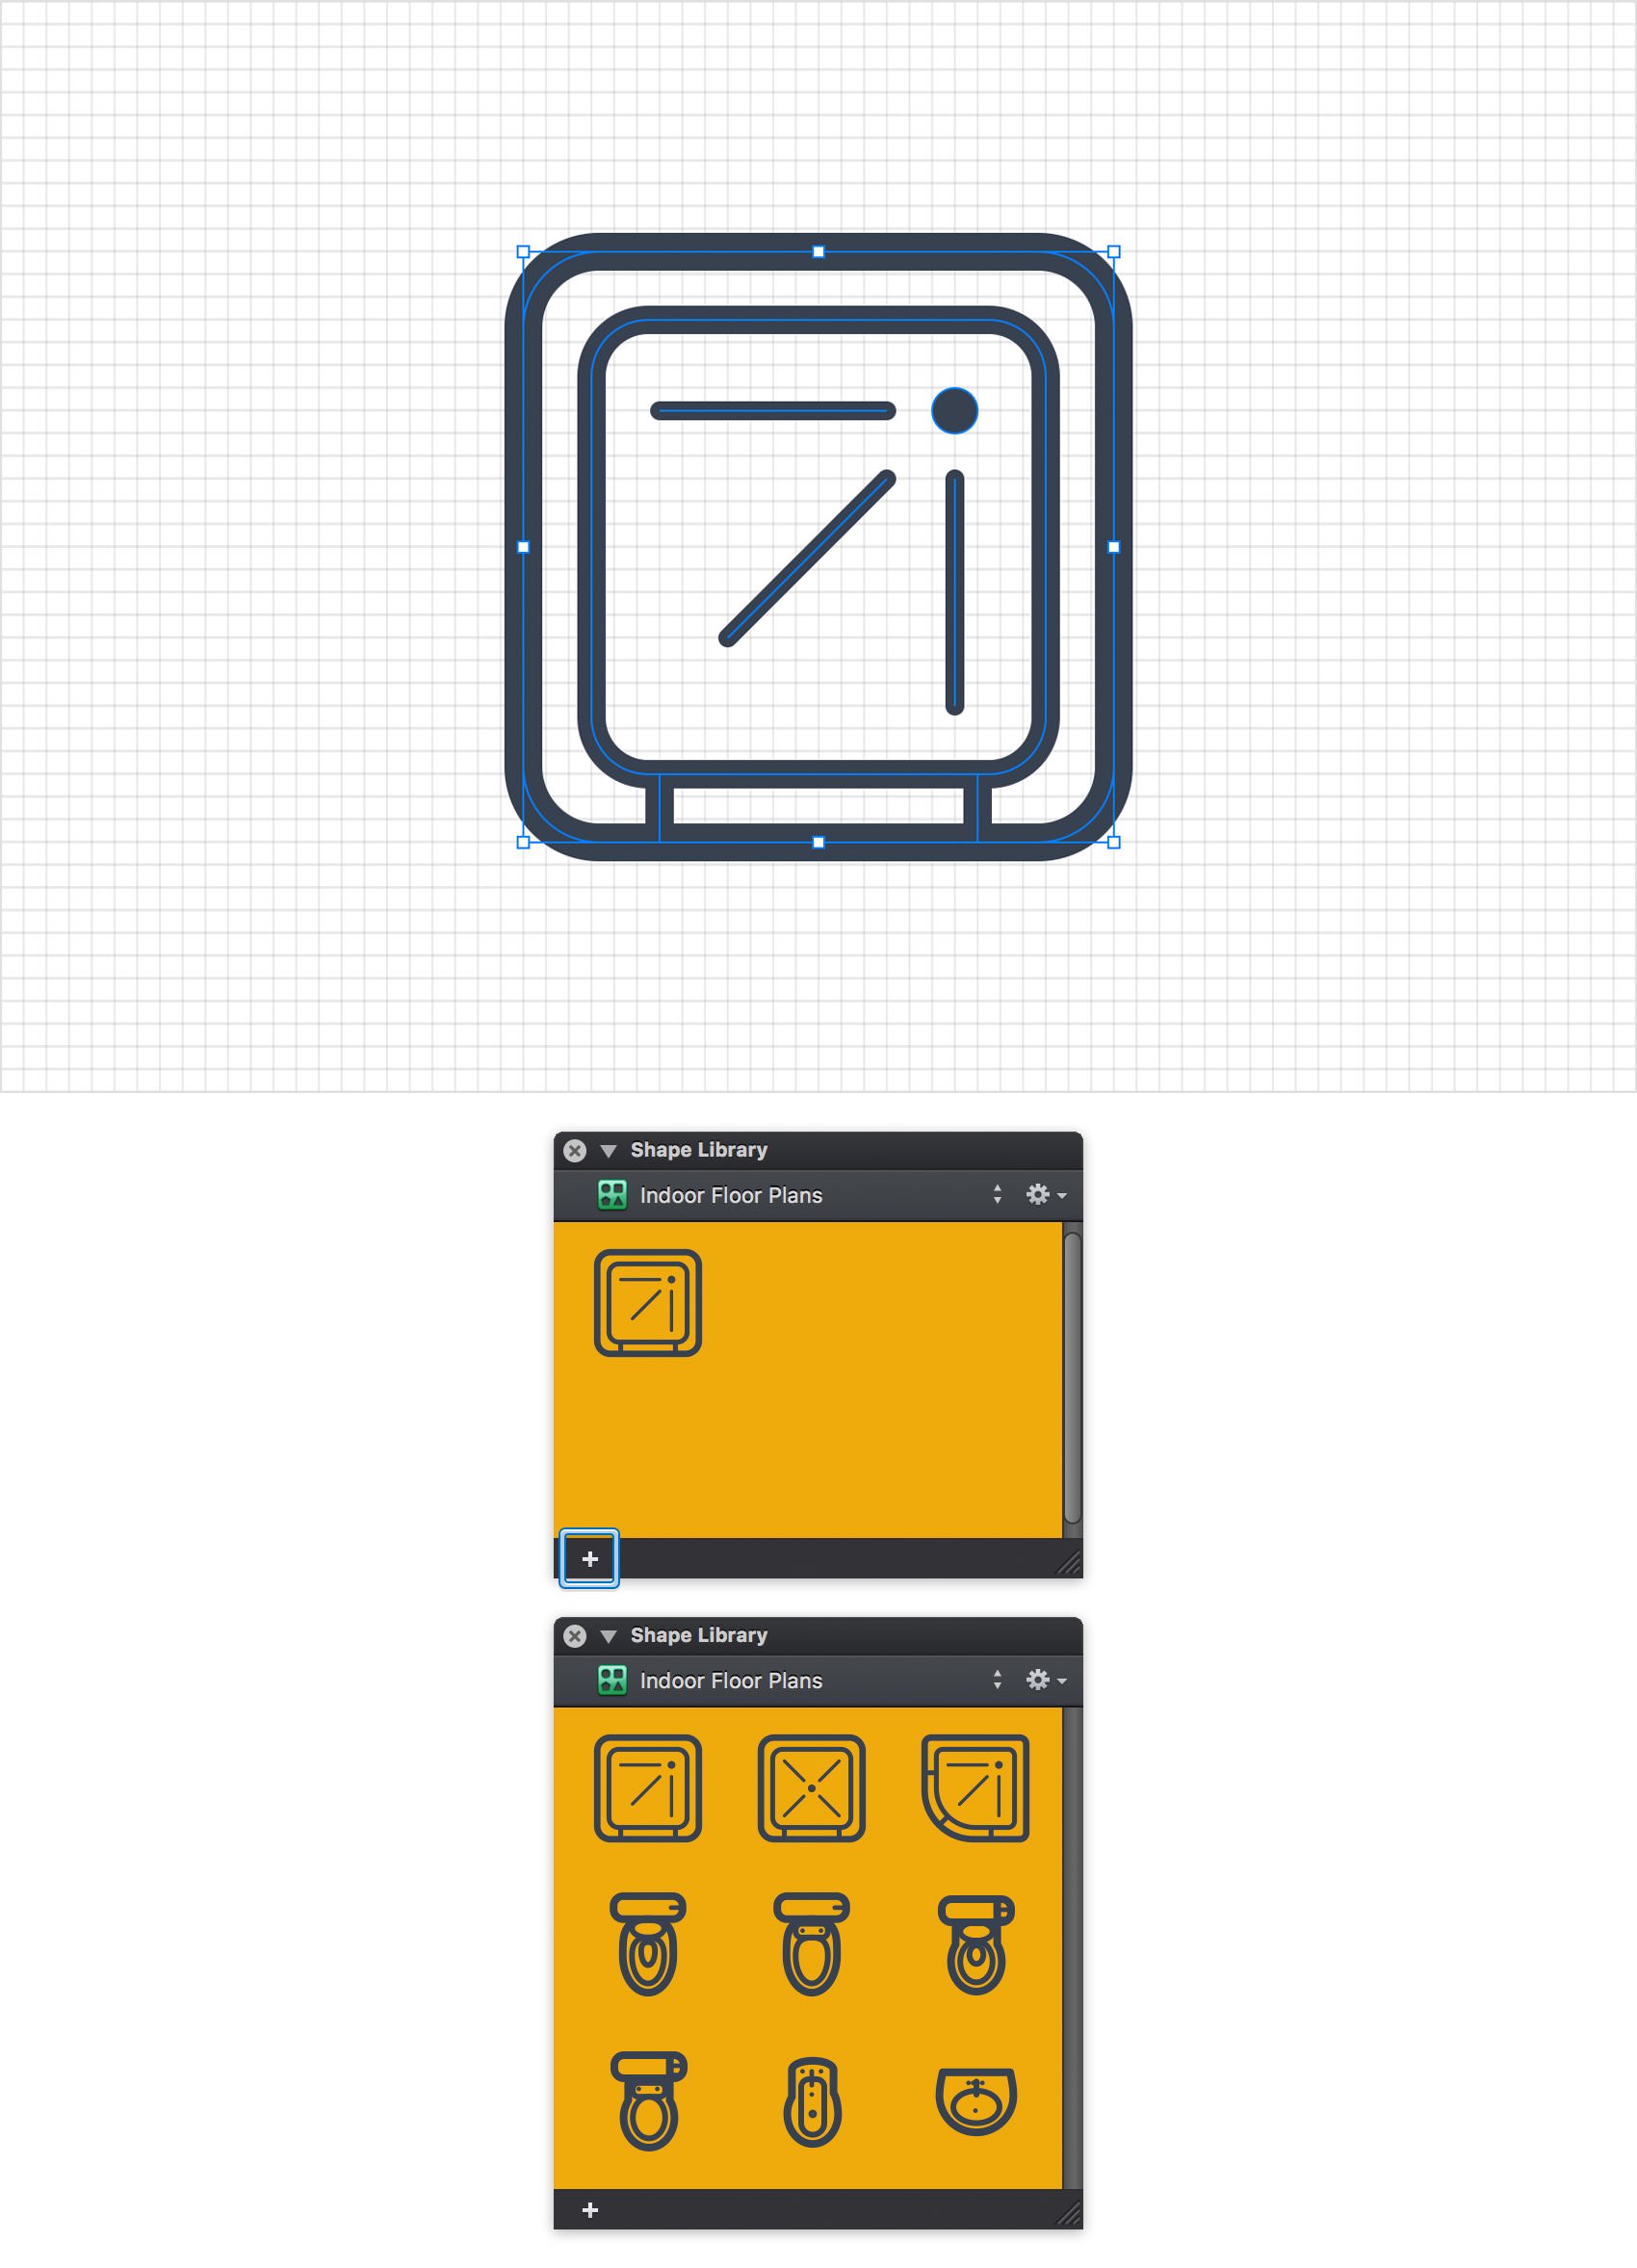
Make sure that your new shape library is active and focus on the shapes that lie inside your "shower 1" layer. Select this layer from the Layers panel. Pick the Move Tool (V) select all those shapes and Group them (Command + G). click the plus button from the bottom, left corner of the Shape Library panel and your selected group will be immediately saved inside the active shape library.
Your shape libraries and their content are saved and can be used in any document. You can easily import or export shape libraries and use them on different device. Click that settings icon from the Shape Library panel and use the Import Shape Library command or the Export command.
Finally, feel free to add the rest of the symbols created so far. Select each layer and don't forget to Group the existing shapes and paths before you click that plus button.
Finished Design
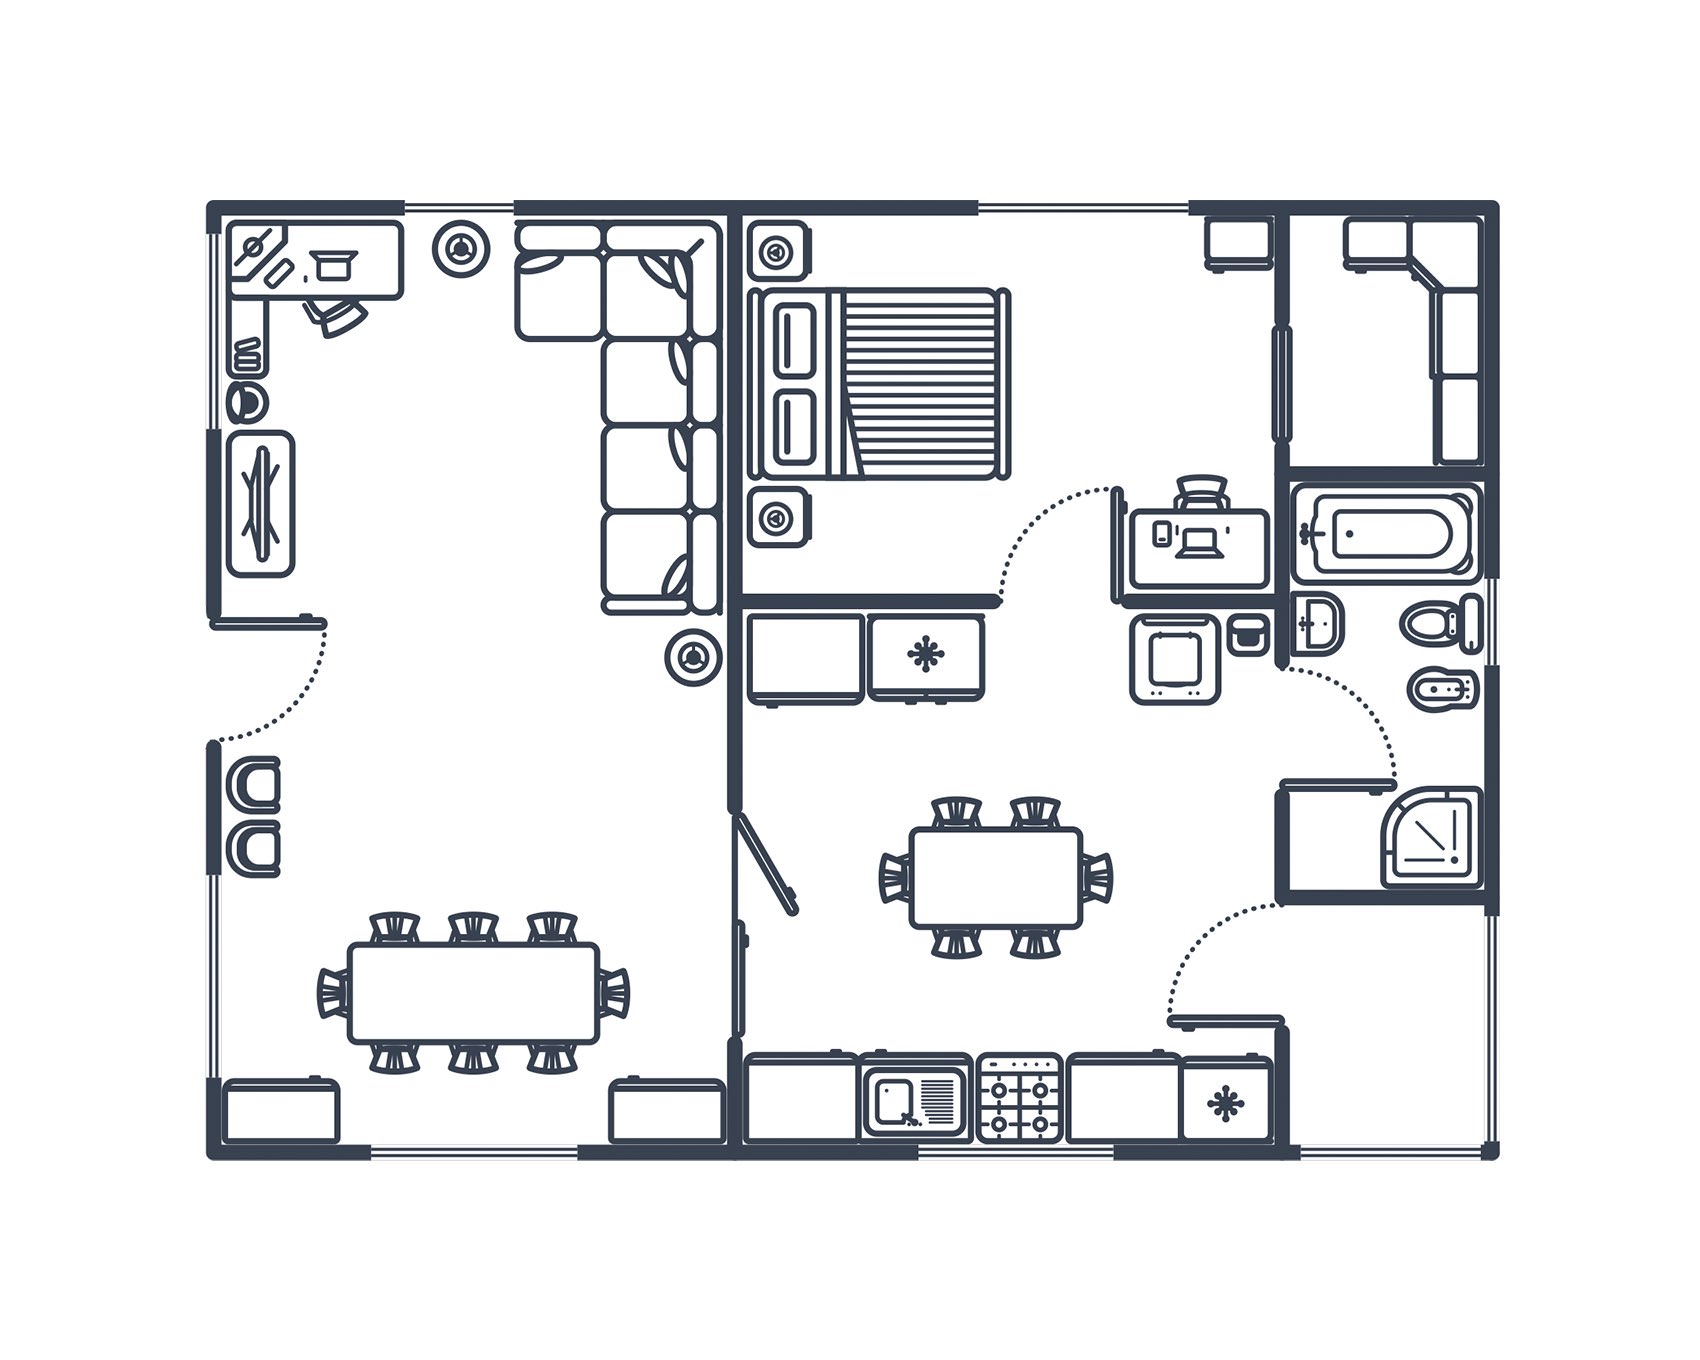
Congratulations, you've finished the tutorial!
Hope you've enjoyed learning some of the techniques and processes presented in these steps. As always, feel free to adjust the final design and make it your own.
Download Graphic File:
furnitureshapes-indoor.idraw 


